Checking in and automatic cancellations
Configure automatic cancellation
Once you have a checkbox object field set up for the purpose of checking in, you can configure automatic cancellation.
Go to Customize -> Admin -> Special and scroll down to the "Cancel reservation Automatic" section. This is where you configure how you want the automatic cancellation to function for the page's reservations. Only reservations that belong to the template selected under Customize -> Admin -> Template group reserve will be affected.
If automatic cancellation is not active, the "Cancel reservation Automatic" title will state this like so: "Cancel reservation Automatic: No". Once the configuration is completed, this state will change to Yes.
To activate automatic cancellation, you need to fill in the following settings:
- Cancel reservation (- and +): how many minutes before (-) and after (+) the reservation's start time you want users to be able to check in
- UserID: the ID of the user account that will be used to perform cancellations
- Type Field: the object's checkbox field that will be used to check in. This field is used to confirm reservations and the object field must be of the type Checkbox.
After saving the above settings, the "Cancel reservation Automatic" state will change to Yes, indicating automatic cancellation is active.
To turn automatic cancellation off, remove the Cancel reservation, UserID, and Type Field values and save your settings again for the change to be applied.
Check in to a reservation
Once you have made a reservation on a page with automatic cancellation enabled, the reservation details will provide information on when the user will be required (and able) to check in.
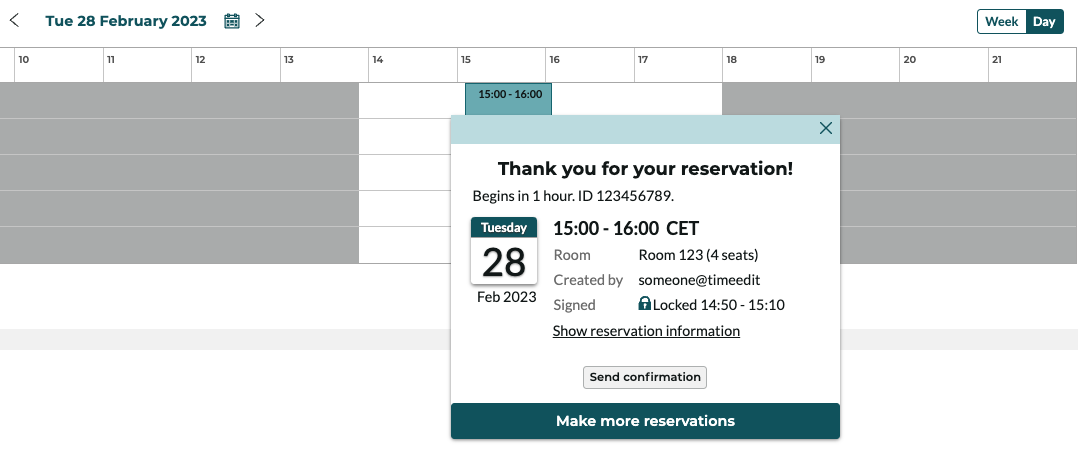
The same indication can be seen in the general view and in the My reservations list.
If your reservation is outside the check in time frame, you will see a padlock icon. If your reservation is within the check in time frame, you will see an hourglass icon.

To check in to a reservation, click on it to open the reservation details. You will find a check in button which, once clicked, will check you in. Any user that is allowed to edit the reservation will be able to check in.
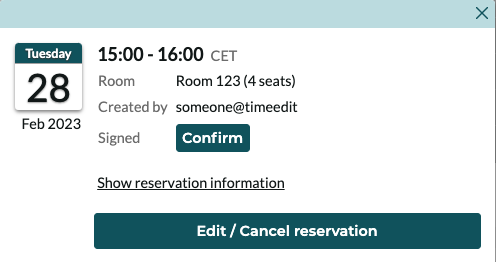
Once the user has checked in, it will be displayed as Signed and will no longer be subject to automatic cancellation.