Curriculum: configure processes and notifications

- In this lesson:
- 1Define and configure processes
- 2Configure transitions and notifications
- 3Notifications
- 4Process transitions
- 5Start processes from other processes (status propagations)
- 6Configure process timing
- 7Define and configure notification templates
- 8Configure hooks (process automation functions)
- 9Process configuration report (documentation)
- 10
- 11
Define and configure processes
Processes in curriculum are used to to organise the creation, adjustment, validation, approval of curriculum objects (study, specification, module, ...) and their relation.
Different processes will be created that cover a specific process around an object, e.g. the request new study process, the management of an existing study, etc.
The process to request (create) a new study or specification will be completely different than the management process. Different statuses, different stakeholders, different data.
The Curriculum processes can be defined around a specific object and its lifecycle, but can also just take a slice of data from an education object. For instance the management of the study guide texts or the gathering of the schedule requirements. Different process, manipulating a part of the data of a module.
The picture below shows that different processes, with different statuses (and stakeholders), can be defined to cover a slice of curriculum related data.
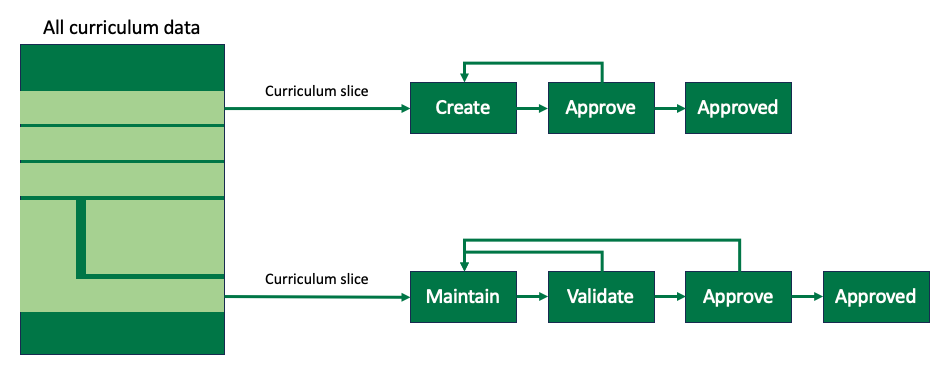
The process configuration is used to define these different processes that cover the management of (a part of) an educational object from start-to-end.
An example of a process definition is the process for the change and approval of modules, including all steps and stakeholders involved in the process.
The menu-option Processes opens an overview of the defined processes.
The image below provides the part of the overview of the defined processes, where at the left the type of the educational object is shown. There are in this overview already 3 processes defined for Study, but there is also a process that is defined for persons, and is used to get the availability information. The organisation process is used for validating and adjusting the allocated and requested staff allocation as part of workload management.
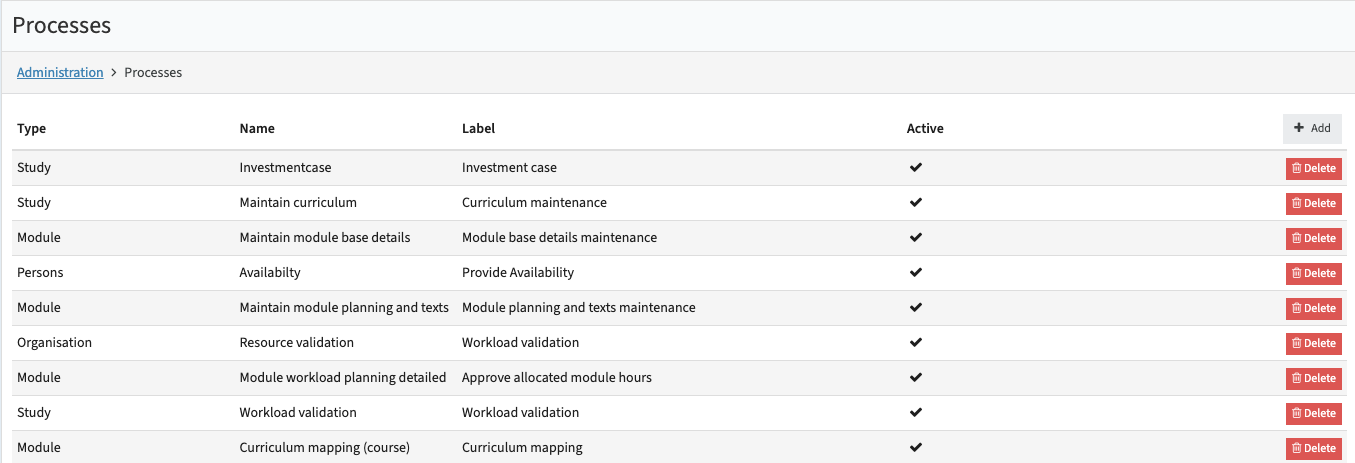
Processes can be managed using the Add, Edit (select) and Delete buttons.
The first step is to define the Process and its generic behaviour.
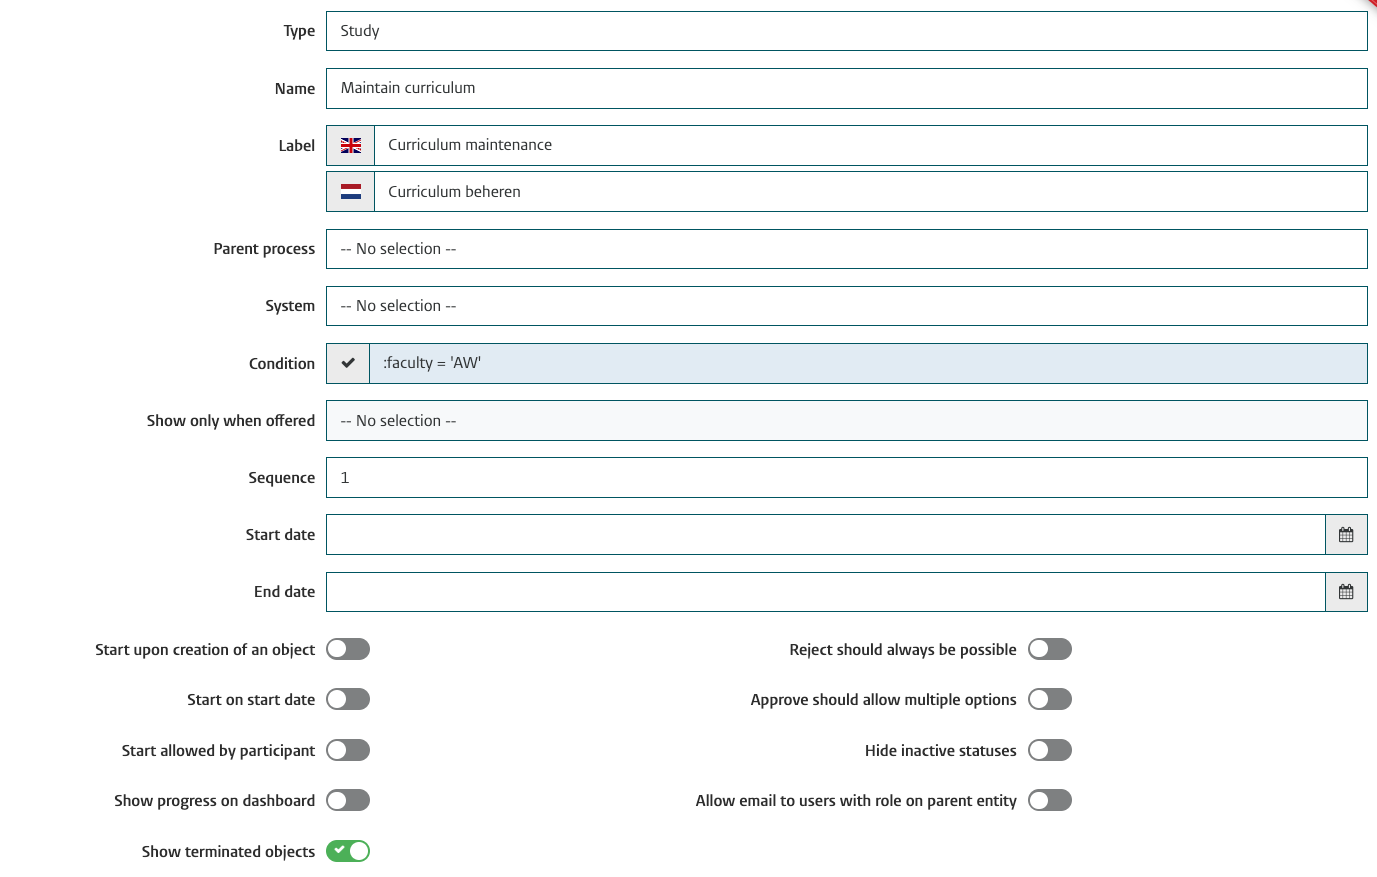
Different definition and configuration are supported:
- Type - Object type the process is designed for. Supported types are:
- Faculty
- Organisation
- Specification
- Qualification
- Study
- Module group
- Module
- Assessment
- Method
- Team
- Person
- Name - Internal name of the process
- Label - The descriptive text for the workflow, as shown to the user on the personal Dashboard and in reporting and process management.
- System - Define the default system the 'approved' result should be sent to. The system configuration can be used to identify the destination, but can also be used as a filter mechanism to exclude certain educational objects.
- Condition - Define a condition that specifies the objects must meet for this process
- Show only when offered - Define the rule used in case a process is defined to run using an offering period. This option can be used to run the process for schedule information twice (or more time) a year, one time for each semester.
Options supported:- Offering period starts in: will select all modules with an offering period that starts in the given period. For instance if the process period is semester 1, this means that all modules starting in semester 1 will be included. Thus the courses in quarter 1, quarter 2 and also academic year.
- Offering period overlaps: will select all modules with an offering period that overlaps the given period.
- Offering period ends in: will select all modules with an offering period that ends in the given period. For instance if the process period is semester 1, this means that all modules ending in semester 1 will be included. Thus the courses in quarter 1 and quarter 2.
This option is used to execute a process after a module is finished and for instance the validation of teaching hours of the module should be validated. The initial start is planned allocation, the scheduling provides scheduled allocation, and this process will provide the actual allocation.
- Sequence - Order the process is shown in the reporting and process management overview
- Start Date - Date from which this process configuration will be valid
- End Date - Date till which this process configuration will be valid
Based on the setting the process wil be started for the relevant educational objects that meet the criteria.
- Start upon creation of an object - Indicator if the process and relevant tasks must be created automatically on creation of a new object of the defined Type.
- Start on start date - Indicator if tasks must be created automatically on the defined process start date, or a process manager fill launch the process.
- Start allowed by participant - Indicator if a participant of a process is allowed to start that process for an individual education object.
- Show progress on dashboard - Indicator that will show the progress of this process in the Process progress Dashboard widget.
- Show terminated objects - Indicator if the task is shown after the deadline is past
- Reject should always be possible - Indicator if the user is allowed to reject to all of the previous defined states in the process, or only to the defined route / options.
- Approve should allow multiple options - Indicator if the user is allowed to approve to all of the defined states in the process, or only to the defined route / options.
- Hide inactive statuses - Indicator if inactive statuses in the workflow should be hidden or shown (default)
- Allow email to users with role on parent entity - Allow sending of notifications to any user in the hierarchy, e.g. sent to study coordinator if its a module process.
Configure transitions and notifications
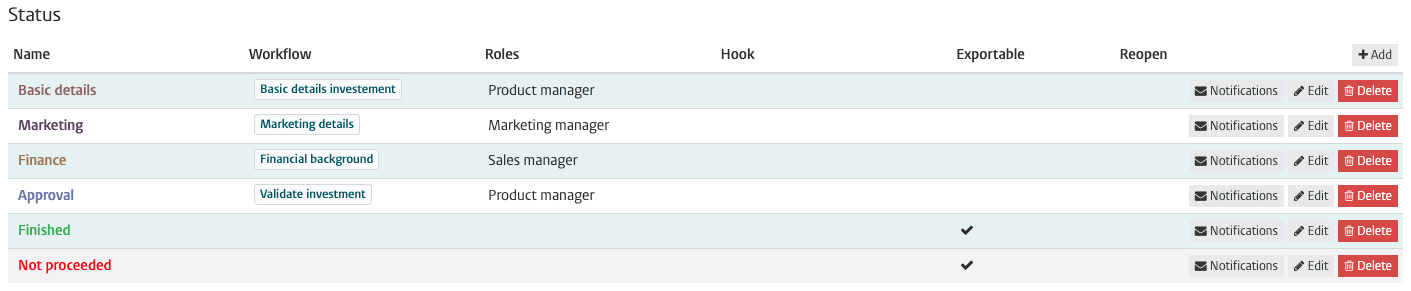
After finishing the basis configuration of the process, the next step is to define the process statuses and transitions.
First define the statuses the process consists of. In the example below the process consists of 5 statuses.
Each status is assigned a workflow and a stakeholder. Based on the status of the process, the defined stakeholder will get a task on the personal dashboard.
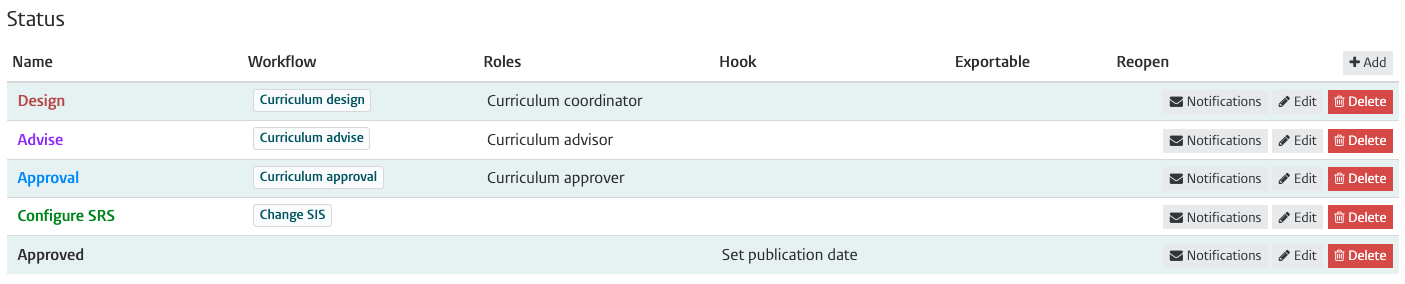
Use the Add, Edit and Delete options to manage the statuses.
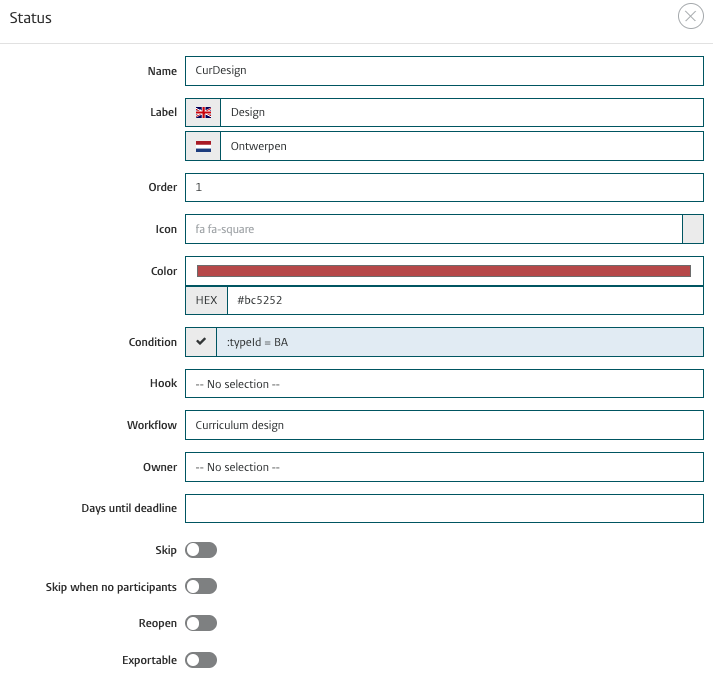
Different definition and configuration are supported:
- Name - The internal Curriculum name of the status. There is a limited number of predefined statuses that can be used in the definition of the process flow.
- Label - The name of the status as shown to the user.
- Order - The order of the status in the process.
- Icon - Assign an icon to the process that is shown in the Task Header on the personal dashboard.
- Color - The color assigned to the status will be used in the reporting screens.
- Condition - Expression (rule) to define a condition to only start the process for the (in this case) modules that meet the condition.
- Hook - A specific hook (technical action) that should be executed once this status is reached.
Configuration of hooks is covered in the last section. - Workflow - The workflow assigned to this status that will provide the dedicated 'wizard' support for the responsible task executor.
This step is easily forgotten!
Depending on the working order, the configuration may start with the process configuration. In that case the workflow is not yet available and cannot be assigned.
First after configuration of the workflow (menu-item workflows) the defined workflow can be allocated.
- Owner - The owner (role) of the process, used to override the stakeholders defined at workflow level
- Days until deadline - Show a visual indicator on the personal dashboard in case the process deadline is less then the configured days
- Skip - Indicator if the workflow can be skipped by the task responsible user, so no data is validated or entered.
- Skip if no participants - Indicator if this status can be skipped in case no 'task responsible user' is defined.
- Reopen - Indicator if the user is allowed to reopen the process to this task
- Exportable - Indicator if the process is in a status it can be 'sent' as approved to other systems like an SRS by an authorised user (f.i. process manager)
- Export automatically - Indicator if the process has reached a status it will automatically be sent to other systems like an SRS
Notifications
Notifications can be sent out when the next step or configured date is reached. The default behaviour is that this will happen immediately.
The administrator can configure the time the notification(s) are send, e.g. at night, via the administrator menu-item Script.
In the status overview use the notification button to manage the automatic sending of notifications.
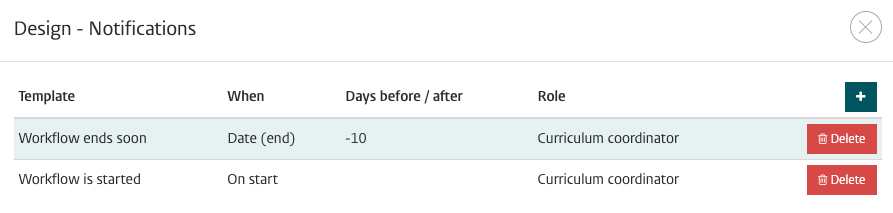
Click on a defined notification or use the + or delete button to manage the notification.

Different definition and configuration are supported:
- When - The used event or date to trigger the sending of the notification
- Date end: The notification trigger will be based on the defined end date of the process.
- Date start: The notification trigger will be based on the defined start date of the process.
- On reopen: The notification trigger will be executed if the process is restarted.
- On start: The notification trigger will be executed if the process is started - Before/after - In case of start / end date, this specifies the relative days from that day.
- Template - The notification template to use.
Notification templates can be modified/added by the administrator via the menu-item notifications, this is covered in one of the next sections. - Role - Recipient of the notification. The person(s) assigned to the role on a specific object (f.i. module responsible on a Module).
Process transitions
The flow in the process is defined via status transitions. They define the transition in the process from the source status to the target status.
The example below shows a configuration of transitions in the earlier used curriculum management process.

Graphical the process looks like.
The configuration above is for the Curriculum Management process (green). Once reaching the status Approval, the process module details is started for all modules owned by the study. This is done using the propagation Maintain, that points to the desired step and process (see next section).

Use the Add, Edit or Delete button to manage the transition.

Different definition and configuration are supported:
- Source - The status the transition starts from
- Target - The status the transition goes to
- Description - Additional information shown on the transition submit page to the user
- Comments - Indicator how comments are handled during transition from the source to the target status:
- Never (no option to add comments is added to the user)
- Optional (the user can choose if comments are filled)
- Required (the user has to enter a comment) - Hook - A specific hook (technical action) that should be executed once this status is reached.
- Wait for last participant - The setting enables that in case a process step has multiple stakeholders that the process will only proceed if ALL stakeholders have finished their task.
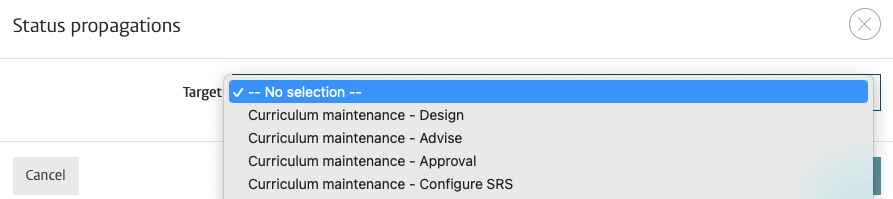
Start processes from other processes (status propagations)
The transition overview, shown in the section above, supports the definition of propagations for a specific transaction.
A propagation is used in case the status change is not only restricted to the current process, but should also start a new process.
Click on the [ + ] to add one or more propagations. The target is the process and its status that will be started for this object.
The example below shows the statuses defined in a process that supports the request for a new study, including validation by marketing and sales.
In this process a status transition is defined from an approval status to the approves status.
On this transition a propagation can be defined that will automatically launch the curriculum design task on approval.

The administrator can add a propagation and select the process and status of the started process.
Configure process timing
The final step is to define the process running parameters. These parameters are used to define the 'opening period' for the defined process.
The bar shows the progress and number of days left until the deadline.

Use the Add button to define a new 'running period'.
For annual processes each year a new process should be configured that is bound to the academic year.
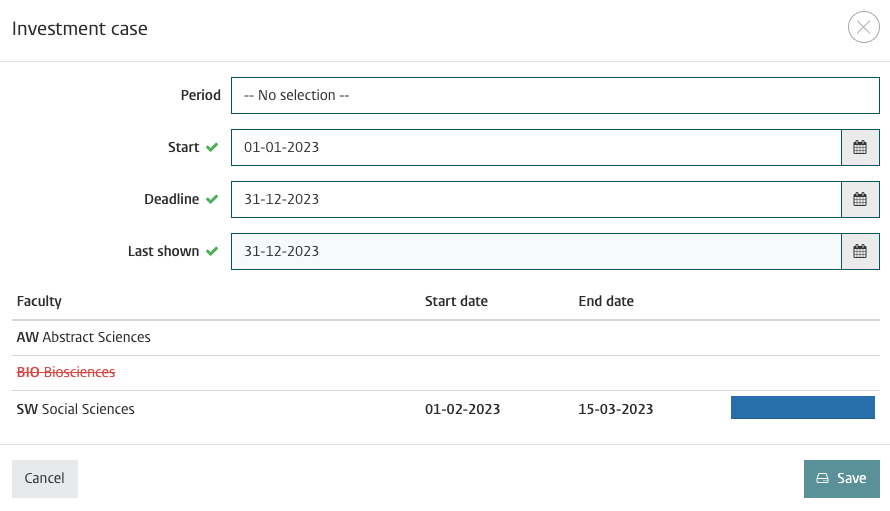
Different definition and configuration are supported:
- Period - If a process is defined as bound to a period, the period can be selected this process will run for.
This option can be used to gather scheduling preferences for modules based on semester (twice (or more times a year). - Start - Start date of the process, indicates when tasks will be created automatically (if configured so) and will be available in the user personal Dashboard.
- Deadline - End date of the process, used for notifications that can be sent relative to deadline.If not configured tasks are still available after deadline the tasks will no longer be available for the user in the personal Dashboard.
- Last shown - The date on which the tasks will definitively be removed from the user personal Dashboard, even if 'show after deadline' is set.
In case for specific faculties a different timing should be used this can be configured, as shown in the above example.
The Biosciences faculty is excluded from the process and the Social Sciences faculty is running the process in a different time frame.
Click on the faculty to configure a different timing from the configured default.
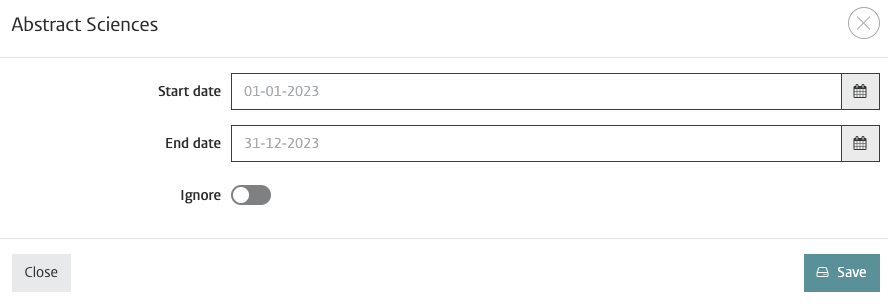
Different definition and configuration are supported:
- Start date - Start date of the process, indicates when tasks will be created automatically (if configured so) and will be available in the user personal Dashboard.
- End date - End date of the process, used for notifications that can be sent relative to deadline.If not configured tasks are still available after deadline the tasks will no longer be available for the user in the personal Dashboard.
- Ignore - Exclude this faculty from the process
Define and configure notification templates
The process configuration allows the option to inform the various stakeholders via notifications. These configured notifications are a notification template with [tags] that are replaced with actual data sending the actual notification to a user.
The notification template menu is used to manage the notification templates.

Select a template or use the Add or Delete button to manage the template configuration.
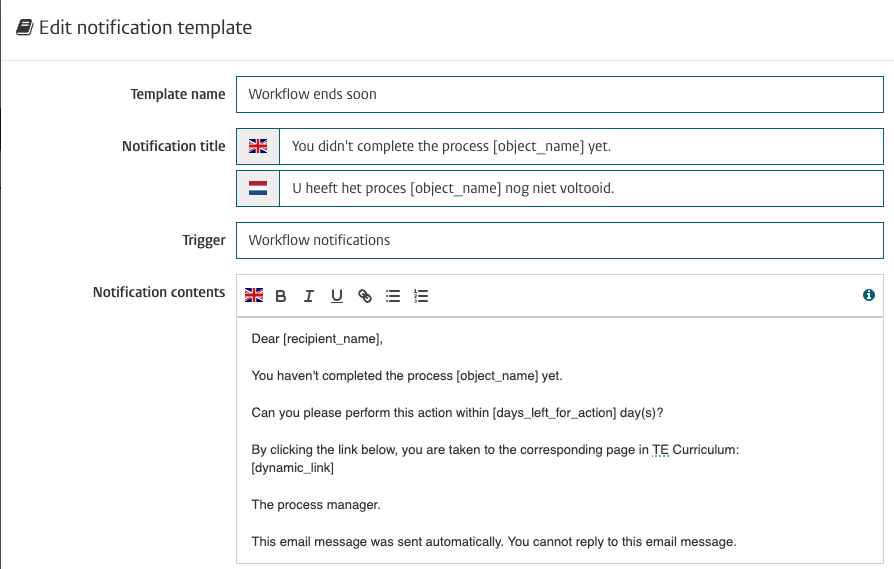
Different definition and configuration are supported:
- Template name -The name of the template, shown in the selectbox in the workflow configuration
- Notification title -Subject of the notification/mail send
- Trigger -Specifies how this notification will be triggered, supported values are:
- Workflow notification: notification can be used in the workflow definition
- Manual: notification can be send by a user
- Individual change rejected: notification is used as a reply to the user that proposed a change in case a proposed change is rejected- Reply to comment: notification is used as a reply to a comment on a proposed change or another user comment- Module terminated: notification if a module is terminated
- Notification contents - The notification body to be send. The notification text can be defined containing specific [tag] / placeholders.
During the sending process the placeholders are replaced by the actual value.
Not shown:
- Send online -Indicator if the notification is sent within the system, and shown on the dashboard (bell icon)
- Send by email -Indicator if the notification is sent by email
- Urgent -Indicator if the notification should be sent with an urgent indicator
- Style -Specify a style to be used to style the notification
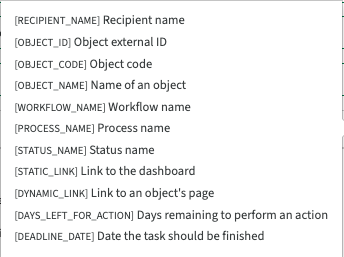
Information on the available [tag] / placeholder is available via the (i) icon.
Supported placeholders are:
- recipient_name - show the name of the notification receiver
- object_id - show the external id of the object (study, module, ...). Can be used to create a url using the object_id as a part of the link.
- object_code - show the code of the object (study, module, ...)
- object_name - show the name of the object (study, module, ...)
- workflow_name - show the name of the workflow assigned to the notification, e.g. validate module
- process_name - show the name of the process the notification is sent from, e.g. maintain module process
- status_name - show the name of the status the process is in
- static_link - provide a link to the personal dashboard of the user, to enable access to all outstanding tasks
- dynamic_link - provide a direct link that will open the users task
- days_left_for_action - number of days till the deadline
- deadline_date - deadline date
Configure hooks (process automation functions)
The definition of processes and process transitions provide the option to execute a hook (a piece of logic (functionality)).
The system allows for the configuration of hooks that can be selected during process configuration. The hooks can be configured via the menu Hooks.

Use the Edit, Add or Delete button to manage the hooks.
Depending on the hook different options are offered to detail the hook.
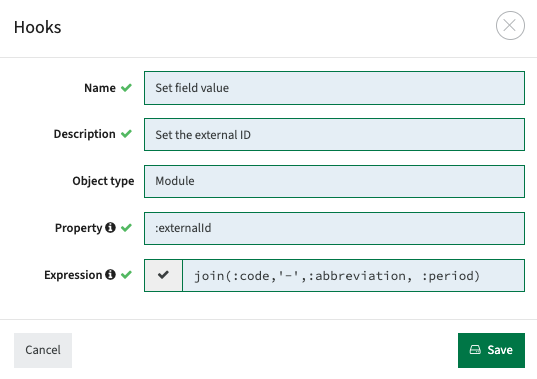
The definition of the hook is straight-forward. First select the type / name of the hook and then provide the description that is used in the process configuration.
Different type of hooks are supported:
- Approve cost divisions - automatically approve the defined inter-faculty cost division (no human approval)
- Clean activities - automatically remove deleted activities
- Clear publication date - reset the publication date of an object, to set it to an initial state
- Combine hooks - option to combine multiple hooks, including the order they should be executed
- Complete advices - automatically complete (approve) the given advice(s), e.g. from the exam board, in the process.
- Complete cost divisions - lock the approved inter-faculty cost division
- Evaluation Change status - change the status of a related evaluation process, see the (External) examiner guide
- Evaluation Export - create an evaluation in Evaluation based on the module information and its stakeholders, see the (External) examiner guide
- Export data - event-based integration by sending the approved data to an external system
- Generate value - trigger the regeneration of a field value that is defined based on a configuration rule (expression)
- Set field value - set the field value of a specific field based on an expression, see example above
- Set publication date - set the publication date
- Sync module methods - customer specific implementation (not a generic hook)
Process configuration report (documentation)
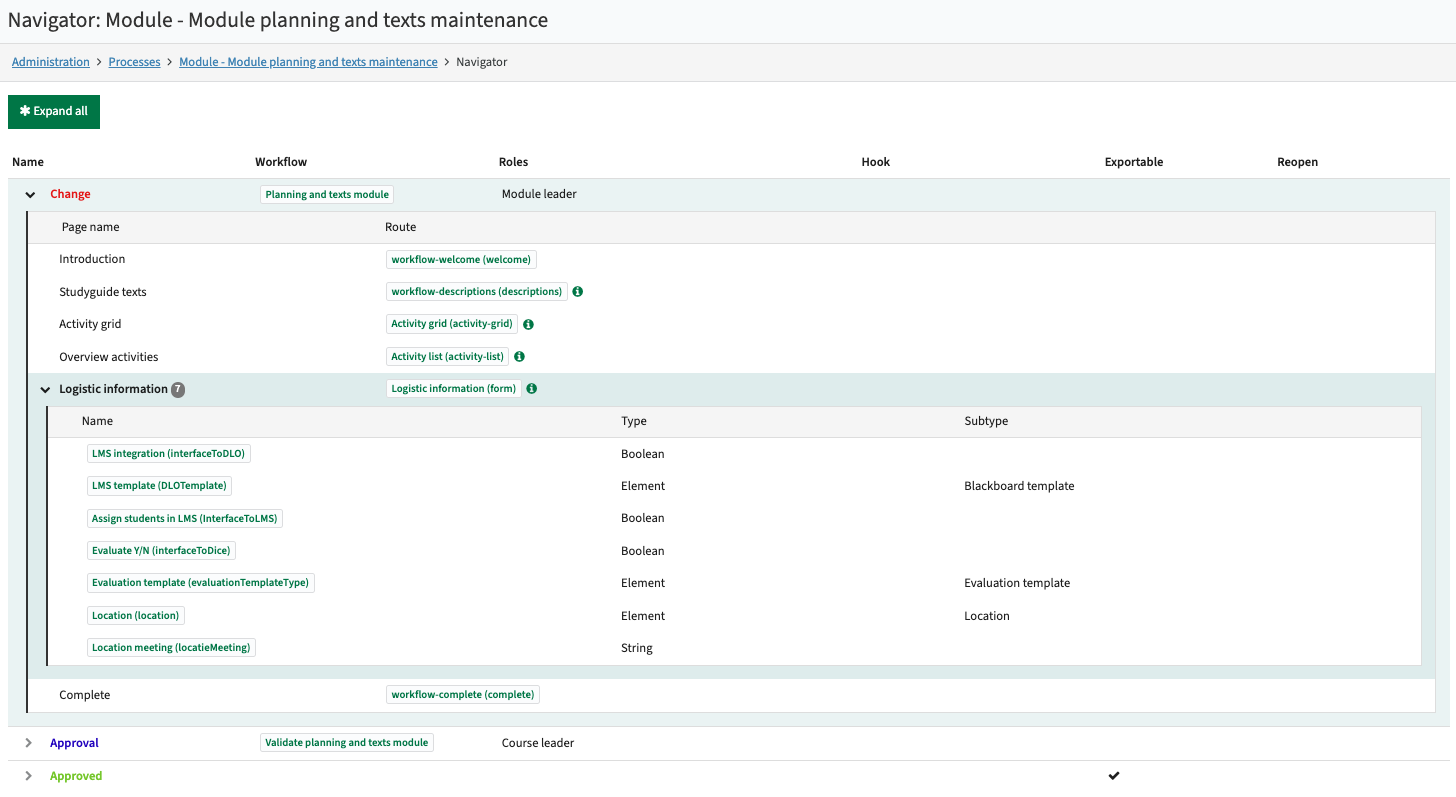
The complete configuration of process and used workflows, pages and fields is probably the 'best hidden feature' in Curriculum.
At the top of the process configuration is the magic button 'Navigator'

Just click the magic button and a dynamic report with the complete configuration of the process and the used components (pages, fields, reference lists) is opened.
The report is dynamic and by expanding the information, the details of a specific configuration part is shown.
The information shown provides direct access to the named configuration item. Just click on the Workflow to jump direct to the workflow configuration, click on the Route (page), to jump direct to the page configuration, click on a field to jump to the custom-field configuration.