Curriculum: configure the academic year
The academic year defines a version of the academic structure. Multiple academic years can be defined, with each their own year calendar. Learn how to create a new year including roll-over of data and define and manage the year calendar with its quarters, semesters, periods, teaching weeks, etc.

Academic year configuration
The academic year defines a version of the academic structure that resides in a specific year. Multiple academic years can be defined, with each their own year calendar.
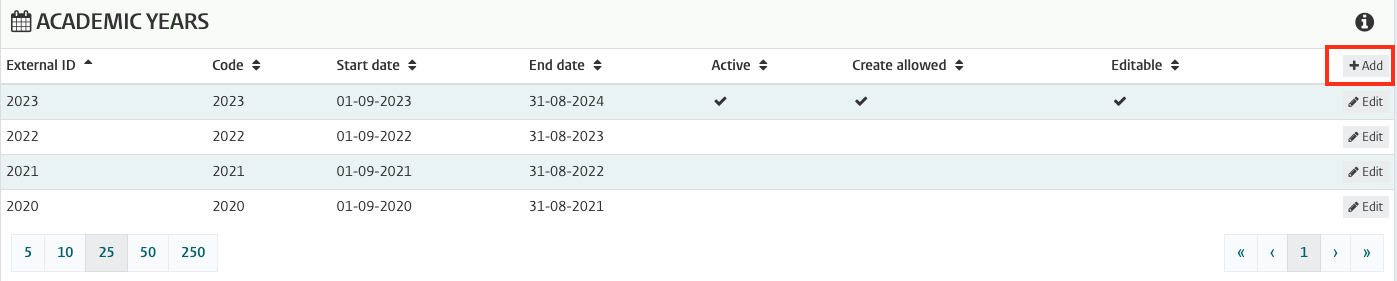
Navigate to Administration -> Academic years to start configuration.
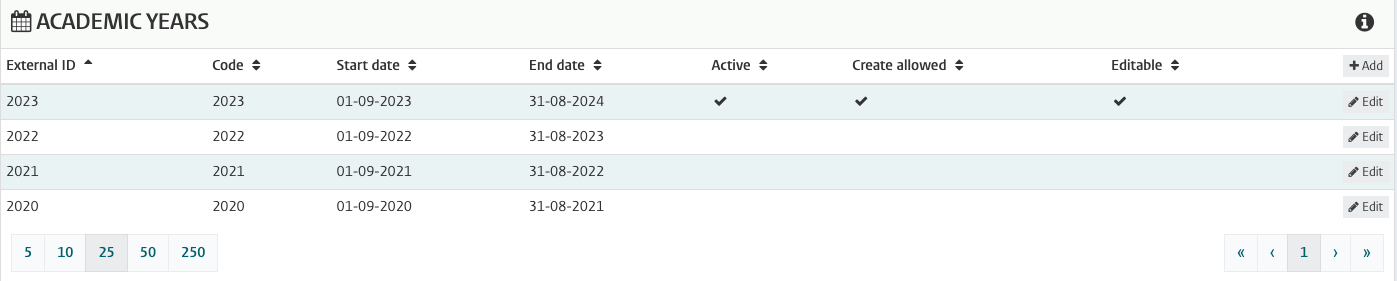
Select the Add button to define a new academic year or the Edit button to modify an earlier defined academic year definition.
The academic year provides the following configuration options.
Academic year configuration supports different settings:
- Name - The name is used for display purposes
- External ID - The external id is the unique code and is used in the API to define the year
- Start - The date the defined academic year starts
- End - The date the defined academic year ends\
- Active - Indicator if the year is currently the active year (and therefore default selected when opening the application)
- Create allowed - Indicator if create of educational components (e.g. study, module, ...) is allowed in the defined year
- Editable - Indicator if the data in the year can be modified or is locked for changes
- Always show dashboard tasks - Indicator if tasks for this defined year are shown on the User Dashboard
Rollover (new academic year + data copy)
Curriculum is based on (academic) years that follow the base cycle of the curriculum management processes.
Creating a new year supports two different options:
- Create complete new, clean year
- Create new year, based on a previous year
Create complete new
The create complete new is in general only used once, for creating the first year in the Curriculum system.
For all next years the standard is to create a year, but build further on the data from previous years and be able to track and report on all changes.
Create new year, including rollover of data
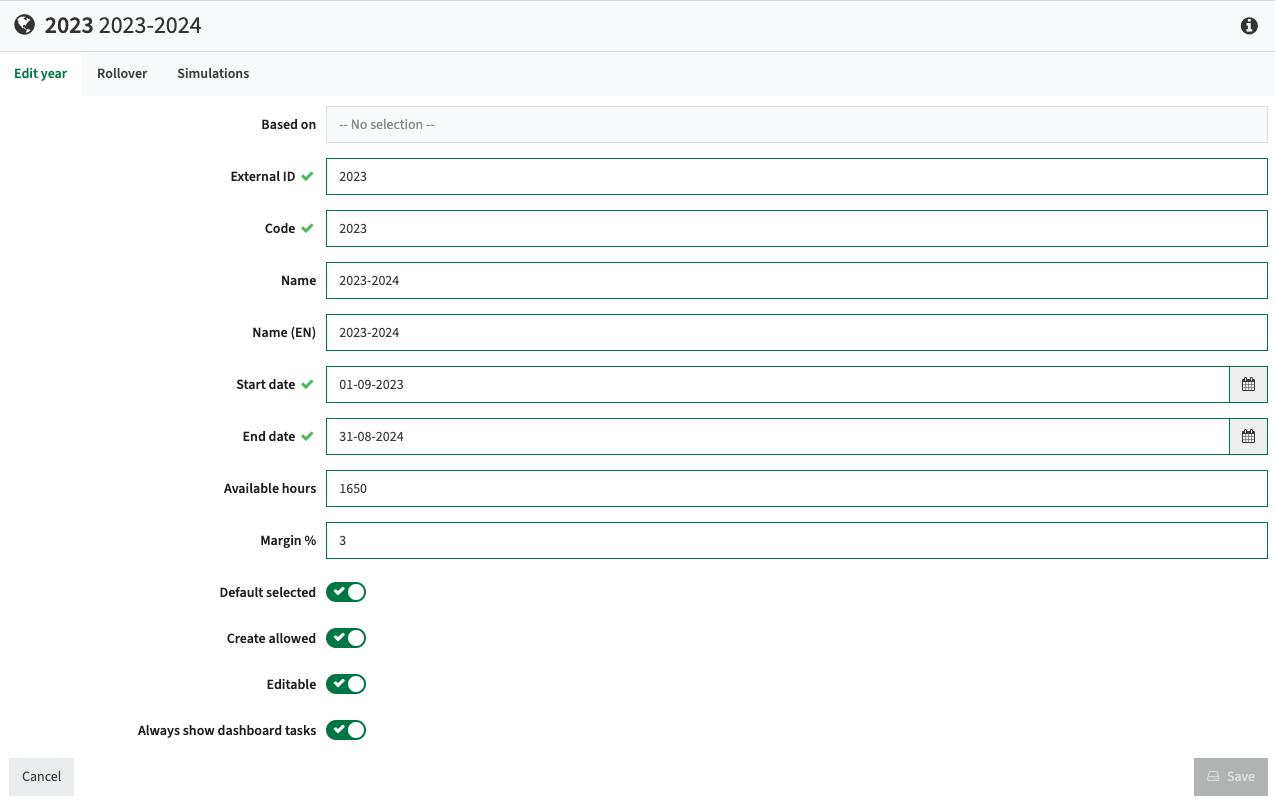
The first step is the same for both options, open the Academic years menu and click on the Add button.
Fill-out the relevant fields, as defined in the previous section.
Select the Based on if the year should be based on a previous year.
In the case of a completely new year without any rollover requirements, don't fill the Based on. Most situations it will be the first year ever created, so there are no previous years.

The new year will be created, but no rollover will be performed, that's something that should be started manually.
Open the newly created year, and select the faculties that should be rolled over.
Select all to perform a full copy of all data from the previous year. Otherwise just select the faculties, and come back at a later stage to copy the remainder.
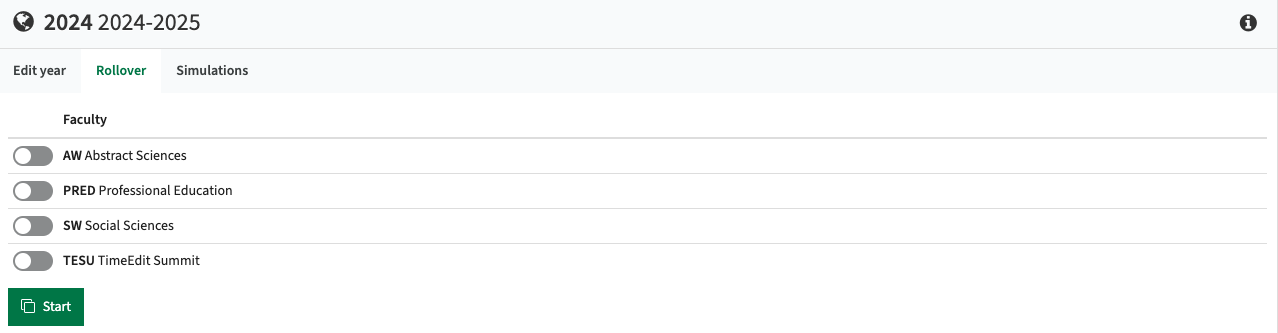
After finishing the creation of the new year based on a rollover of a previous year, some actions has to be performed on the academic year calendar configuration for the new year.
These actions are highlighted and mentioned in the following sections.
Manage simulations
A simulation is a specific 'user-owned' version of an academic year. A simulation is used to play around and make large changes and validate/discuss the effects of these large changes. A simulation lives within an academic year, and users can create multiple simulations of their own.
Open the Tab with simulations in the selected academic year.
The simulations overview shows all defined simulations within a specific academic year. The administrator can manage the simulations to restrict visibility or access, and so 'limit' the list of simulations a user will see.

Using the Edit button an individual simulation can be modified:
- Delete user(s) that currently have access
This option will still keep the simulation, but it will no longer be visible for the removed user(s) - Delete the simulation
This option will delete the simulation from the system
Manage the academic year calendar
The academic calendar defines the structure of the academic year in periods and their respective dates. They will be used to assign the educational objects to the relevant offering period(s). The information will also be used for displays and configuration purposes in the schedule preferences add-on and the visualisation in the Study planboard.
Academic year calendar(s) are defined in the context of an academic year. First select an academic year (right top-hand) in order to view, define or modify the year calendar(s) for that year.

At least one academic calendar must be defined within an academic year. Multiple calendars can be defined, in case the period-layout differs between faculties or studies. The defined calendars can be allocated to a faculty and/or a study. There is an hierarchical determination of the calendar to use, which follows the following mechanism:
- Is a calendar defined on Study level,use that calendar
- Else: is a calendar defined on Faculty level the study belongs to, use that calendar
- Else: use the calendar marked as 'default selected'
To define the structure of the academic year, the first step is to select or create the academic year calendar.
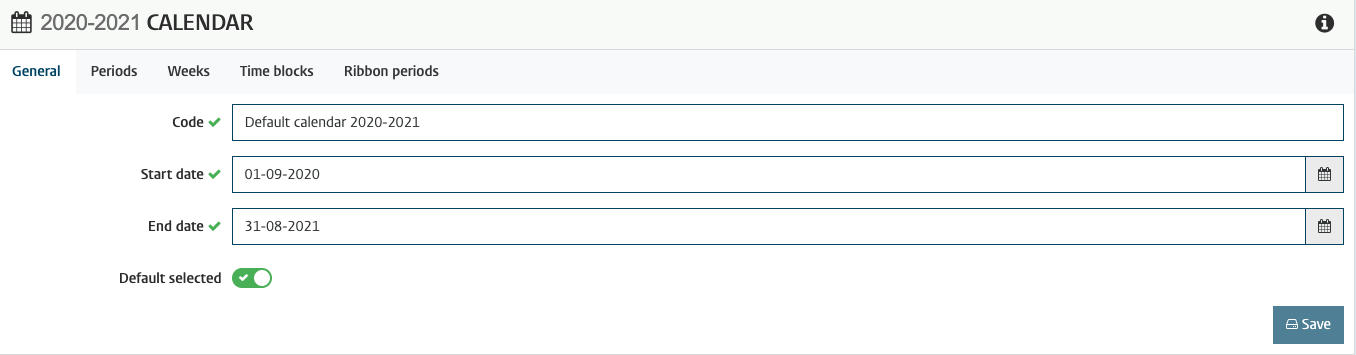
Year calendar configuration supports different settings:
- Code - Define the unique name for the academic calendar. The code is shown in the select options to assign a calendar to faculty or study
- Start date - The start date of calendar, is mostly equal to the start date of the academic year
- End date - The end date of calendar, is mostly equal to the end date of the academic year
- Default selected - Indicator if the calendar is used as the system-wide default within the academic year
Manage academic periods
Once created a year calendar, the first step is the definition of the academic periods. In the academic calendar the 'individual' periods are defined.
The administrator menu-option Ribbon periods can be used to define combination periods (e.g. semester 1 = period 1 + period 2).
Users will not see the Periods, the periods are there for a merely technical reason to enable creating the bae building blocks for the combined periods that are provided to users.
The example shows an academic calendar that consists of 4 periods.
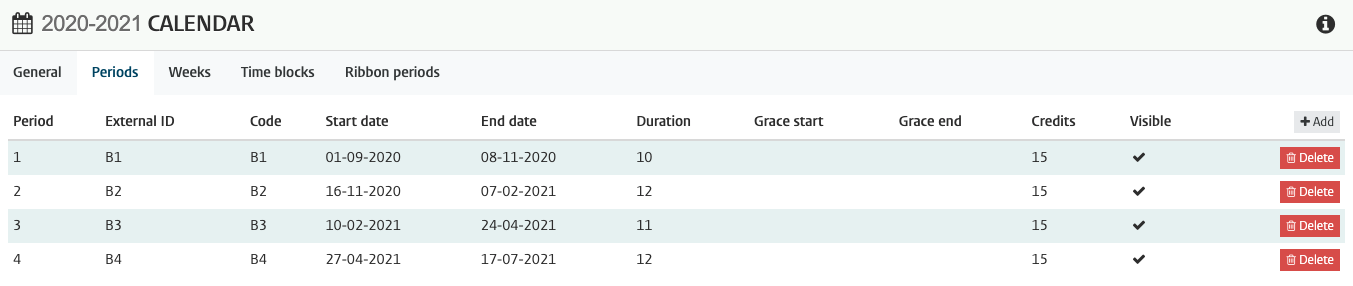
Select Add to add a new period, or click on a defined period to modify the period.
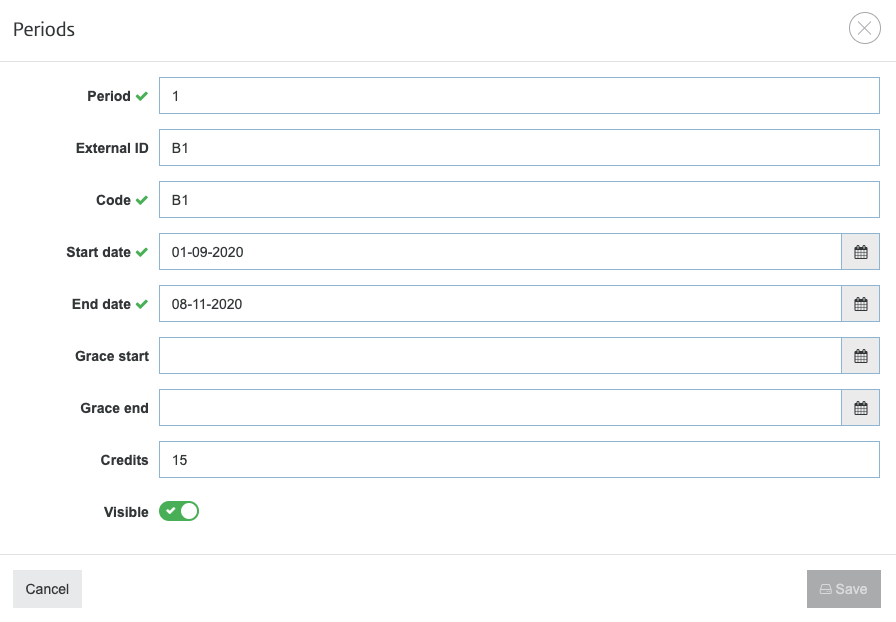
Period configuration supports different settings:
- Period - The sequence identifier for the period, used for ordering the periods.
- External ID - Define the unique external ID for the period.
- Code - Define the unique name (code) for the period.
The code is shown in the select options to assign a calendar to faculty or study - Start date - The start date of academic period
- End date - The end date of academic period
- Grace start - Grace period prior to the start date of the period to allow specific actions.
E.g. allow earlier provisioning of License to student, just before the period end. - Grace end - Grace period after the end date of the period to allow specific actions.
E.g. allow to extend provisioning of License to student, till just after the period end. - Credits - The credits used to validate the EC-study load within a period in the Dashboard.
If no credits are specified, the total credits of the study are used and equally divided over the number of periods. - Visible - Indicator if this period is shown in the study planboard. This option can be used to hide a summer period from the planboard.
Action after creation of new year (rollover)
In case a new year is created that is based on another year, the calendar(s) from that year are copied too.
The rollover function will only modify the 'year' information of the defined periods, so 1-9-2023 will be modified to 1-9-2024.
The action to be performed is change the dates for all of the periods to the correct date. This can mean just move 1 day, to start the period again on a Monday, or extend the period by 1 week, since the holiday weeks are move and will now fall in another period.
Define period weeks and week types
To finish the definition of the period, the detailed week configuration of the defined periods can be added. This is an optional step, and is ONLY used in the scheduling preferences add-on. The weeks in the period are configured and given a type.
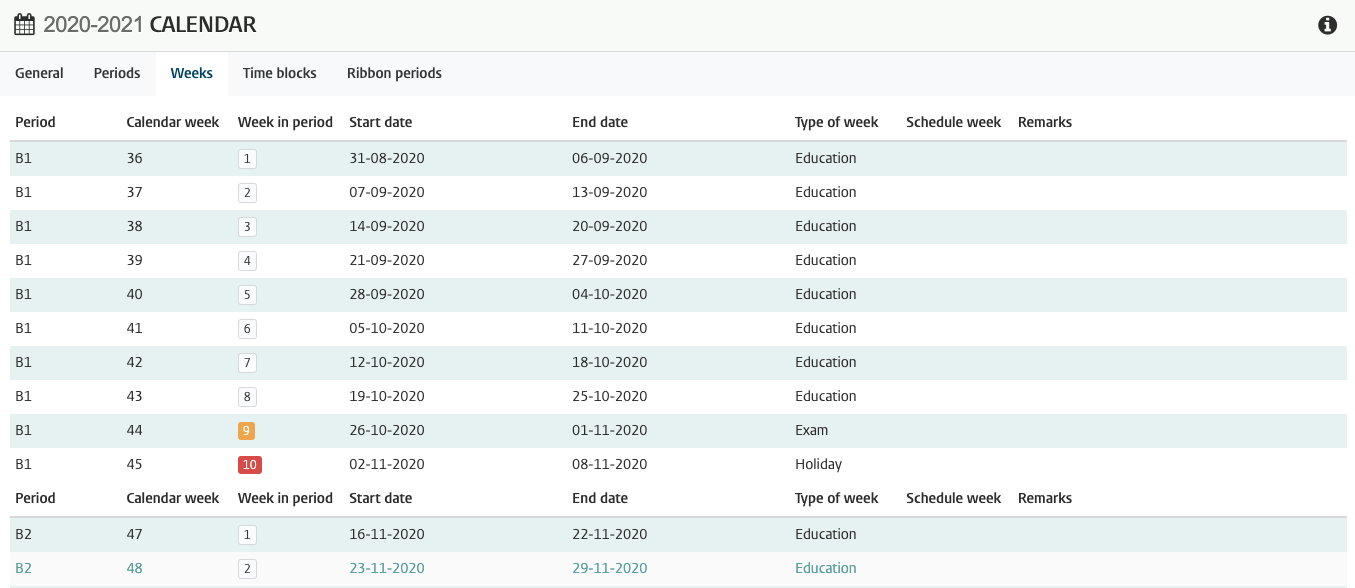
Period week configuration have different settings:
- Period - The period, as defined in the year calendar
- Calendar week - The calendar week is calculated based on the period configuration (start date).
- Week in period - The week in period shows the week within the defined period
- Start date - The start date of the week in academic year.
- End date - The end date of the week in academic year.
- Type of week - Define the type of week. The type is used for display purposes only, where the color is used to identify the different types and a text is shown to inform on the type of week. There are no restrictions applied, which means that a user is free to allocate an activity in a holiday week.
Types can be defined by managing the Element configuration of the week type - Schedule week - Option to define another week numbering strategy besides the calendar week and week in period.
This can be used for integration with scheduling systems that uses different calendar schemes - Remarks - A remark that will be shown to the user when allocating activities in the scheduling plan board.
Action after creation of new year (rollover)
In case a new year is created that is based on another year, the weeks are copied over from the original year.
It could be that some weeks marked as 'teaching' will be 'holiday', or 'exam'.
The action to be performed is change the weeks to the correct type.
This is only valid in case the schedule preferences module is used, otherwise don't bother about week types.
Week type configuration
The week types can be configured using the standard week type element, covered in detail in the guide on reference list management.
The main take-aways is that using the Element menu and select the Week type (right top-hand corner) an overview is provided of the defined types, allowing to manage the types.
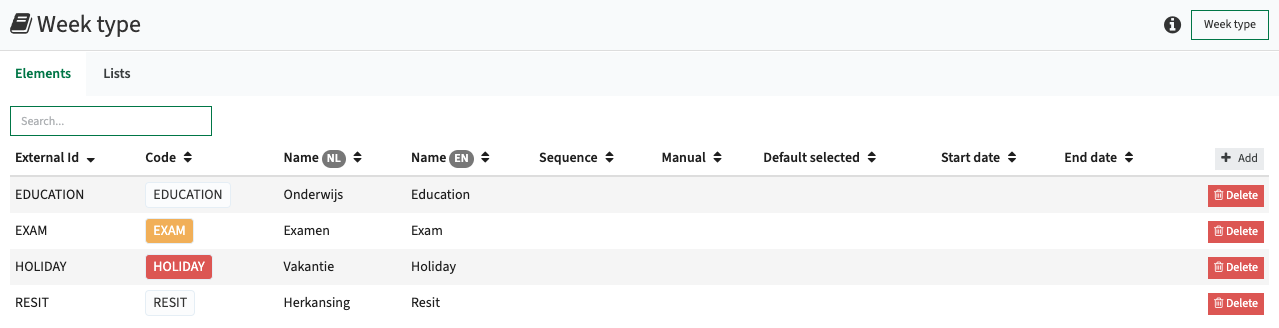
The definition / configuration of a week type is straight-forward, the only real relevant setting is Default selected.
In the definition of activities by users, there is an option to select via one click all teaching weeks. This function will default select all weeks with a week type set to Default selected.
Multiple types can be set als default selected.

Define ribbon / offering periods
Use the ribbon period option to specify/combine the different periods defined in the academic year. The ribbon period information is used to assign offering periods to modules and for display purposes within the planboard and structure view.
Selecting the Ribbon periods menu item opens the list of defined periods.
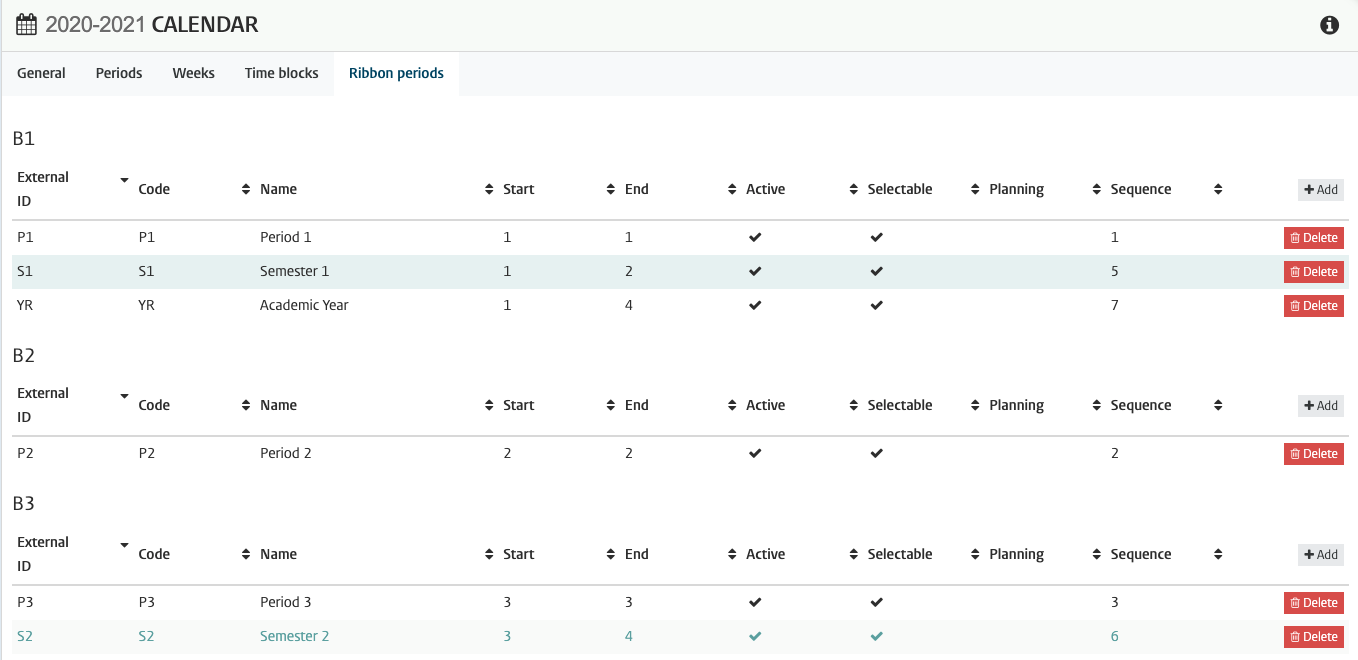
The Ribbon periods can be managed using the Add and Delete button or by selecting the relevant ribbon period.

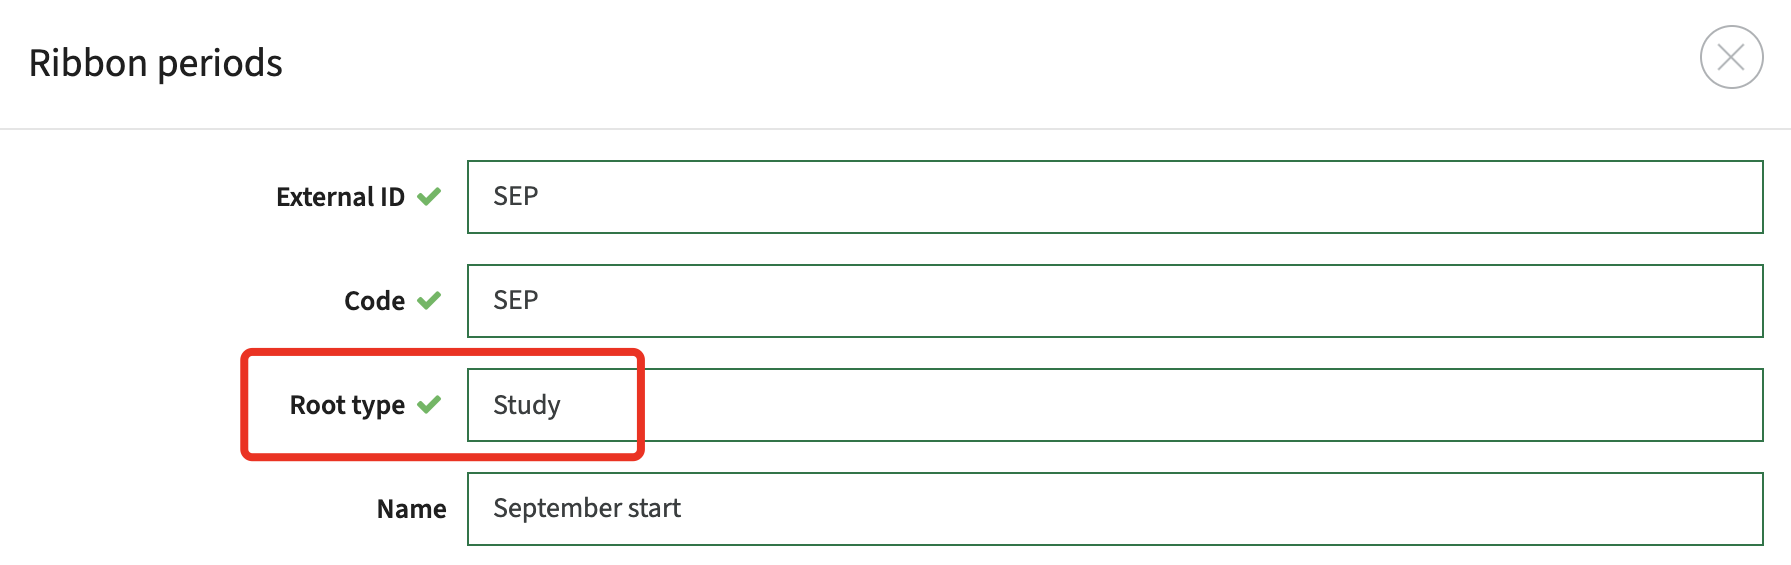
Ribbon period configuration supports different settings:
- External ID - Unique ID, used for the integration with an external source like student record system (SRS)
- Code - The code is the unique identification with Curriculum and is used as a 'short description' in the user interface
- Root type - Set the object type (study, module-group, module) the offering is available for.
- Name - The name defines the period and is used in the user interface instead of the code when sufficient space is available.
- Start - The period the defined period starts. This allows for defining periods like 'semester' that span periods 1-2.
- End - The period the defined period starts. This allows for defining periods like 'semester' that span periods 1-2.
- Registration start date - Date the registration for this period starts
- Registration end date - Date the registration for this period ends
- Registration start time - Time the registration for this period starts. Specifically used by eduXchange integration.
- Registration end date - Date the registration for this period ends. Specifically used by eduXchange integration.
- Sequence - Define the order the periods are presented in select options to the user
- Selectable - Indicator to define if the defined period can be selected by the user when allocating a period to a module.
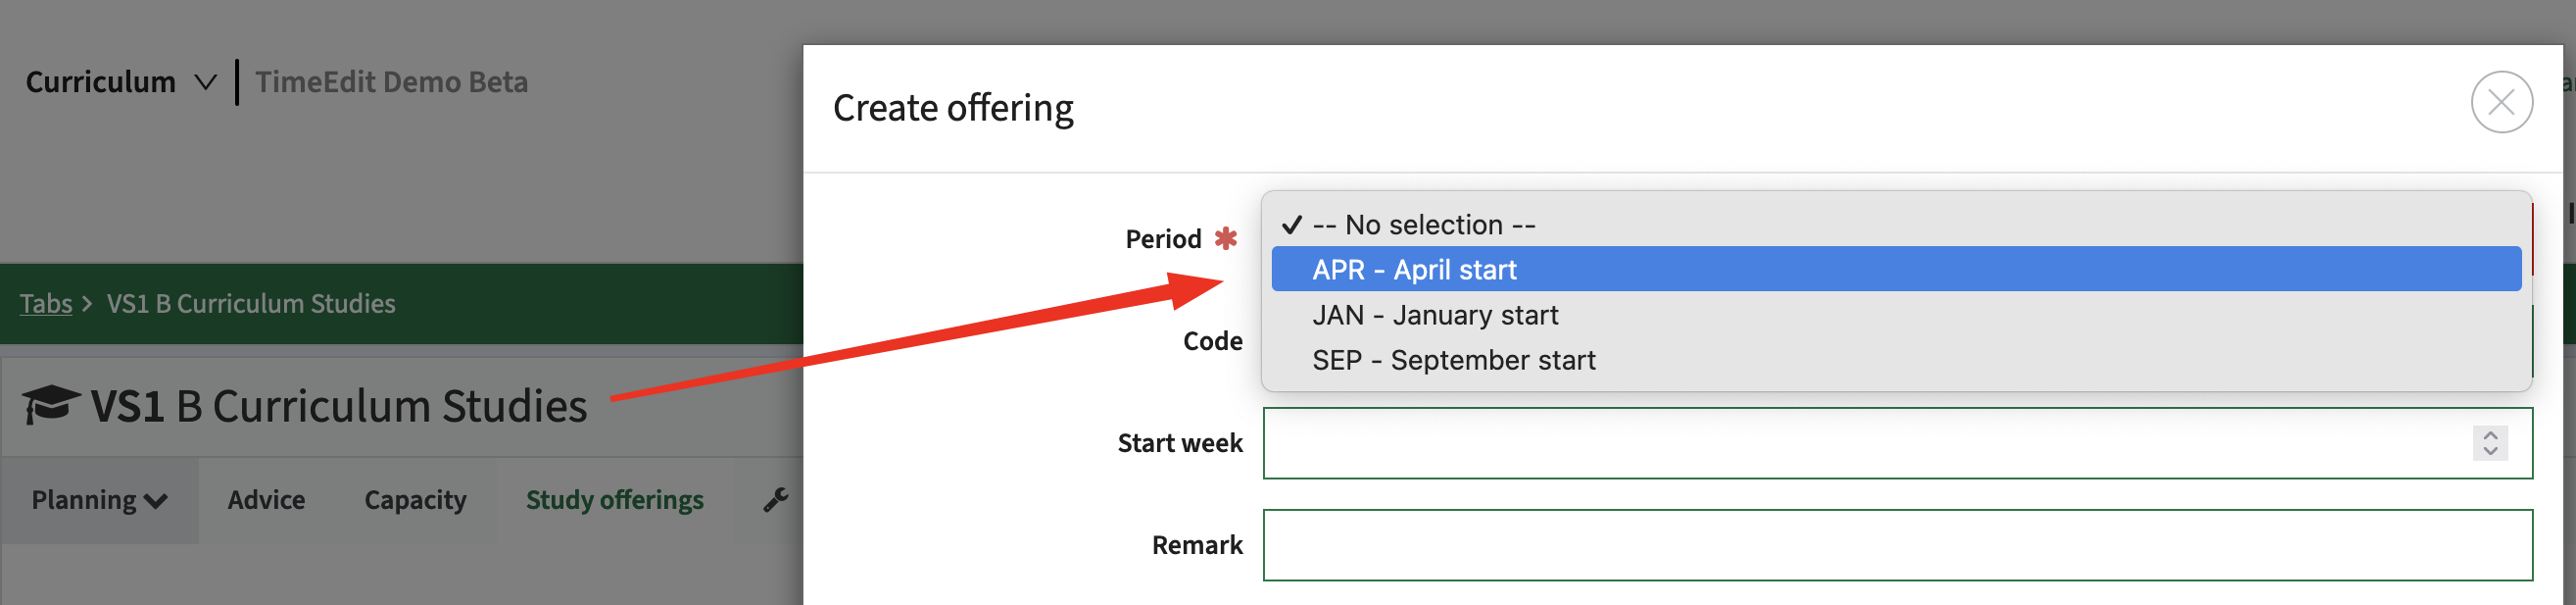
Root type based limit the selectable offerings for users
Using the root type offerings can be assigned to an object. This allows definition of 'study start moments' that are only available for selection when adding an offering to a study.
The offerings defined for a module, e.g. semester 1, semester 2 will only be selectable when assigning an offering to a module. The root type will default to "module."
Action after creation of new year (rollover)
In case a new year is created that is based on another year, the combined periods of the original year are copied.
The action to be performed is change the dates defined for the different combined periods (e.g. registration start / end date).
Define Time blocks
Time blocks are used to split the defined periods in so-called time blocks (e.g. morning, afternoon, evening, whole day). The time-block information is used to assign offering periods to modules and for display purposes within the planboard and structure view.
From a functional perspective the definition of time blocks can be used in combination with the studyability reporting option. Since the periods are split in separate time blocks, this information can be used to determine if there are clashes for required courses since they are in the same offering period and exceed a specific number of credits in that period.
Selecting the period menu item opens the list of defined periods.
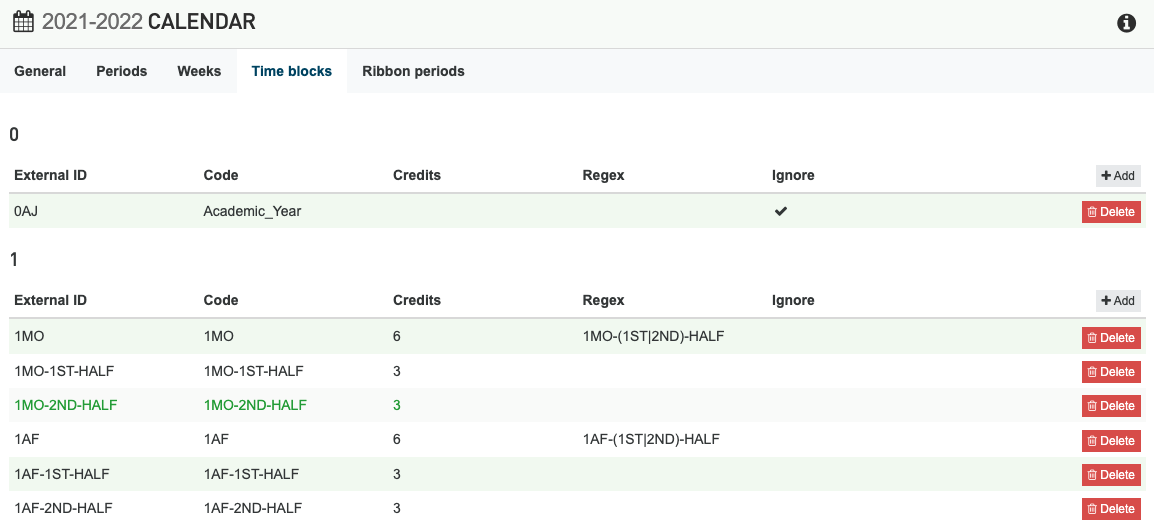
The time blocks can be managed using the Add and Delete button or by selecting the time block.
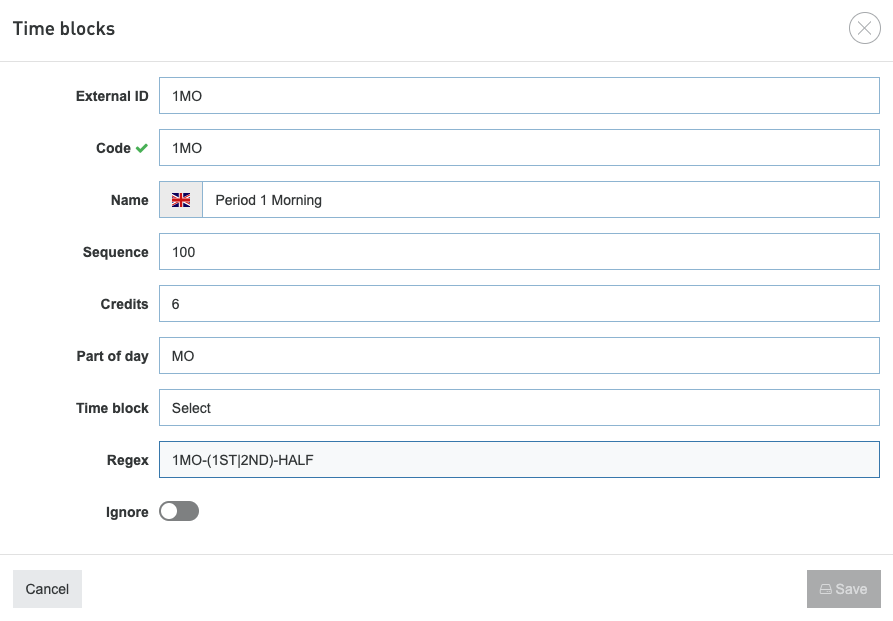
Time block configuration supports different settings:
- External ID - Unique ID, used for the integration with an external source like student record system (SRS)
- Code - The code is the unique identification with Curriculum and is used as a 'short description' in the user interface
- Name - The name defines the time block and is used in the user interface instead of the code when sufficient space is available.
- Sequence - Define the order the time blocks are presented in select options to the user
- Credits - The credits used for calculation of studyability within the time block.
- Part of day - The part of day (reference list) the time block is allocated to, e.g. morning, afternoon, ...
- Time block - Optional additional division of the time-block in the first half of the period or the second half of the period
- Regex - A regular expression that defines what time-blocks will be joined via the regex.
- Ignore - Indicator if the time block should be shown to the user