Evaluation: configure workflows and notifications (Workflow menu)
To manage the process of an evaluation workflows are used. Workflows will configure the statuses and their respective responsible stakeholders, timing of the different stages including notifications to be send as call for action, reminder or just to inform. This guide will cover all aspects to define and configure workflows as offered via the administrator menu Workflow.
Evaluation types
The first step in configuring a process is to specify for what type of evaluation the workflow is meant for, the evaluation type.
The evaluation type is used to define and configure the default behaviour of evaluations of that type. Different types can be defined, e.g. ad-hoc evaluation, periodic evaluation, internship evaluation, thesis evaluation that all can have their own process configuration.
Select the menu item Workflow -> Evaluation types to manage the evaluation types.

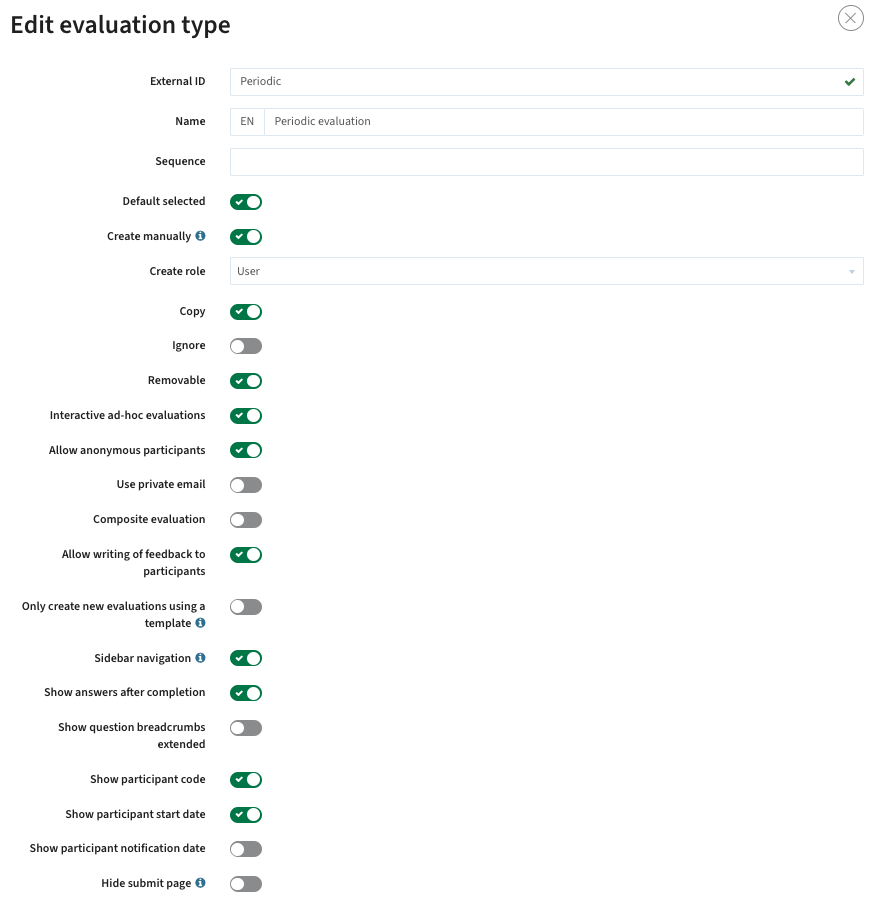
Click on a defined evaluation type or use the Create and Delete button to manage the evaluation types.
The evaluation type definition supports a large number of configuration options, so we split it in two:
- External ID - Used to define a unique code to the evaluation type. The external id can be used in integration scenarios where evaluations are created automatically including the (reference) to the correct evaluation type.
- Name - The name of the evaluation type shown to the user
- Sequence - The order in which the evaluation type is shown in different select boxes
- Default selected - Indicates if this evaluation type is by default selected in the evaluation overview page
- Create manually - Indicates if an evaluation for this evaluation type can be created manually (by a user)
- Create role - Defines the required user role to allow creation of evaluations of this evaluation type
- Copy - Indicates if an evaluation of this evaluation type may be copied by a user to create a new evaluation
- Ignore - Hides the evaluation type (e.g. when it is not supported anymore)
- Removable - Indicates if the evaluation can be deleted.
- Interactive ad-hoc evaluations - Indicates if an eval of this type can be offered as an ad-hoc evaluation / in-class evaluation with a short link and a QR-code
- Allow anonymous ad-hoc evaluations - Indicates if an eval of this type can be offered as an ad-hoc evaluation / in-class evaluation that is anonymous and doesn't require the participant to login via the SSO.
- Use private email - Indicates if the evaluation uses the recipient's private email address instead of the institution email address. Used for graduation evaluations where students may no longer use or have access to their institution email, or for internship evaluations send out to the companies that provided internships.
- Composite evaluation - Allow splitting the evaluation in multiple evaluations that are combined
- Allow writing feedback to participants - Indicates if an eval of this type will provide the option to provide feedback on the evaluation results to the student.
- Only create new evaluations using a template - indicates if evaluations can be build from scratch, or users should use a preconfigured template.
- Sidebar navigation - enable the sidebar navigation instead of the bread-crumb style
- Show answers after completion - show the option to view all given answers on the submit page
- Show question breadcrumbs - Indicates if an eval of this type will show an more elaborate breadcrumb to students
- Show participant code - Indicates if an eval of this type will show the participant code in the reports
- Show participant start date - Indicates if an eval of this type will show the participant start date in the reports
- Show participant notification date - Indicates if an eval of this type will show the participant notification date in the reports
- Hide submit page - Indicates if an eval of this type will finish (provide submit) on the page with the last question, or if an extra page is added with a summary of question blocks. In case this indicator is on, the "send button" will be on the last question page instead of the summary page.
So we covered the first half of the configuration options, let's continue with the rest
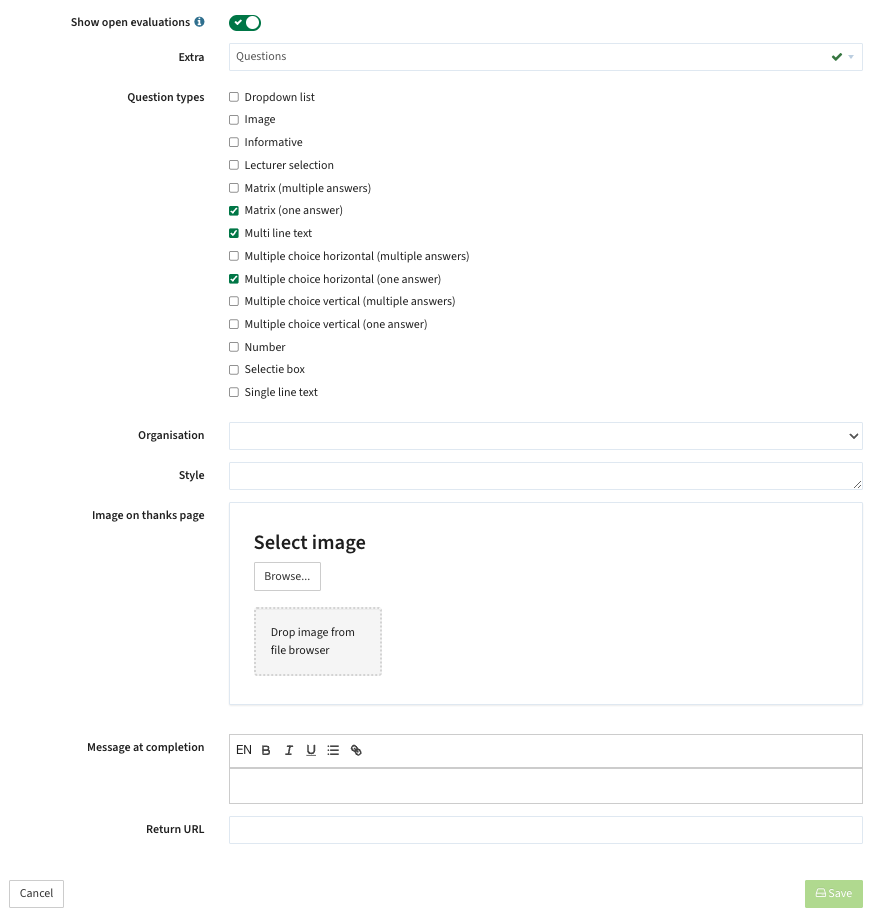
- Show open evaluations - Show open evaluations of participant when evaluation has been submitted
- Extra - Indicates if an evaluation of this type will offer the option to add additional question blocks or questions that are not standard offered in the evaluation template.
- Question types (in case Extra is selected) - Defines the question types that are supported and can be added for this evaluations of this type.
Supported values are:
- Dropdown list
- Image - select from a number of images
- Informative - not a question, but just some text that can be positioned between questions
- Lecturer selection - select the lecturer(s) you want to evaluate
- Matrix (multiple answers)
- Matrix (one answer)
- Multi line text - text area for large textual responses. The number or characters can be limited.
- Multiple choice horizontal (multiple answers)
- Multiple choice horizontal (one answer)
- Multiple choice vertical (multiple answers)
- Multiple choice vertical (one answer)
- Number
- Select box
- Single line text - Organisation - Defines what organisations / faculties are allowed to define evaluations of this evaluation type
- Style - Allows to define a specific style (using CSS) for this evaluation type
- Image on completion page - Defines what image should be shown to the participants on the completion page.
- Message at completion - Defines what message should be shown to the participants on the completion page
- Return URL - Defines the URL the participant should be redirected to after completing the evaluation
Roles in the evaluation workflow (member types) and their permissions
The member types are used to define the roles in the process and their permissions in the evaluation process.
Select the menu item Workflow -> Member types to manage the evaluation roles for the member types.
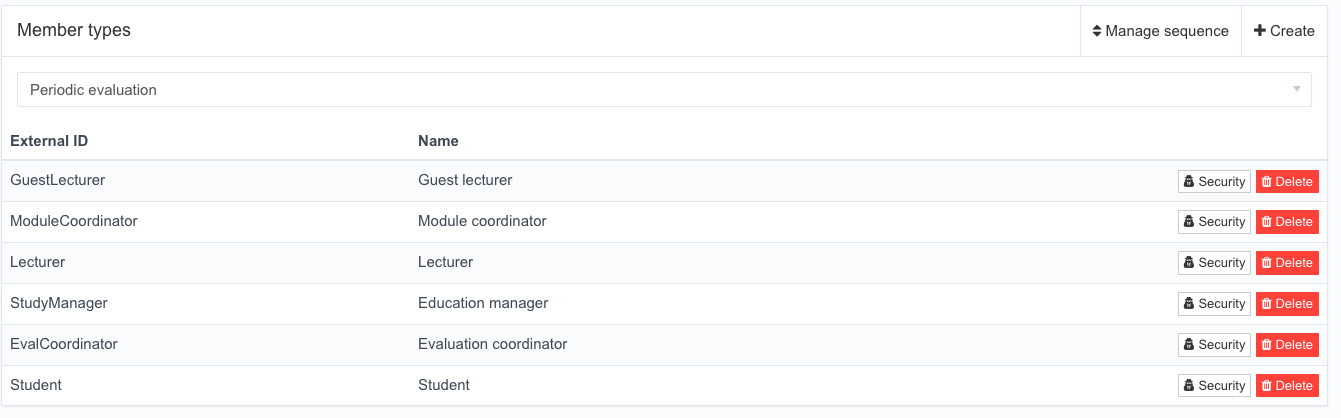
Click on a defined member type or use the Create and Delete button to manage the member types.
The member type definition supports the configuration options:
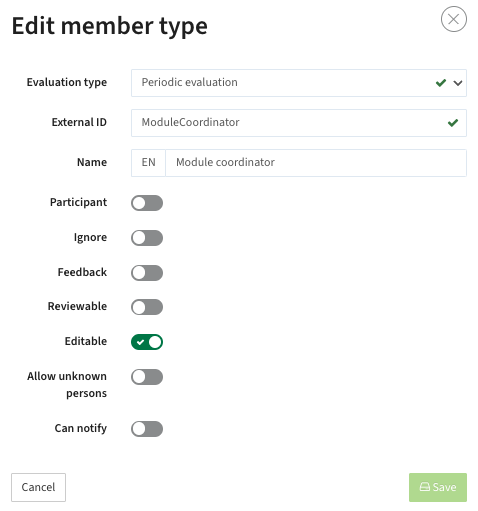
- Evaluation type - Select the evaluation type the member (role) is defined for.
- External ID - The unique ID for the member type that can be used in automatic integration scenarios.
- Name - The name shown to the user.
- Participant - Indicates whether the member type is a recipient of the evaluation (i.e. student or participant).
- Ignore - Indicates whether the member type is skipped for this evaluation (this is used when the automated import provides more relations than you want to use)
- Feedback - Indicates whether the member type is shown in the tab feedback. This allows specification of roles that will receive and roles that will not receive feedback (e.g. lecturer versus course coordinator)
- Reviewable - Indicates whether the member type (role) and its assigned members (persons) is shown in the general tab of an evaluation.
- Editable - Indicates whether users assigned to this member type in an evaluation can be edited by users (with the right authorization).
- Allow unknown persons - Indicates if unknown persons, e.g. not provisioned persons) can be assigned to this member type (role).
- Can notify - Indicates if users having this member type (role) can send ad-hoc notifications to participant.
Click on a the security-button to define the permission for the defined member type (role).
The permissions screen allows for the definition of the permissions assigned to the role, including in which workflow status. If an operation is allowed in more than one status, you have to create it twice.
The permissions require the definition of the process statuses, since they are part of the additional restrictions applied to the restrictions.
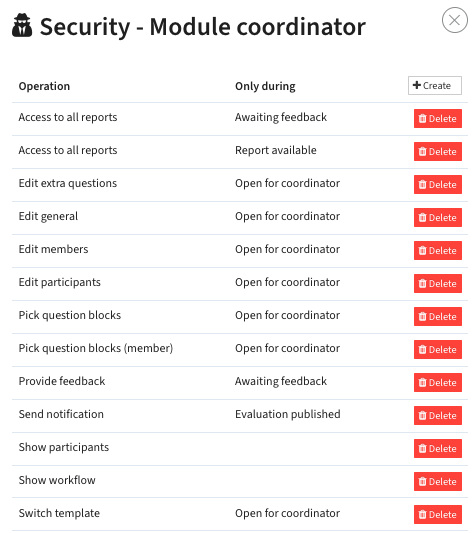
Different roles will have different permissions. The coordinator shown earlier will have almost any right, where the education manager will only have access to the reports that are created after finishing the evaluation.
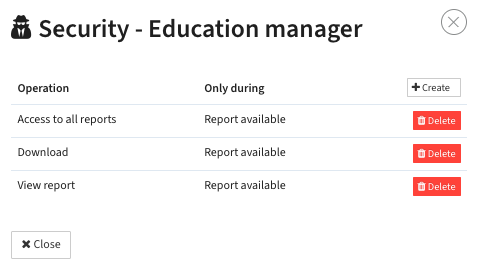
The supported permission rules are:
- Access to all reports
- Archive
- Calculate
- Change status
- Delete evaluation
- Download
- Download participant tags
- Edit extra questions
- Edit general
- Edit members
- Edit participants
- Edit tags
- Pick question blocks
- Pick question blocks (member)
- Pick question blocks (required)
- Provide feedback
- Send notification
- Send notification (automated)
- Show participants
- Show workflow
- Switch template
- To next status
- View QR
- View public reports
- View report
Statuses in the workflow
The status types are used to define the statuses in the process, including option permission restrictions.
Select the menu item Workflow -> Status types to manage the statuses in the process for the different evaluation types.
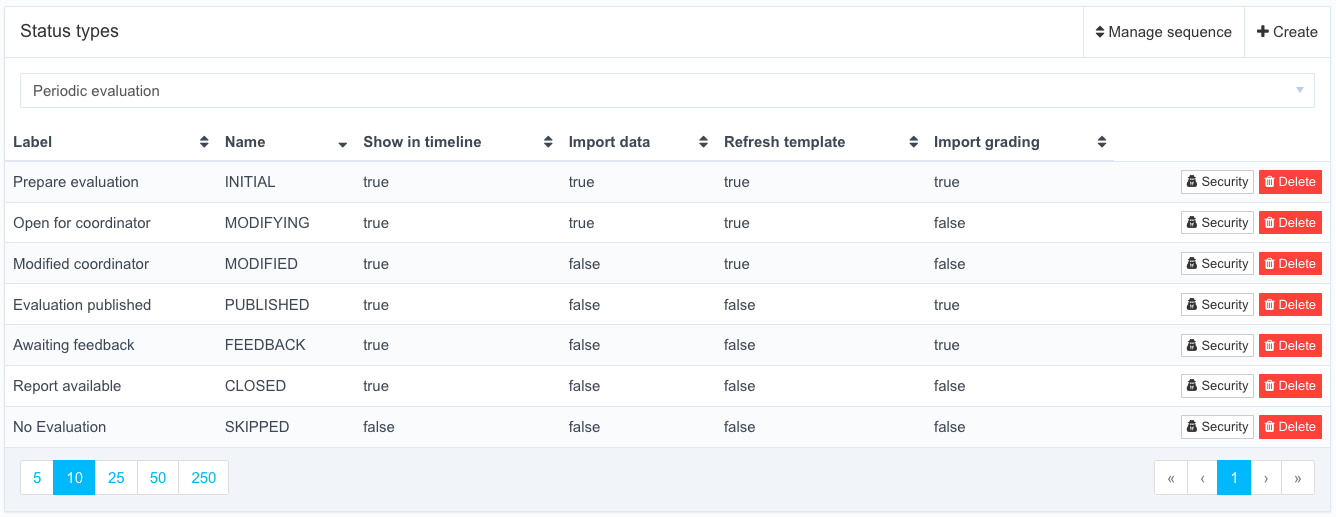
Click on a defined status type or use the Create and Delete button to manage the status types.
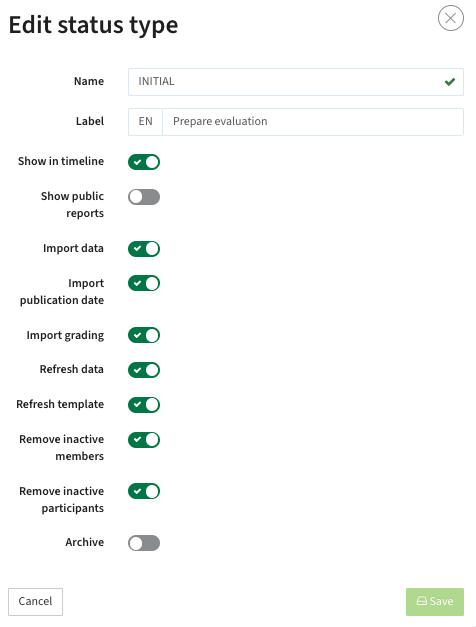
The member type definition supports the configuration options:
- Name - Internal, unique name/code of the status.
- Label - Name of the status shown to users
- Show in timeline - Indicates if the status will be shown in the timeline of the evaluation details
- Show public reports - Indicates if public reports are available and accessible for users in this stage
- Import data - Indicates if data (evaluations) will be provided by an automated interface, and it is allowed to be processed.
- Import publication date - Indicates if the publication date can be provided by an automated interface, instead of being set/calculated base on the configured workflow.
- Refresh data - Indicates if data can be refreshed (after the initial date exchange) by an automated interface
- Remove data - Indicates if data can be removed, in case refresh is allowed, by an automated interface
- Refresh template - Indicates if during this status it is allowed to overwrite the assigned evaluation template. This is typically done in the initial phases of the evaluation configuration process, but will be disallowed later on.
- Import grading - Indicates if during this status it is allowed to overwrite the various course results
- Archive - 'Soft delete' to disable using this status any longer
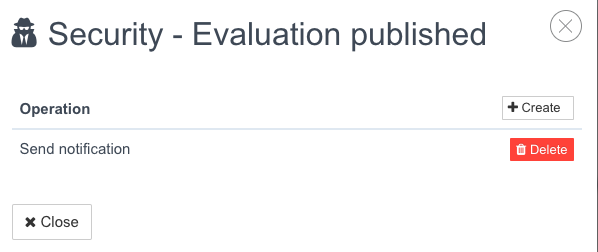
Click on a the security-button to define the permission for the defined status type.
The permissions screen allows to specify which permissions are allowed to be performed in the specific workflow status. This option allows to add additional status based permissions that are not specifically bound to a member type (user role).
Transitions between statuses in the workflow
After defining the process statuses, the next step is to define the supported transitions between the statuses.
Select the menu item Workflow -> Status transitions to manage the status transitions supported by the process.
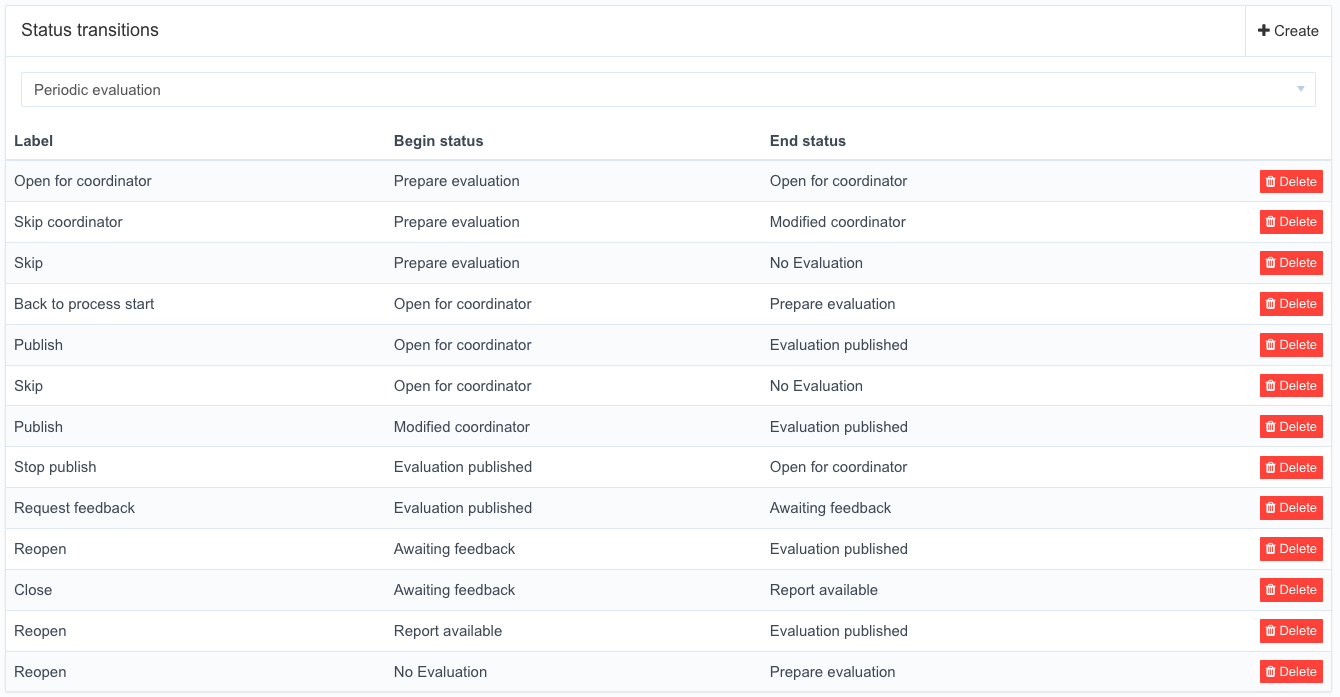
Click on a defined status transition or use the Create and Delete button to manage the status transitions.
The status transition definition supports the configuration options:
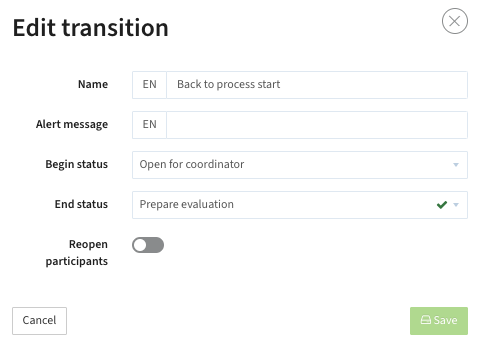
- Name - Defines the Name of the transition. The name is used as the text of the Action button that is offered to the user to execute the status transition.
- Alert message - The Alert message is shown after clicking on the 'button' to execute a transition and is an informative message for the user.
If the text box for the alert message is left empty, the standard text "Are you certain about this status transition?" is shown to the user (see screenshot below). - Begin status - Defines the status the transition will start from
- End status - Defines the status the transition will end
- Reopen participants - Reopen the evaluation also for the participants (if applicable).
Configure notifications that will be send automatically
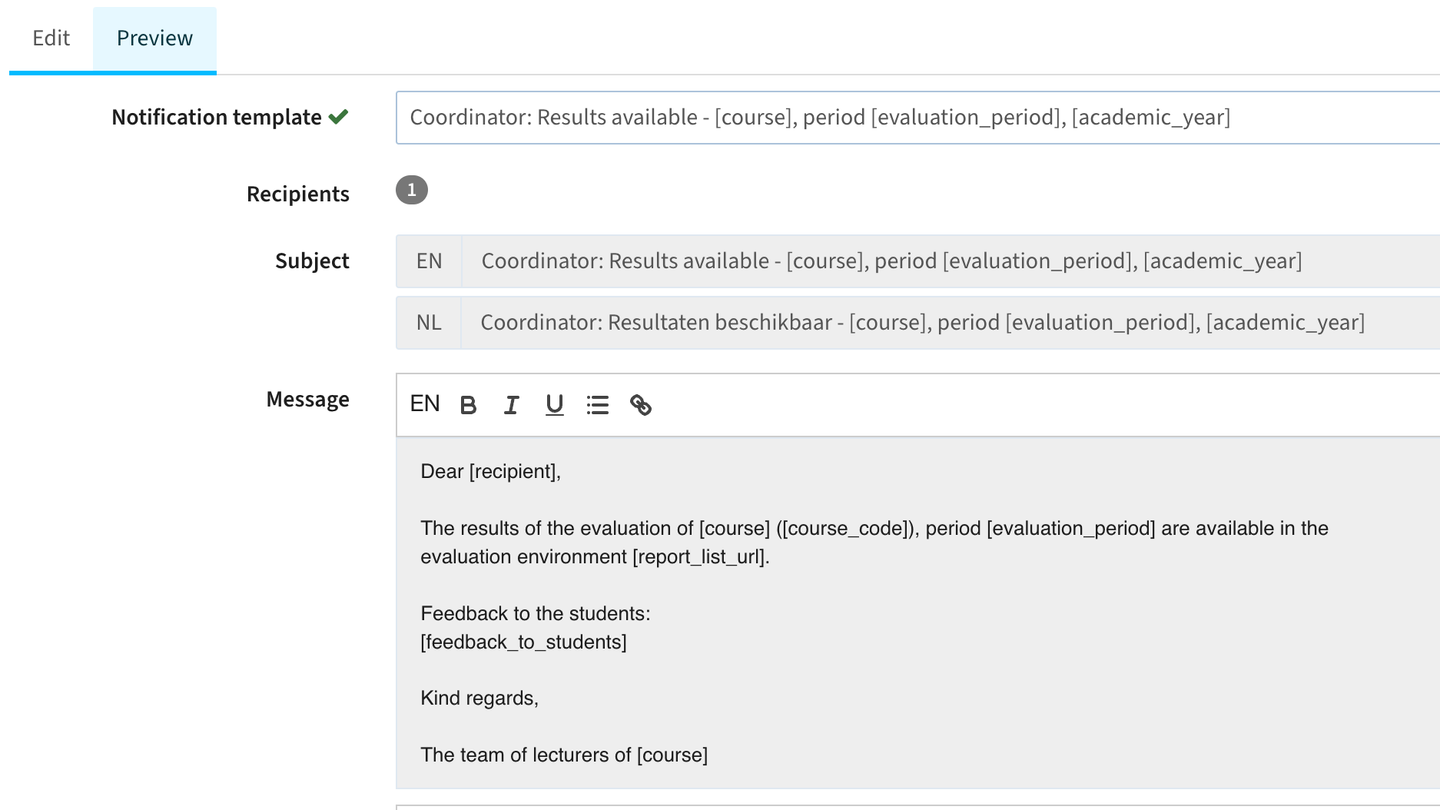
Notifications are preconfigured templates that are used to send notifications (emails) to the different stakeholders in the system.
Select the menu item Workflow -> Notifications to define and manage the notifications send in the process.
Notifications can be sent as email using the process automation or by an authorised user via the Notify function.
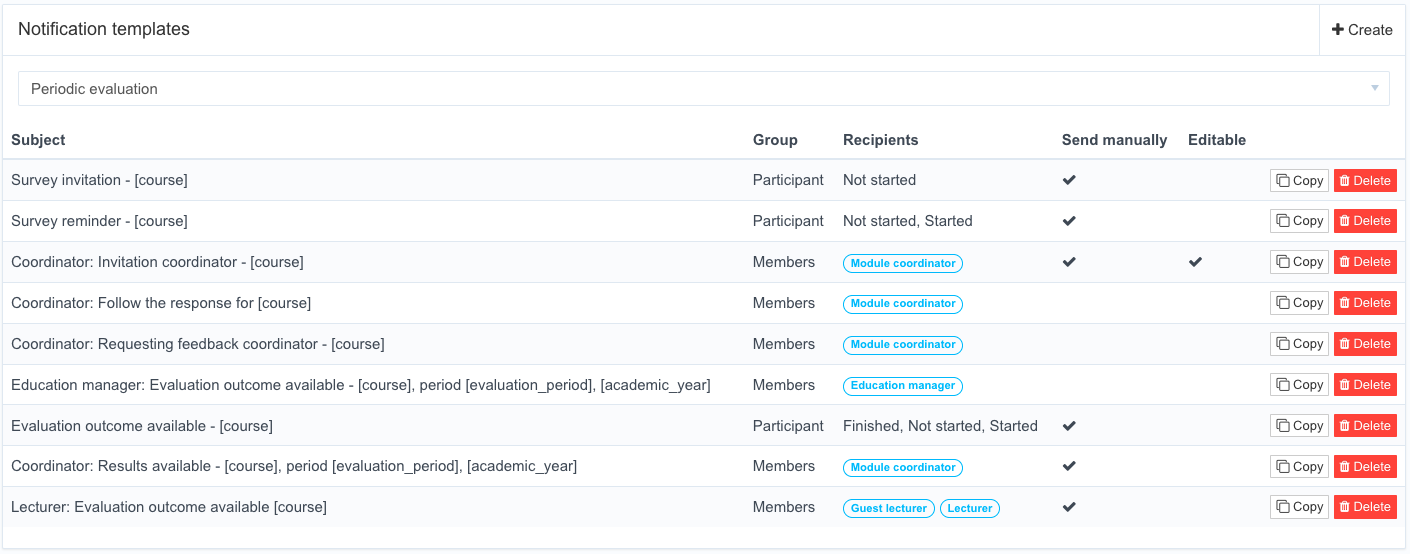
Click on a defined process notification or use the Create, Copy and Delete button to manage the process notifications.
The process notification definition supports the configuration options:
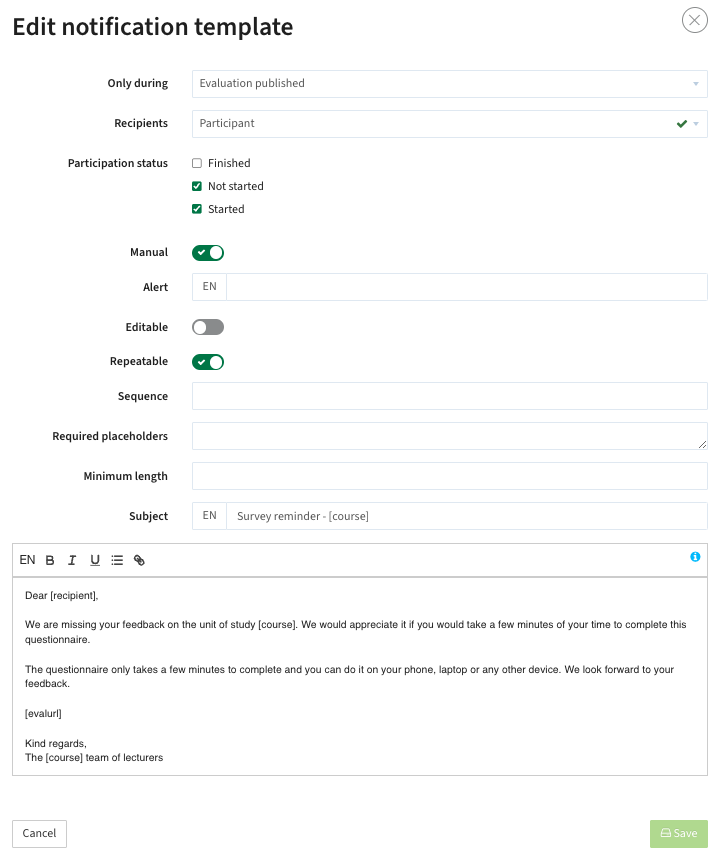
- Only during - Define during which status of the evaluation this notification can be sent
- Recipients - Define the recipients that will receive this notification.
Two options are allowed: members (staff) and participant.
In case members is selected the member type(s) (roles) that should receive this notification can be configured. - Participant status - Indicates which participants will receive the notification based on the status of their response to the evaluation.
In the example screenshot below the notification will be send to all respondents that have NOT yet finished the evaluation. - Manual - Indicates if this notification template can be used for manual sending of notifications.
- Alert - Indicates if an additional alert / message is shown to the recipient
- Editable - Indicates if the notification that is generated based on the template is editable by the user prior to sending.
- Repeatable - Indicates if it is allowed to send this notification multiple times for the same evaluation to the same user
- Sequence - Defines the order in which the notification is shown to the user in case of selecting of an ad-hoc / manual notification
- Required placeholders - Specifies the placeholders that must be used in ad-hoc (modifiable) notifications sent by authorized users.
- Minimum length - Defines the minimal length of ad-hoc notifications sent.
- Subject - Defines the subject of the email
- Text - Defines the actual notification message (multi-lingual) using the HTML editor.
Placeholders can be used in the notification text, that will be replaced with the actual value prior to sending.
Click on the (i) icon to get an overview of all supported placeholders:
- [academic_year]: Academic year (e.g. 2016/2017)
- [course]: Course name (e.g. Genomics)
- [course_code]: Course code (e.g. ABG-30306)
- [dashboard_url]: Dashboard URL
- [evaluation_details_url]: Evaluation details URL
- [evaluation_id]: Evaluation ID
- [evaluation_period]: Evaluation period (e.g. 1)
- [evalurl]: Evaluation invite URL
- [feedback_to_students': Feedback message to students
- [next_status_date]: Next status date (dd-mm-yyyy)
- [participant_code]: Participant course code (e.g. FPH-80439)
- [publication_date]: Publication date (dd-mm-yyyy)
- [recipient]: Recipient name (e.g. Jan de Boer)
- [report_list_url]: Private report URL
- [reporturl]: Report URL
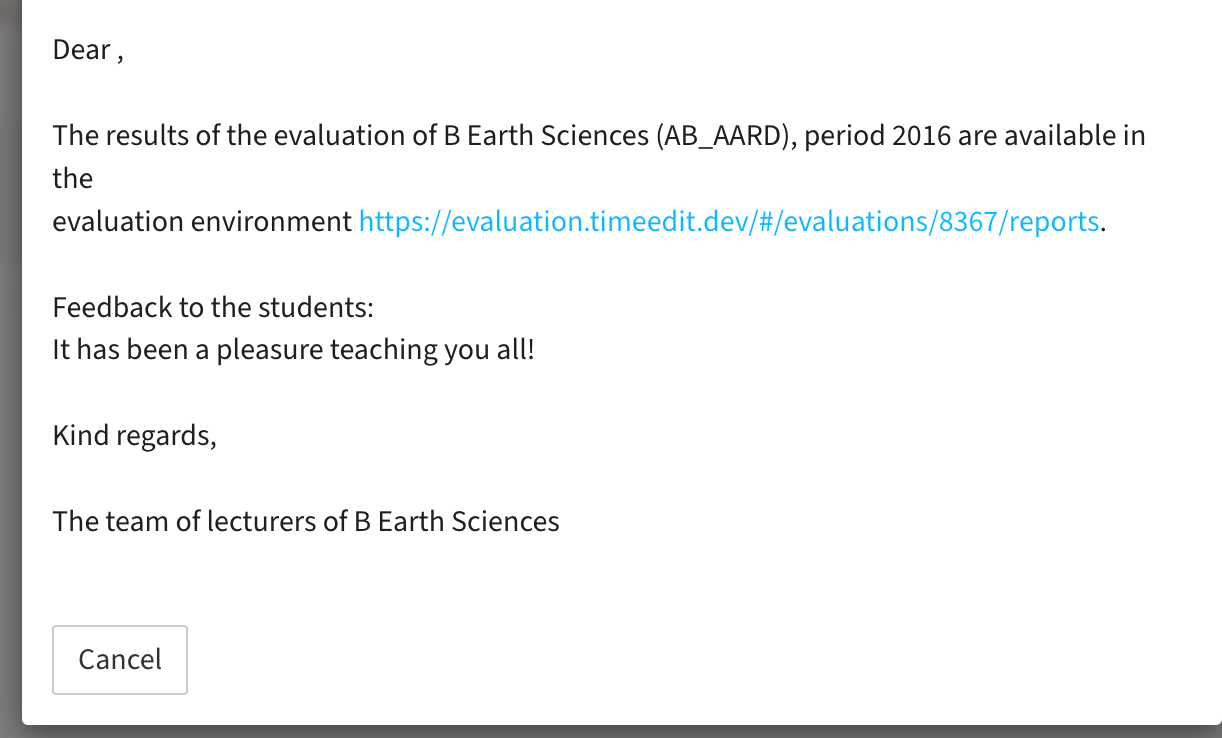
Ad-hoc notifications
Based on the configured notification templates the relevant fields are substituted. The notification template can also be used for sending ad-hoc notifications that use the template but can be (slightly) configured by the user. The example below shows a notification based on a preconfigured template with some fields that should be substituted when sending.
Participant Email configuration options
The email functionality can be configured to specify whether evaluation invitations should be sent to participants' public, private, or both email addresses. This enhancement aims to improve response rates, especially in graduate evaluations.
There are now three options for email delivery:
- Public (institution email, e.g., @student.institution.com)
- Private (personal email, e.g., @hotmail.com)
- Public and private (both) (new)
When using the "Public and private" option, two identical emails with the same participation link are sent to both addresses. It's still a single evaluation for a single participant, with the participant able to start and continue the evaluation from either email, as progress is saved under the same link.

If "Private" or "Public and private" is set but no private email is available, the invitation will always be sent to the public email as default.
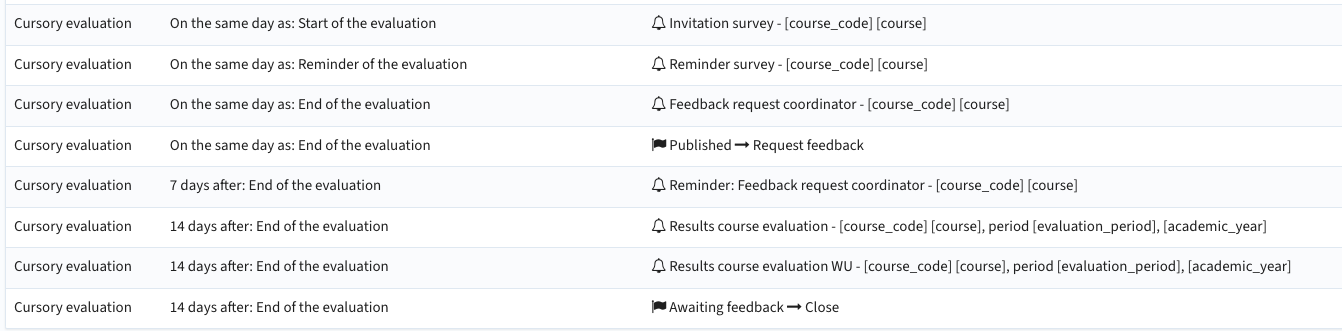
Configure the process automation by setting up the schedule (workflows)
The process automation is used to automate the process for an evaluation type based on relative days from start (or end) that will automatically execute the the workflow transitions and send notifications. The automation allows for running an evaluation process with no user intervention, evaluating the course with the default evaluation template.
Select the menu item Workflow -> Workflows to define and manage the notifications send in the process.
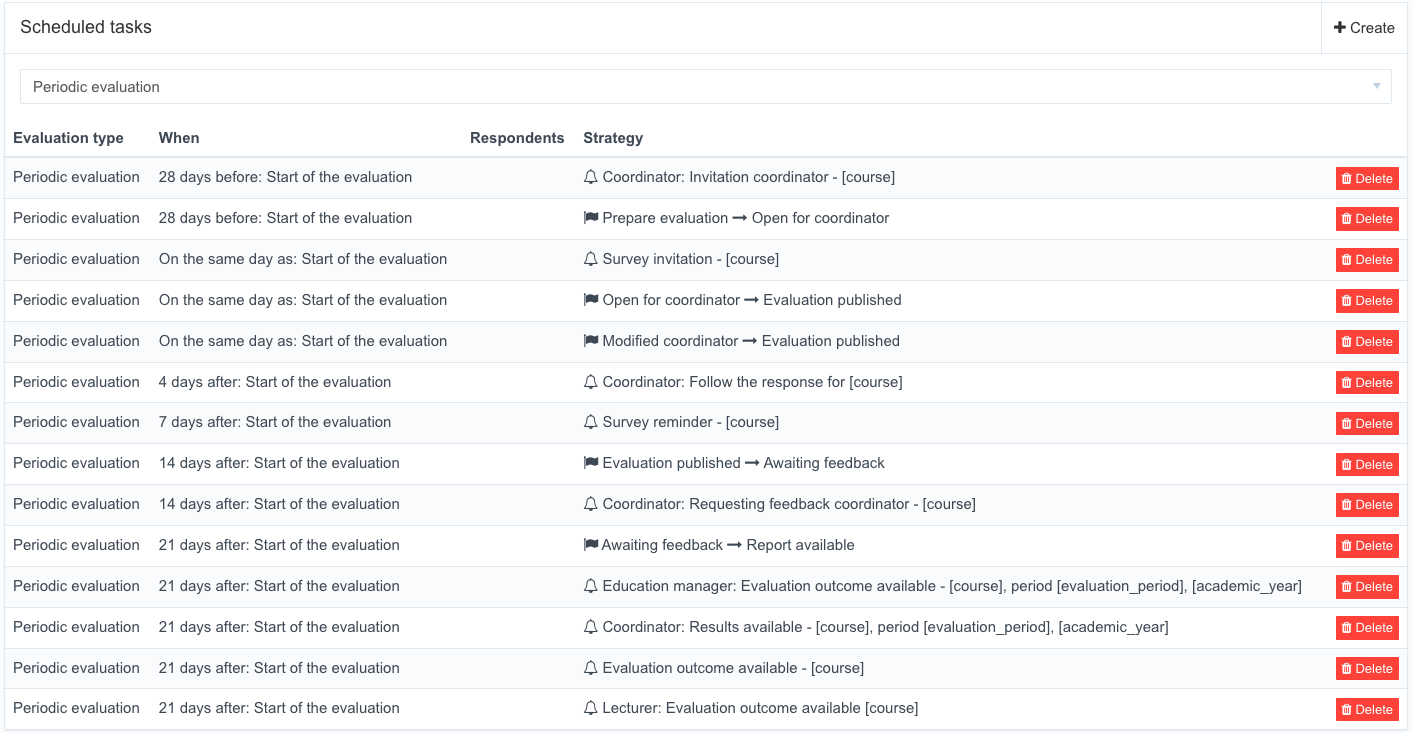
Click on a defined process automation step or use the Create, Copy and Delete button to manage the process automation

The process automation definition supports the configuration options:
- Offset in days - Specify a relative 'day' (offset) from a date type (specified in the next selection box). Days before a date type are indicated by using a minus sign (-). In the example below, a notification will be send out 28 prior to the start date of the evaluation.
- Date type - Select a date type (e.g. startdate, enddate, end of period, last course day)
- Type - Specify whether the step results in a notification or status transition.
- Use notification template - Depending on the type a select is offered to select
- notification template from the defined notification templates for the selected evaluation type
- status transition from the defined status transitions for the selected evaluation type - Respondents value - The value used in combination with the operator, used to define a filter to this task
- Respondents operator - The operator defines the operator to be used in combination with the defined number.
In case the defined operator / value combination evaluates to true, the task will be executed.
Operators supported are:
- Equal to
- Greater or equal
- Greater than
- Less or equal
- Less than
Example: only request feedback, of inform students the evaluation results are published via notification if the number of respondents > 25. - Disabled - 'Soft delete' that will no longer offer this task for future scenarios
Override the default period configuration for a specific evaluation
The workflow is configured based on interval dates either based on start, evaluation or end date. This means that for instance during the Christmas Holidays the workflow continues and the student reminder will be sent during this period.
An option is added to pause the workflow during a specified period, e.g. December 23 till January 8. This will prevent notifications from being sent during this period and will also recalculate the actual workflow dates including the 'pause period'.
Configuration:
- Navigate to the Admin / Holidays menu
- Click on Create to specify a new Holiday (pause) period
- Navigate to Admin / Evaluation types
- Define the number of days the reminder should be sent after start of the evaluation
- Define the number of days the evaluation should stop after start the reminder date
- Navigate to Workflows / Workflows
- Adjust the workflow to enable usage of the configured holiday period and days until reminder / end

Define the number of days the reminder and the evaluation should be ended after start of the evaluation.


The evaluation type overview will show the defined days until reminder and end.

Existing configuration of the workflow should be adjusted to use the configured holiday period and days until reminder / end.
Configure workflow and status related widgets to be shown on the user personal dashboard
The widget configuration is used to define the widgets shown on the user personal dashboard.
Select the menu item Workflow -> Widgets to define and manage the notifications send in the process.
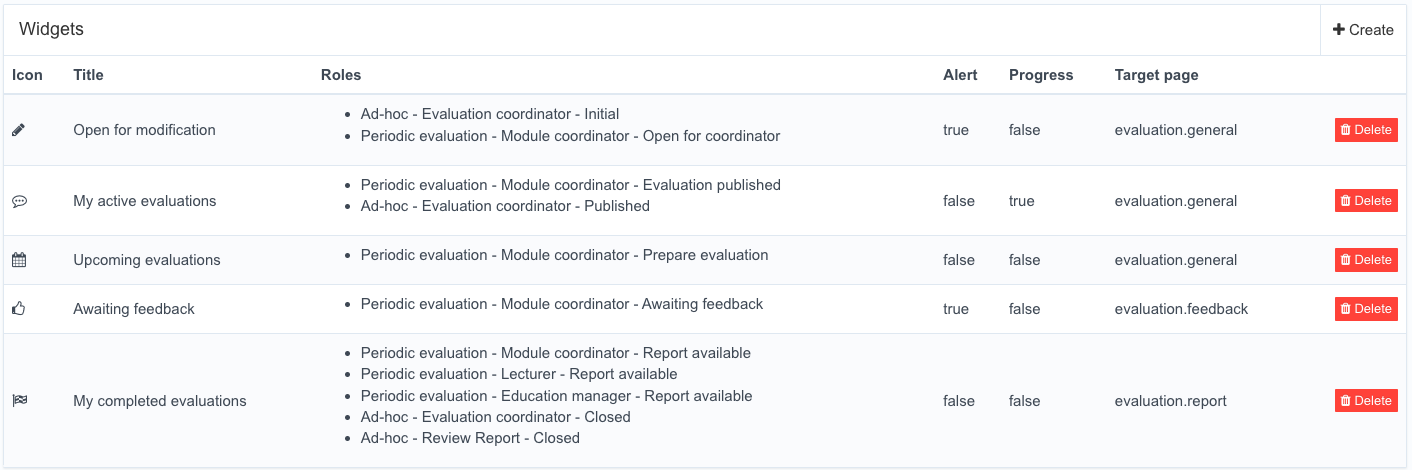
Click on a defined widget or use the Create and Delete button to manage the widgets.
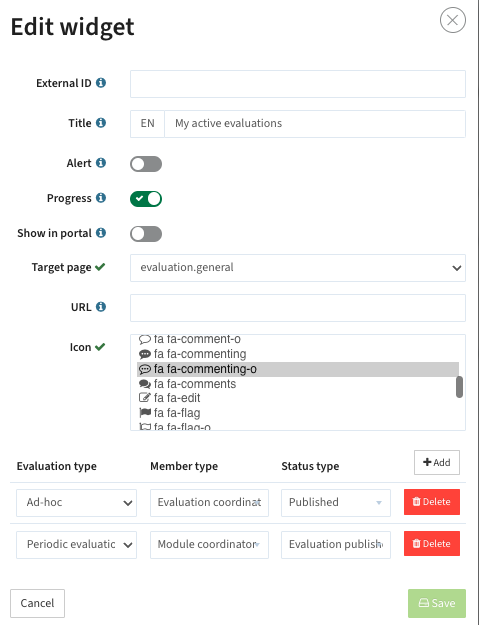
The widget definition supports the configuration options:
- External ID - Unique identifier (optional)
- Title - Specify the title for the widget as shown on the user Dashboard.
- Alert - Indicator to configure if the widget should be highlighted with a distinct color
- Progress - The Progress option is used to indicate if the information is shown as a progress bar.
This is useful for the active evaluations, to see the evaluations that have not been opened, are started (but not finished) and are finished. - Show in portal - Show the widget on the Dashboard.
- Target page - Defines the page that is used as the basis for the information / layout used in the widget.
- URL - Show a static URL in a widget.
- Icon - The icon that is shown next to the title of the Widget on the user personal Dashboard
- Filter - Configure the evaluation types, role and status of the evaluations that should be shown in the widget:
- Evaluation type: specifies what evaluation types should be shown.
- Member type: is used to specify the role on the evaluations shown.
- Status type: is used to specify the status on the evaluations shown.