Exam Settings
In this section we are going through different settings of Exam
.png)
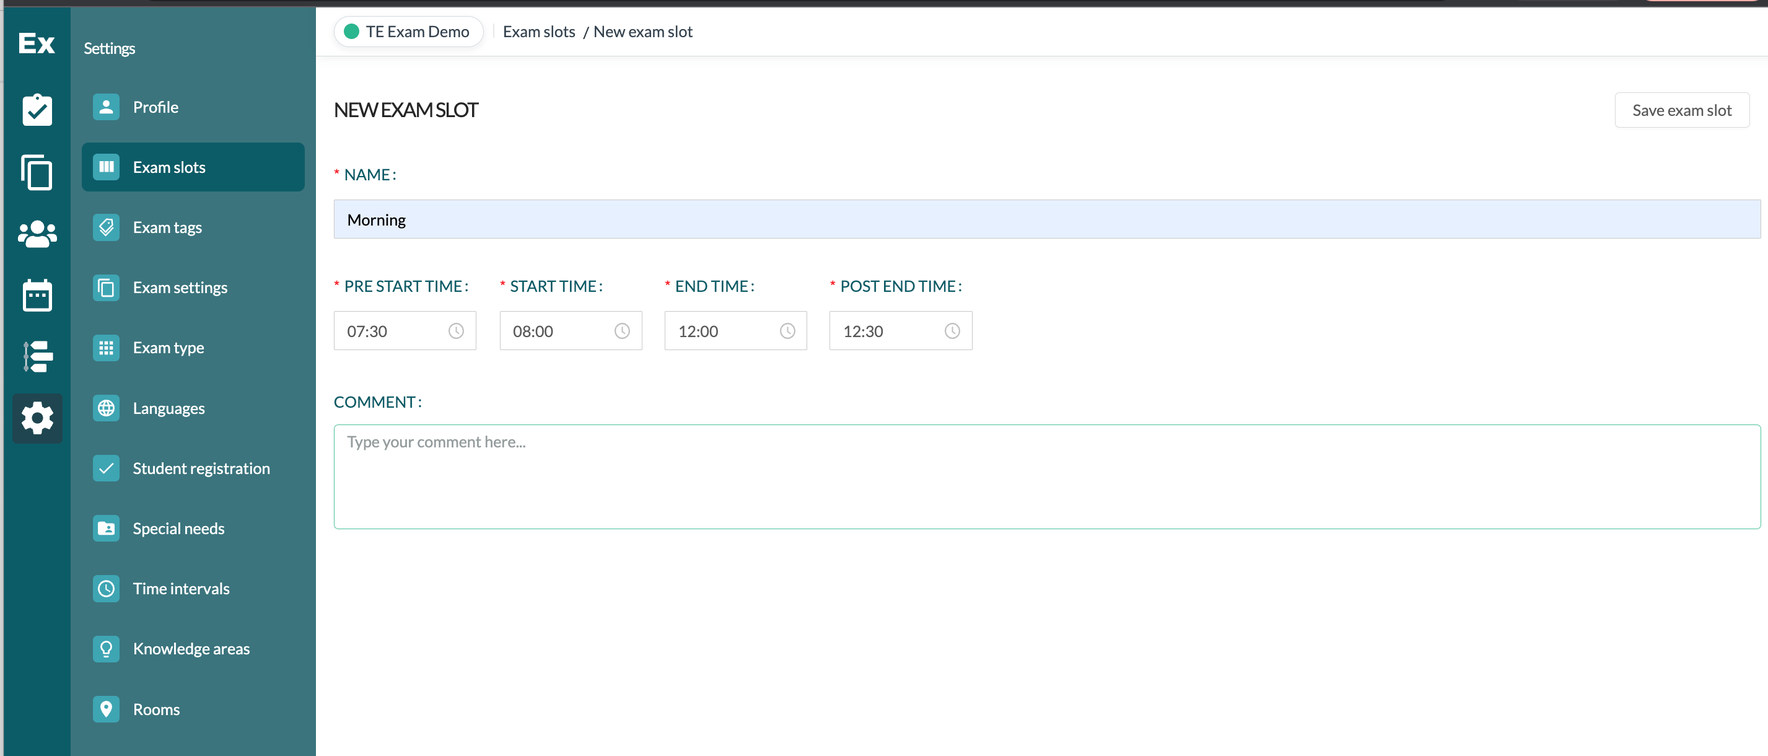
Create Exam slots
In order to book rooms and schedule exams you need to create Exams slots. You can create as many exam slots as you need but can be good to try to keep the number down. An exam slot defines the time for when an exam is to take place during the day for example: morning 8-12 or afternoon 13-17. You can also create block slots for an entire day to ensure that the room is available the specific date.
To create an exam slot do following steps:
- Go to settings → Exam slots
- Click on Create exam slot
- Add name, time for slot and comment/description for exam slot
- Pre start time - is time before an exam a room is needed for preparation
- Start time and end time - is actual time for an exam in a room
- Post end time - is time after an exam a room is needed for clean up.
- Press save when you’re done with your settings for exam slot.
You can filter your exam slots on active/deactivated or create ustom filters under “Add filter”. A filter can be saved and then they are listed under Saved filters.
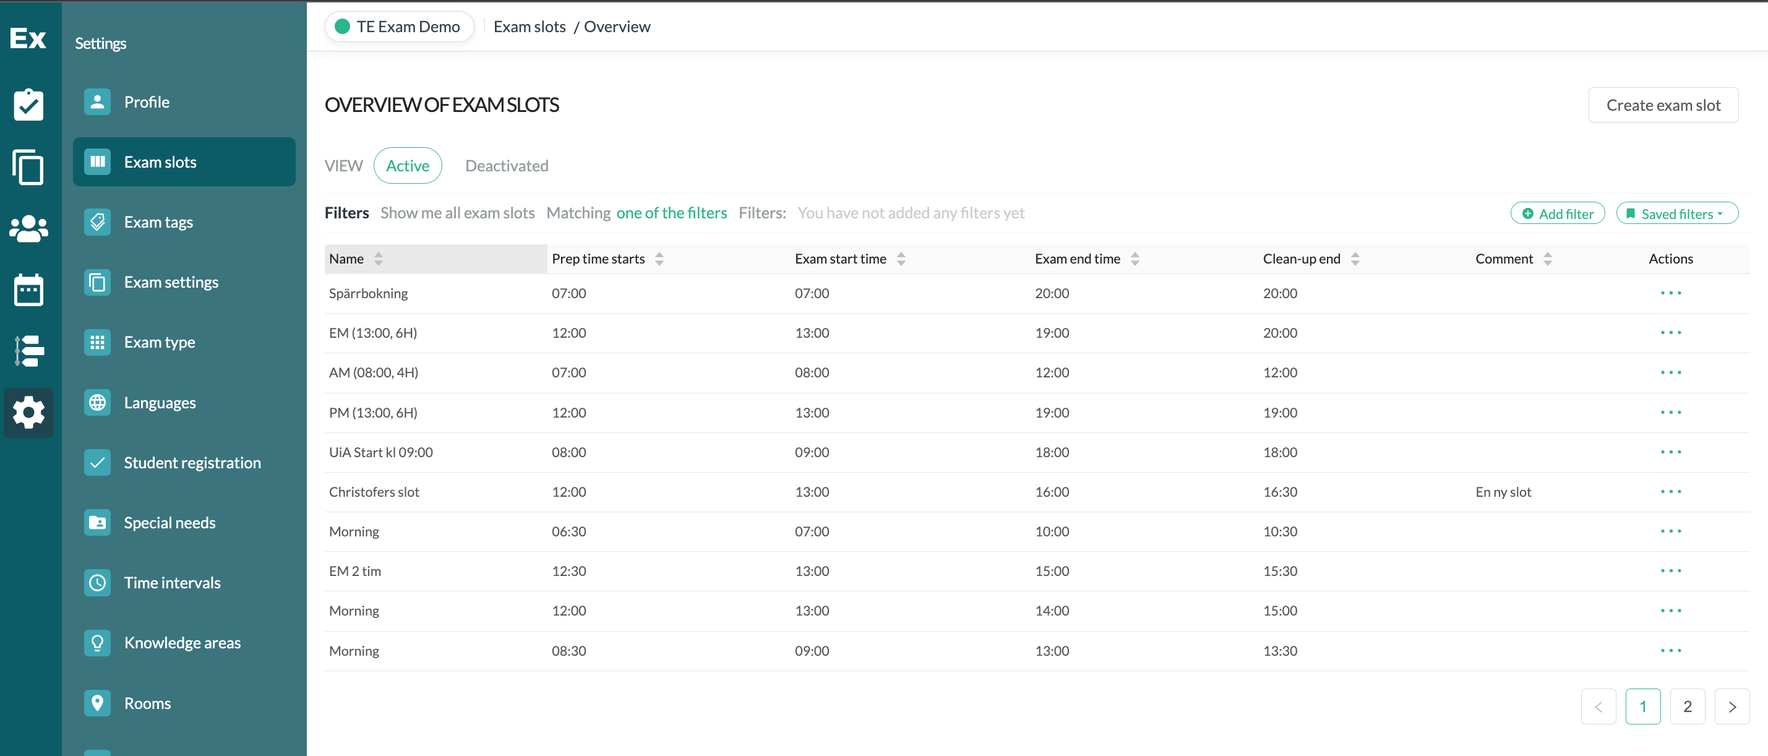
The exam slots can be sorted in the columns of Name, times or comments.
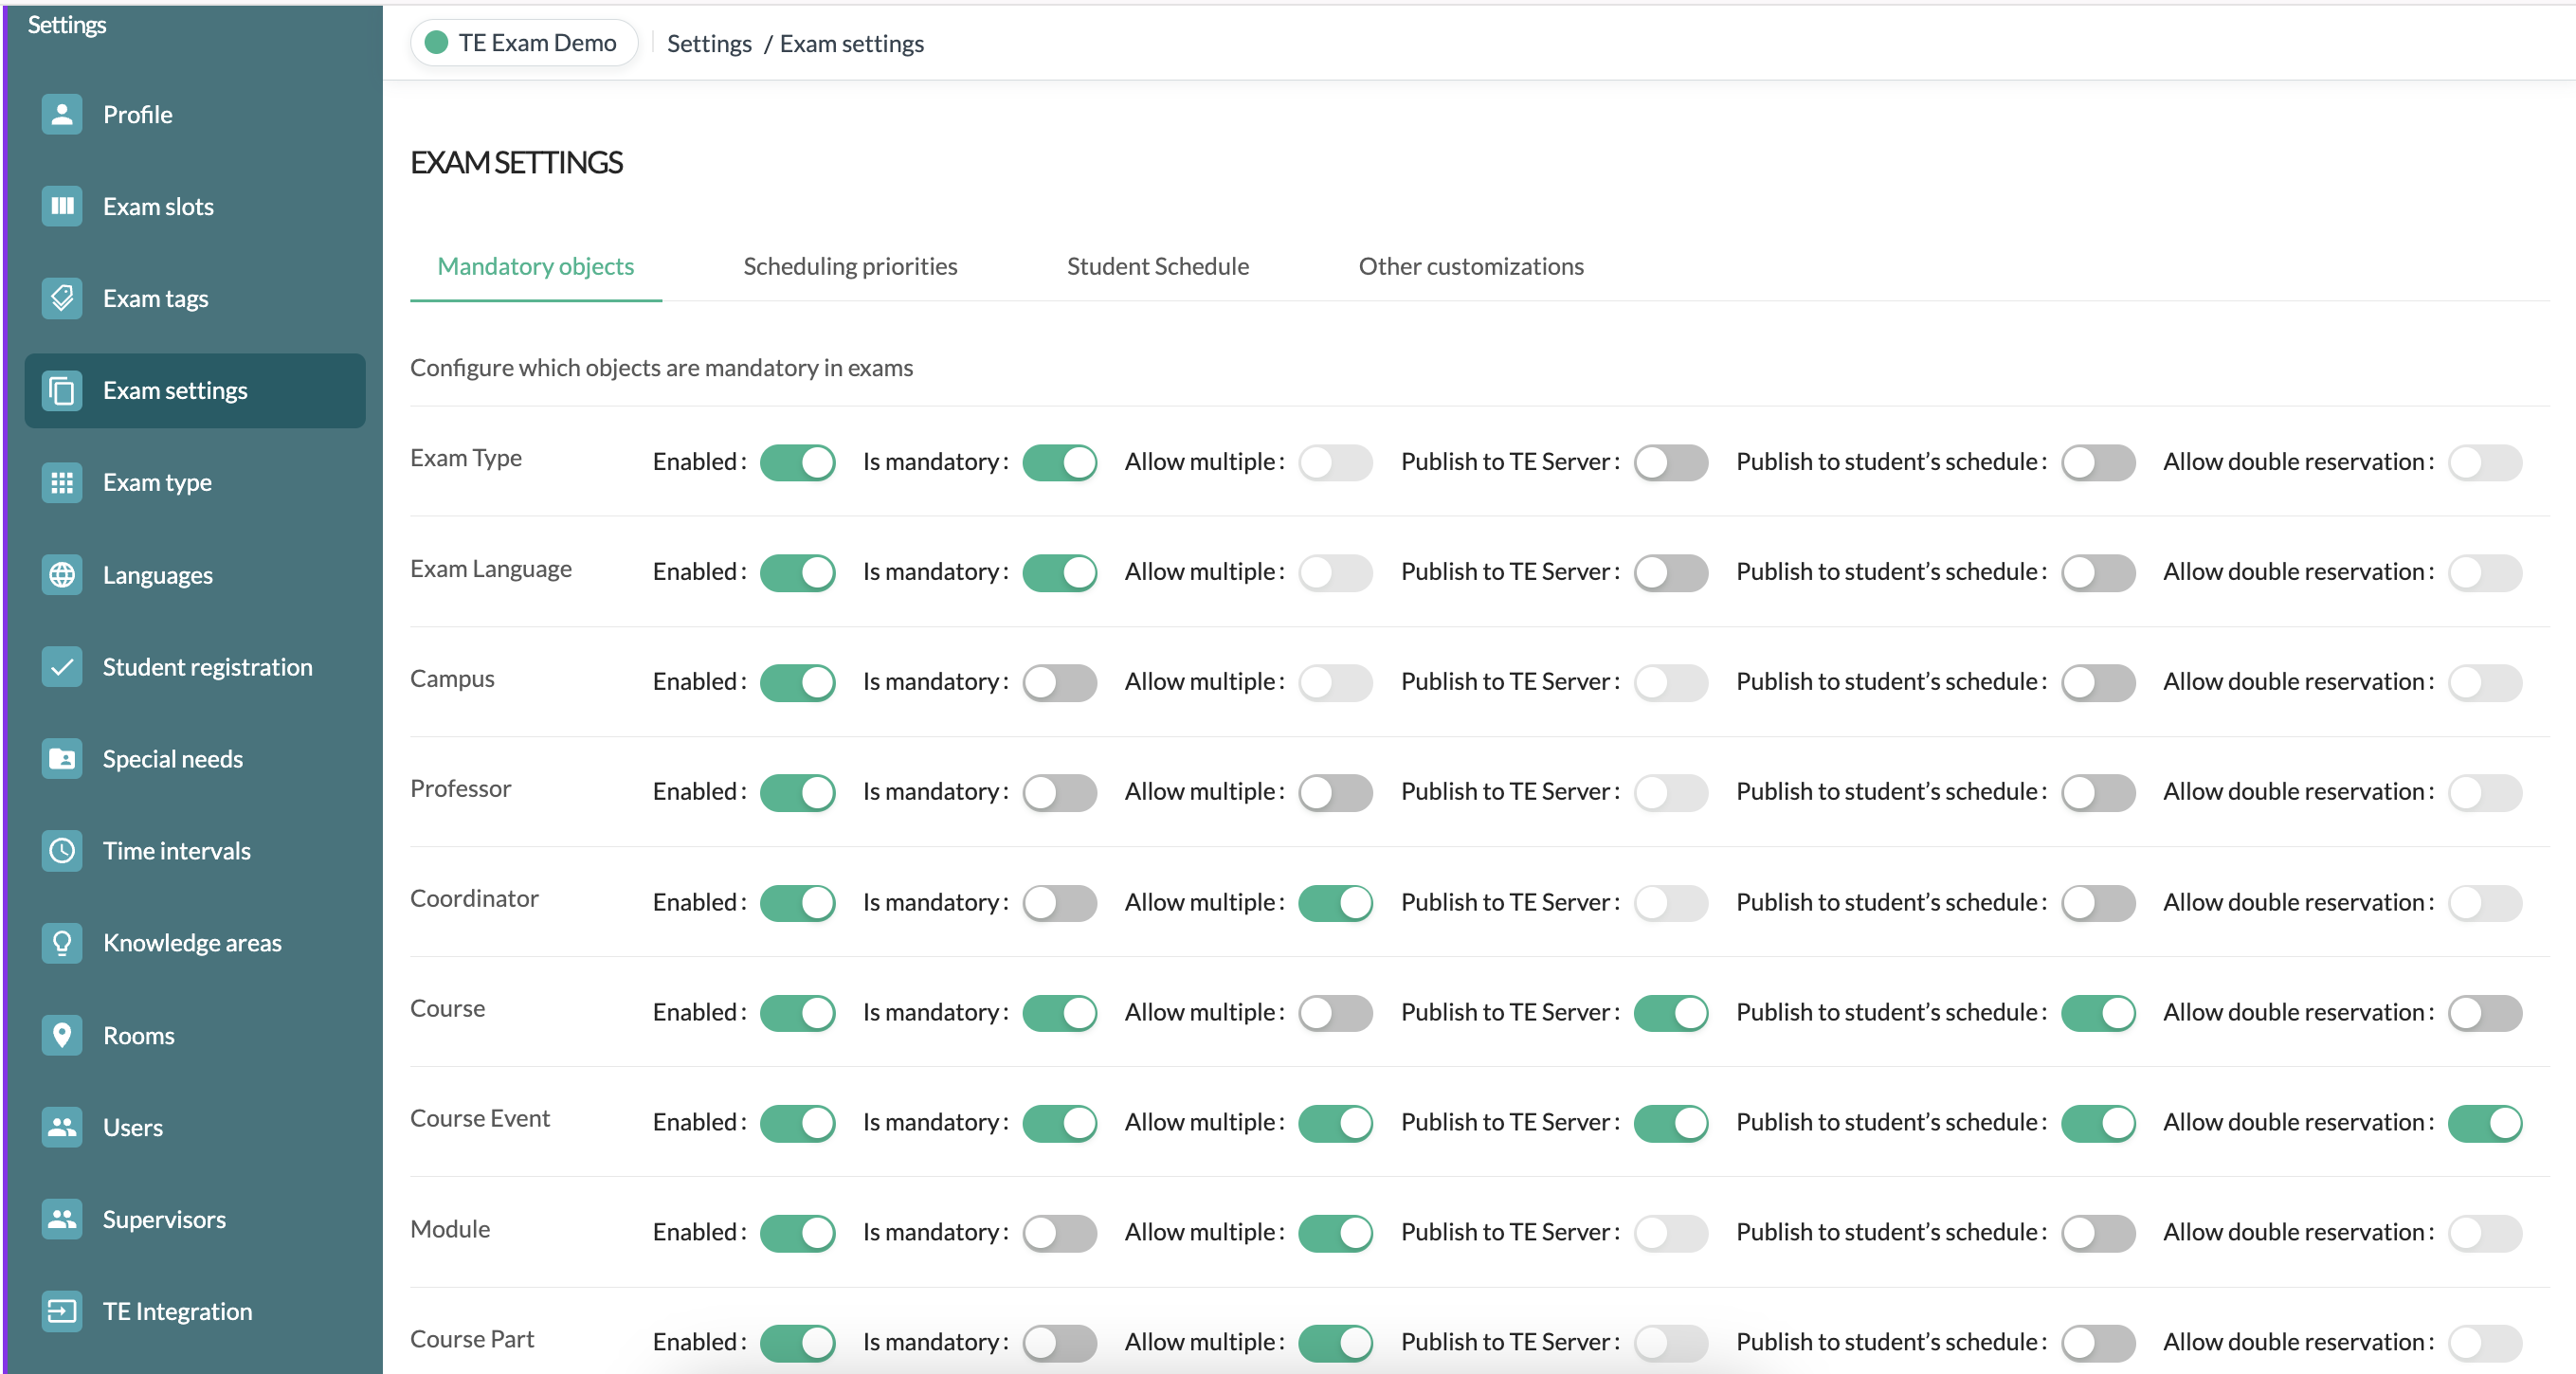
Create Exam settings
Exam settings are used to set which types should be included in an exam request, what should be mandatory, and schedule priorities for the order.
Go to Settings → Exam Settings
a. Mandatory objects are used to set up what must be included in an request
- activated indicates whether the type should be included in the order or not
- Is Mandatory indicates whether it should be mandatory to include the item on an order.
- Allow multiple specifies whether you are allowed to include more than one item of the same type in the order.
- Allow double reservation lets you have same object on multiple reservations when publishing
b. Scheduling Priorities is used to set which requests a customer can make.
- Number of requests indicates how many requests the customer may enter. Please note that a minimum and maximum value must be entered in order to enter a request.
- It is not possible to have more than five requests
- Time intervals or exam slots indicate whether the client must specify pre-configured time intervals or exam slots.
- Allow date priority specifies whether you should be allowed to request a specific date for your order.
- Allow room priority indicates whether you will be allowed to request a specific room for your order.
- Allow interval priority indicates whether you should be allowed to use pre-configured
c. Student schedule let you set accessibility for student public page.
d. Other Customizations you can define some other settings
- Exam title instruction - set a placeholder text for how to title your exam request
- Publication of exam for exam managers
- Email language - set what should be the default language for emails sent to invigilators (English or swedish)
- Supervisor booking request deadline.- set if you want to have a limited time frame to accept a boooking
- Number of supervisors - set a default for how many supervisors needed in a room
- Checklist - if you want to use the checklist within Exam and create a default list.
Click Save Changes when you have made your settings.
Create Time Intervals
Time intervals are used if requested for the exam and specified by the client. Unlike exam slots, time intervals function more as a placeholder for when you want an exam to be scheduled. Time interval is not directly linked to a room booking
- Go to Settings → Time Intervals
- Click Add Time Range to create a new one
- Fill in the name and start time + end time for the time interval and click Done
- Click Save Changes to save
- You can change or delete a time interval under the Actions column
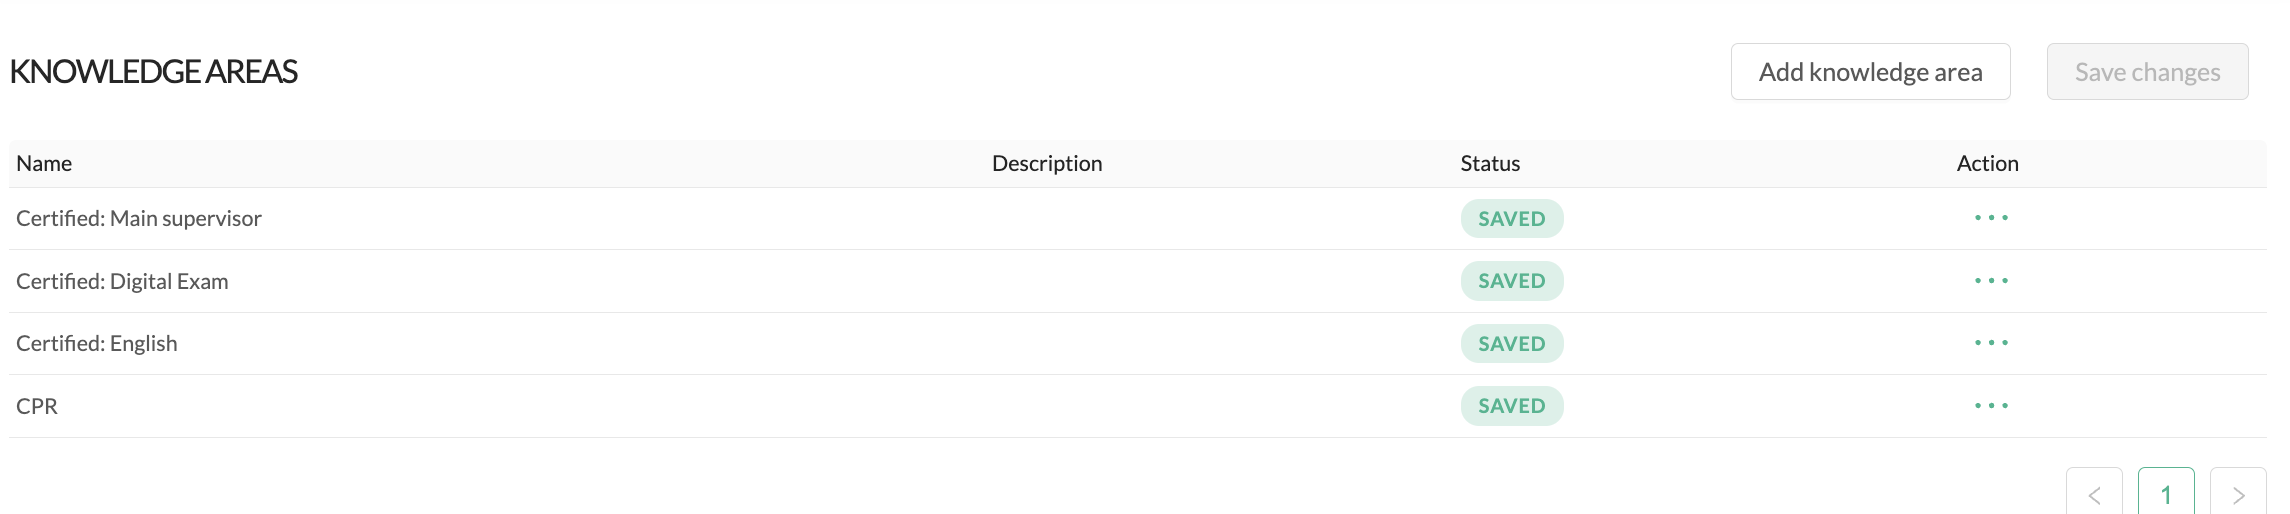
Create Knowledge Areas
Knowledge areas are used for exam invigilators. Areas of knowledge can be used, for example, to describe what knowledge an invigilator needs to have or which campus area the invigilator belongs to.
- Go to settings → Knowledge Areas
- Click Add knowledge Areas to create a new one
- Fill in the name and possibility a description and click Done
- Click Save Changes to save
- You can change or delete special needs under the Actions Column
Create Special Needs
Special needs are used when scheduling exams.
In the context of scheduling exams, "special needs" refers to meeting the requirements and needs of students who have specific circumstances or require accommodations to complete their exams on an equal footing with other students.
examples of special needs could be: Extended time, flexibility in terms of the timing and location of an exam, language needs etc
- Go to settings → Special Needs
- Click Add special needs to create new
- Fill in the name and possibly a description and then click OK
- Click Save Changes to save
- You can change or delete special needs under the Actions column
Create Invigilators/Supervisors
- Go to Settings → Supervisors
- Add new user
- Fill in first name, last name and email
- Main Supervisor indicates whether the invigilator can be a head invigilator
- Keep in mind that there must always be a head invigilator in each room when scheduling exams.
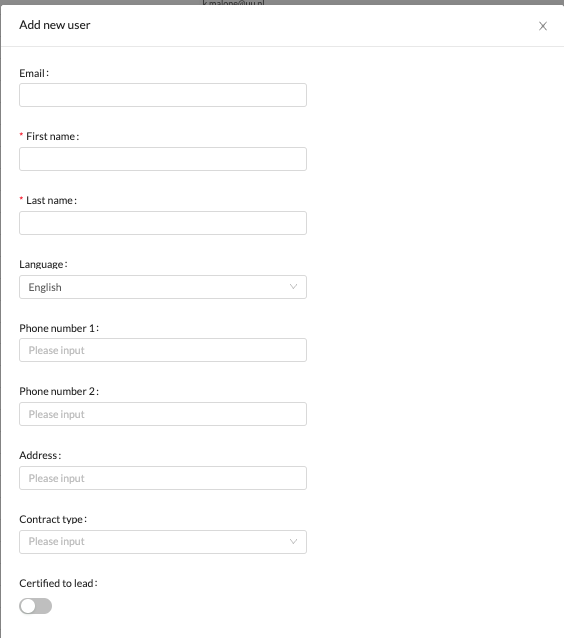
6. Knowledge areas indicate which areas of knowledge the invigilator has. Can be language, campus area or other things that make an invigilator the correct one for an exam

7. Add the supervisor role
THE DIFFERENT ROLES
Exam Administrator - An administrator has full admin rights and can schedule, block rooms, change bookings, etc.
Exam Coordinator -An exam coordinator has the same authority as a exam manager, but can see all exams in the entire organization.
Exam Manager - An exam manager can only order exams and get an overview of the exams within the same organizational group or organizational groups lower down in the hierarchy.(If you already have a user account for TE Preferences it’s the same for TE Exam
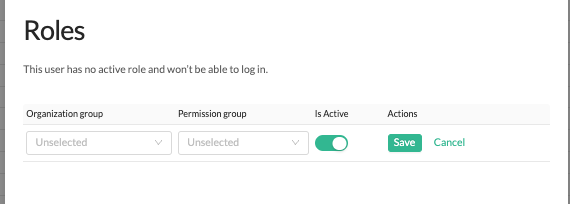
- Click Save supervisor in the top right corner when you’re done. when you have done that, a verification email is immediately sent to the invigilator.
- Please note that the verification email is only valid for 24 hours. If the invigilator does not verify within 24 hours, the account will be locked.
Create Import settings for students file
To import registered students, you need an Excel file that the customer takes out of Student Management System. The Excel file contains columns with the values needed to import the students.
- Go to Settings → Student registration
- Start by clicking on Reset Configuration to reset the settings before the new import you are about to make.
- Drag and drop the excel file directly onto the page.
- Map TE Exam with the imported file as follows:
- Student Id: Unique ID such as student number or social security number
- Student name: The student's name
- Anonymized student code: An anonymous code that will identify the student
- Student personal identification number: The student's personal ID
- Registration date: Date when the student registered for the exam.
- Choose which date format (eg DD/MM/YYYY or YYYY-MM-DD) and make sure that the cell in the excel file is formatted as "Plain text" (not Automatic or Date).
- External exam name: Which type indicates the name of the exam in Student Management system.
- Special needs assignment: Specify any special needs that the student needs.
- The Boolean format indicates the value yes or no and the String format indicates the special need in plain text.
- Click Save Changes to save the file