How to import Activities into TimeEdit

- In this lesson:
- 1Why Import Activities?
- 21. Create and Download Import Template
- 32. Configure Import Template
- 43. Select Objects and Fields
- 54. Review and Download Template
- 65. Fill and Upload the Import Template
- 76. Manage Multiple Tracks
- 87. Import and Schedule Activities
- 9
- 10
- 11
Why Import Activities?
Importing activities into TimeEdit provides flexibility for institutions that use various systems to collect activity information. Whether the data comes from an internal tool or a third-party application, the ability to import these activities ensures that the Activity Manager can be utilized, either through manual scheduling or the Autopilot feature. During the initial implementation phase, importing activities can be very beneficial. It allows for testing various workflows with real-world data, facilitating a smoother transition without the need for data submission through Preferences. Additionally, as configurations evolve or new functionalities are introduced, the capability to import activities ensures that the scheduling process remains agile and adaptable.
What is Imported?
Imported activities are converted into Activity Series within TimeEdit. Each row in the import file represents an Activity Series, capable of spanning multiple weeks. Currently, the functionality supports activities with predefined weeks and durations, import of exact time activities is not yet supported.
Step-by-Step Guide
1. Create and Download Import Template
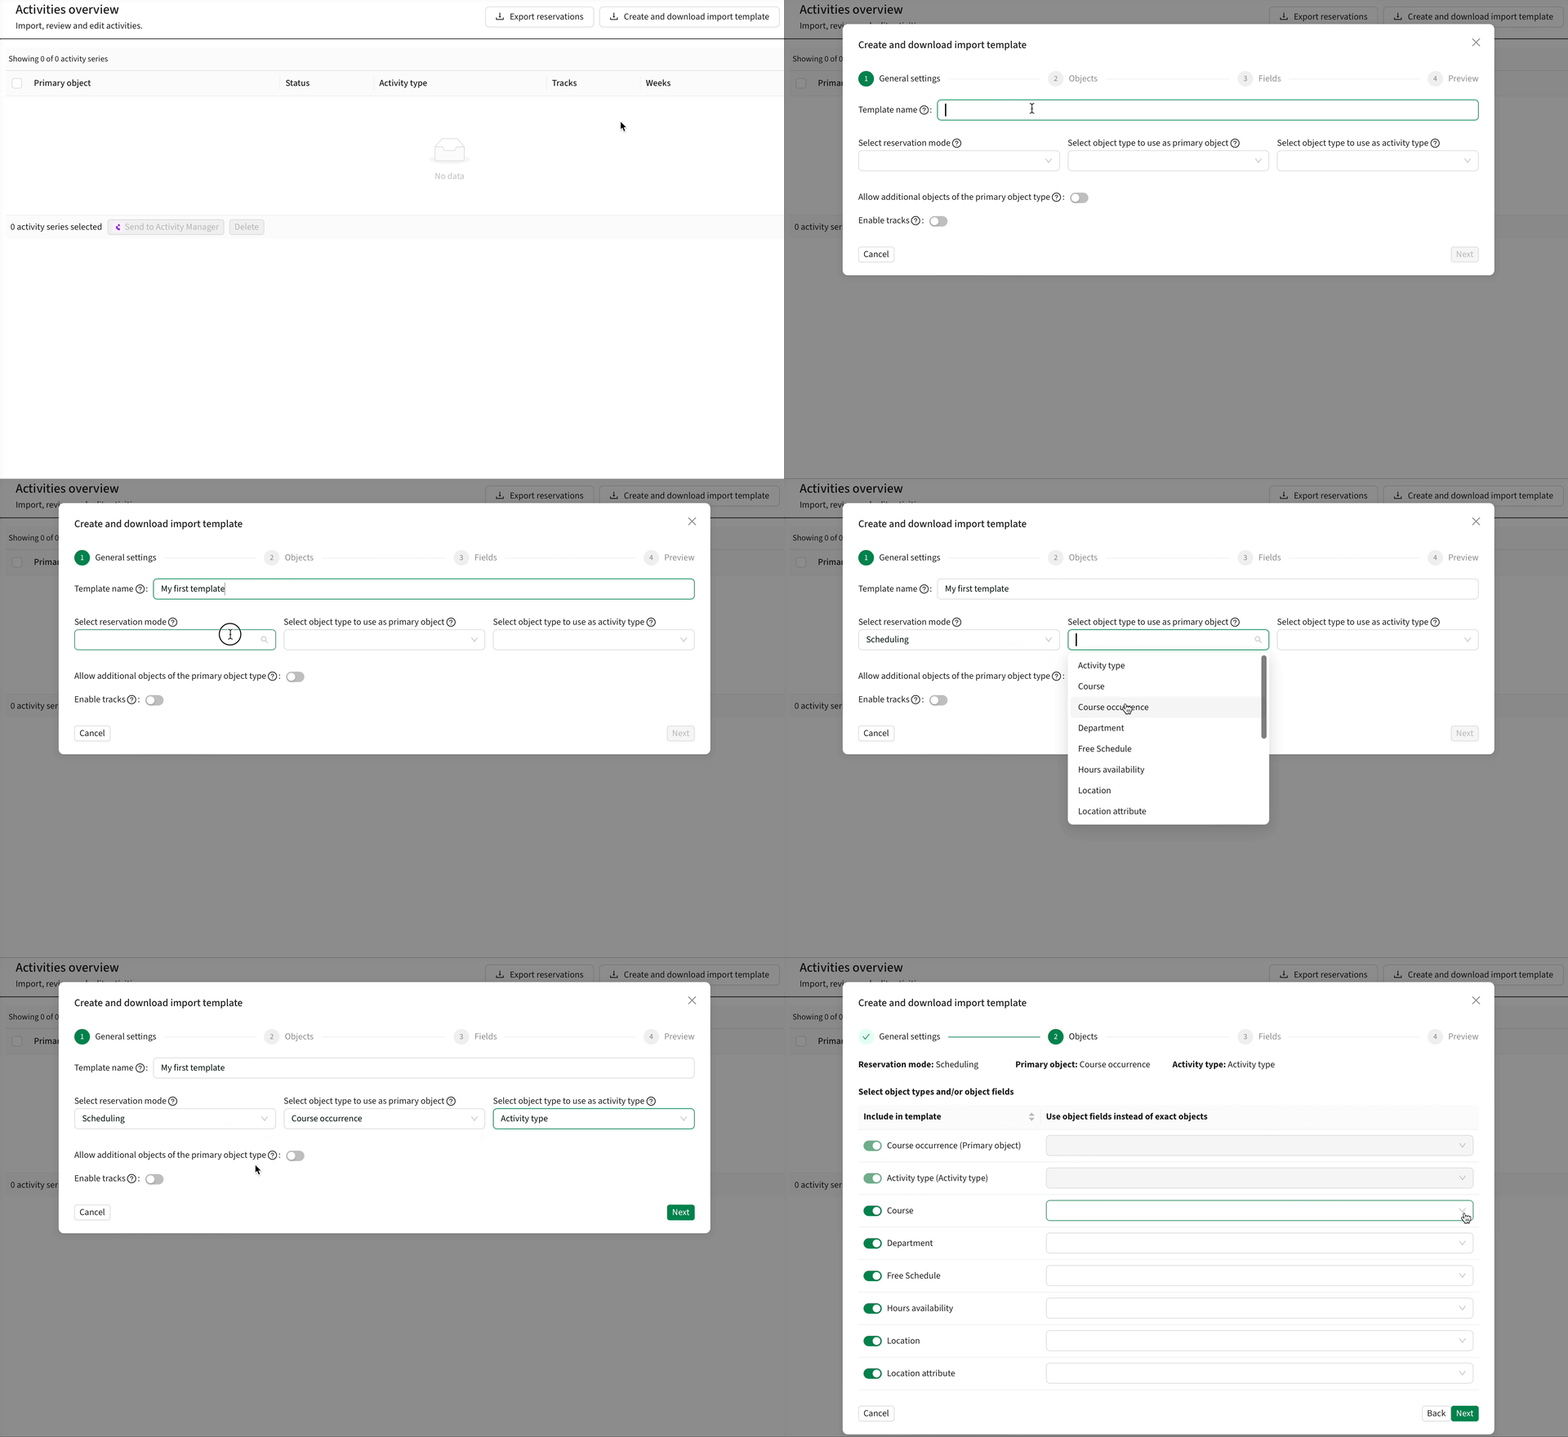
- In Data Manager, navigate to the Activities tab. In order to access this page the user needs the following scopes: "Data Manager: User", "Te Activities: User" and Permission: "Te Activities: readReservationTemplates".
- Click "Create and download import template." This generates an Activity Template used for importing and allows you to download a template file to fill with activity data or use as a reference.
2. Configure Import Template
- Name Your Template: Assign a name to your Import Template for easy identification when uploading Activity Files. This name will also appear in the Activity Manager as the name of the “form” for the imported activities.
- Select Reservation Mode: Choose the appropriate Reservation Mode for scheduling the imported activities. This determines the available Object Types and Fields for upload.
- Define Primary Object Type: Select the Primary Object Type (e.g., Course Instance, Course Offering, or Subject Instance)
- Define Activity Object Type: Select the Activity Type, i.e the type that contains objects for Lectures, Seminars, Workshops etc. This can either be generic objects or specific to the Primary Objects.
- Allow additional objects of the primary object type: If selected, an additional column will be added to the Import Template. This column can be used to add additional objects of the same type as the Primary Object. This is useful if you have shared activities between mulitple Courses. (Jointly Taught)
- Enable/Disable Tracks: Choose whether to enable Tracks for the imported activities. Enabling this allows uploading Activity Series with multiple Tracks, which includes a special column called Tracks Id for grouping rows into the same Activity Series.

3. Select Objects and Fields
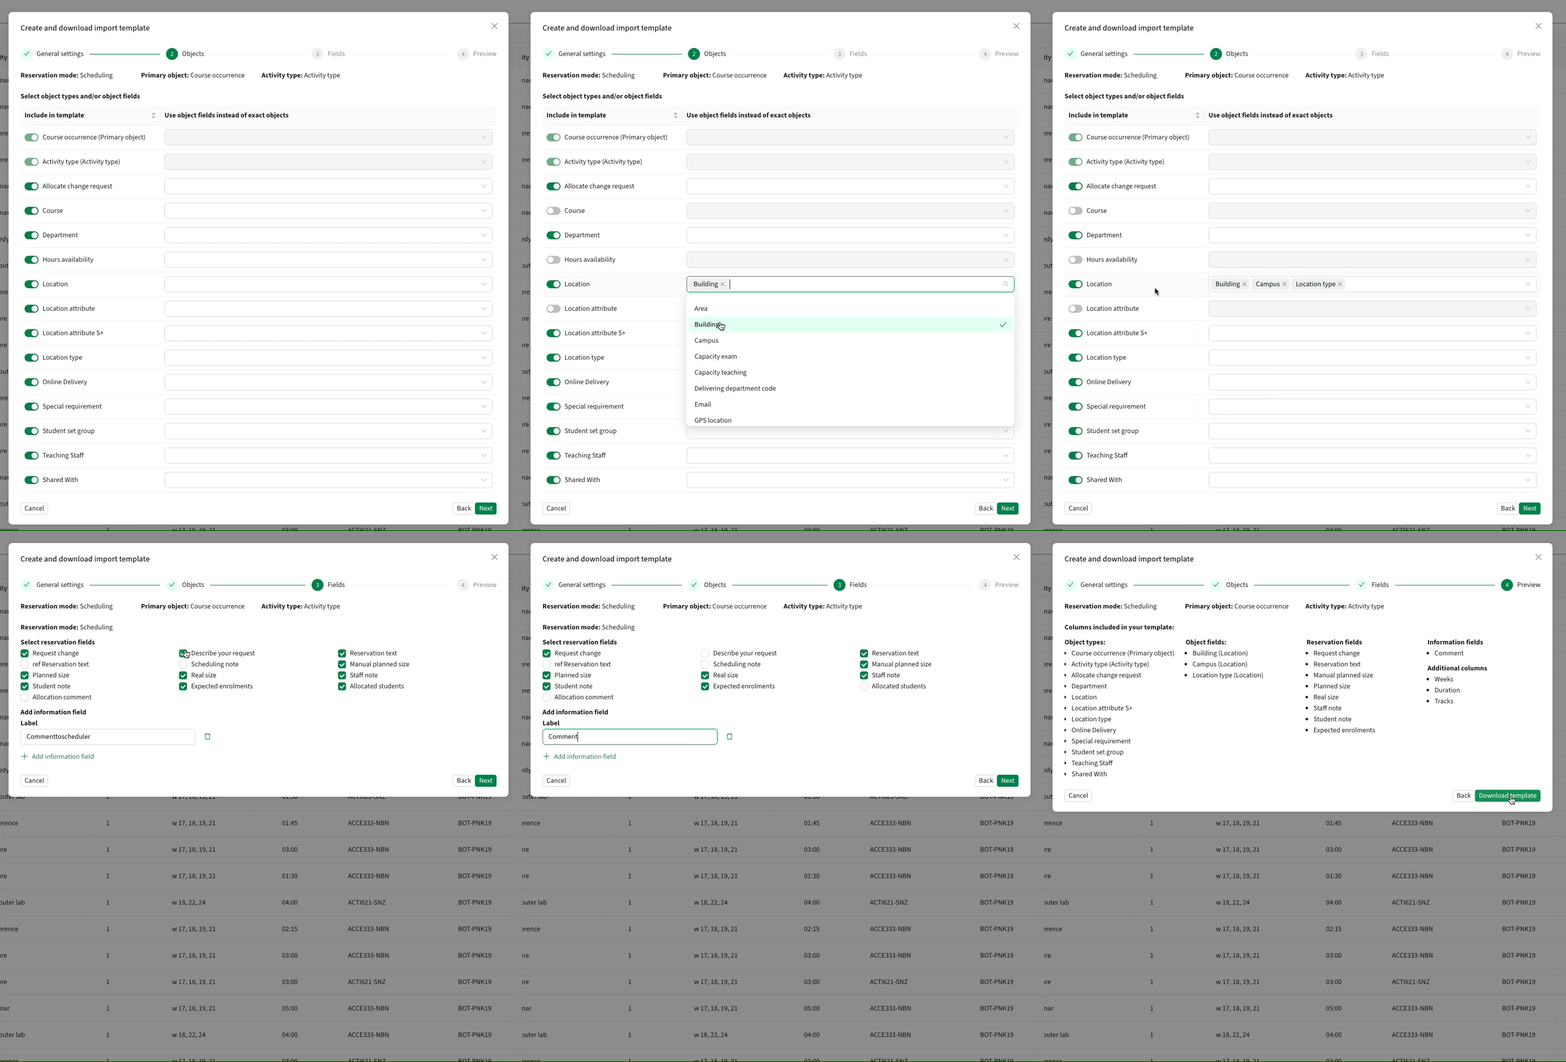
- Object Types: Choose what type of objects to add to the activities. Even if the actual objects are not available during import, they can be added later in the Activity Manager, but the type needs to be a part of the template.
- Object Fields: Object fields can be imported instead of the actual objects and be used as filters during data preparation or scheduling, such as Room preferences (Room Type, Equipment). Select the object fields in the dropdown next to the object type.
- Reservation fields: Select the reservation fields to be imported. All fields present on the selected Reservation Mode can be included, and additional Information Fields not on the Reservation Mode can also be added for scheduler reference.

4. Review and Download Template
- Review the selected Object Types and Fields. Click "Download Template" to obtain an empty Import Template.
5. Fill and Upload the Import Template
- Populate the template with activity data, ensuring the format adheres to the required structure. The first four rows of the import file must remain unchanged, while the column order is flexible. The file must be a Comma Separated Values file, or CSV. The easiest way to ensure this is with Excel or Google Sheets, and Save or Export as CSV.
Required Data Structure:
- Primary Object: Each row must contain a Primary Object entered as ext.id, and only single objects are allowed.
- Weeks: The expected format for weeks is YYWW. For example, week 1 in 2025 should be entered as 2501. Multiple weeks should be separated by the pipe “|” symbol.
- Duration: The expected format for duration is HH:MM. For instance, 2 hours and 30 minutes should be entered as 02:30. Only single durations are allowed.
- Objects: Objects of any type must be added with an ext.id matching an existing object in the organization. Multiple objects can be added to the same activity using the pipe “|” symbol as a separator.
- Object Fields: Each object field is presented in a separate column. Multiple field values can be added using the pipe “|” symbol as a separator. The filter settings in the second header row determine whether the filters should match "all" or "any" of the field values. This setting applies to the entire column.

6. Manage Multiple Tracks
- If Tracks are enabled, use the Tracks ID column to group multiple rows into the same Activity Series, creating one track per row. Each track should be in separate rows, even if they are identical.
- Any rows with the same Primary Object, Activity Type and Tracks ID will be grouped together into the same Activity Series. This means that the Tracks ID only needs to be unique for the same Primary Object and Activity Type.
- As can be seen in the above example, it is possible to import activities with different weeks for different tracks. Also, the duration can be different.
7. Import and Schedule Activities
- After filling the template, upload it to Data Manager. The imported activities will be validated and then appear in the Activities Overview page and can be sent to the Activity Manager for further processing and scheduling.
- To send activities to Activity Manager, select the desired Activity Series and click "Send to Activity Manager." The activities will then be available under the Forms list with the same name as the Import Template. To send activities back to Data Manager, select the appropriate Activity Series in Activity Manager and click "Send back to Data Manager." Ensure activities are unscheduled before sending them back.


