Student Allocation in TE Exam
.png)
- In this lesson:
- 1The structure and rules
- 2Simple Allocation
- 3Student standard allocation
- 4Student registration
- 5Special needs
- 6Allocation
- 7Allocation for single exam
- 8Allocation in different rooms
- 9Allocation with applied seating range
- 10Seating range in different rooms
- 11
The structure and rules
The rule structure below is based on that there are students registered to an exam and there is a hierachy in rules from start to bottom.
Basically that means that Rule 1 is always the fallback, then 2 and so on.
Basic rule for capacity for allocation: The allocation of students in a room is limited by the room's capacity, which is defined as a seating range. For example, a room with 30 seats can allocate 30 students from seat 1 to seat 30, regardless of the number of exams scheduled
Dynamic seating range: Seating range is not defined in advance but is determined during the allocation of each individual exam and student. Basic rule 1 applies to each student and their allocated seat. This means that the seating range can vary for each exam.
- Initially shows as "Seat Range: UNKNOWN."
- Determined after students are assigned to the room, based on their seating numbers in both continuous and non-continuous slots.
Fixed seats: Once a student has been allocated to a room, they are assigned a specific seat that does not change. For example, a student may be allocated to Exam B, Room Y, seat 2, and their seat remains unchanged until exam is planned.
De-allocation and reuse of seats: If a student is de-allocated from their seat, the specific seat is released and becomes available for allocation to other scheduled exams in the same room. For example, if a student previously allocated to Exam B, Room Y, seat 2 is de-allocated, a student from Exam A may later be allocated to seat 2 in Room Y.
Allocation based on chronological order: Students are allocated based on the selected allocation sorting and their creation date. For example, if Exam A has 10 students to be allocated, these 10 students are allocated to their seats according to the selected allocation sort and occupy 10 seats in the specific room (which may be something within the seating range, for example seat 1-30).
Exceeding Planned Students: Upon allocation, more students may be allocated to an exam in a room than originally planned. This makes it possible to handle more students in the room, provided there is enough capacity. The statistics should then show the actual number of allocated places for the room and that more students have been allocated than planned. For example, if Exam A originally had 10 students planned but registers and allocates 12 students, Exam A will take up 12 seats in the room, but the statistics will show that 2 more students have been registered and allocated than planned.
Simple Allocation
Simple allocation is a method of assigning a certain number of seats to a room during a scheduled exam, rather than specific students.
This approach aids in monitoring student attendance when managing allocation elsewhere than TE Exam. Instead of specifying registered students individually, users input the total number of students and then distribute these across the rooms where the exam is scheduled.
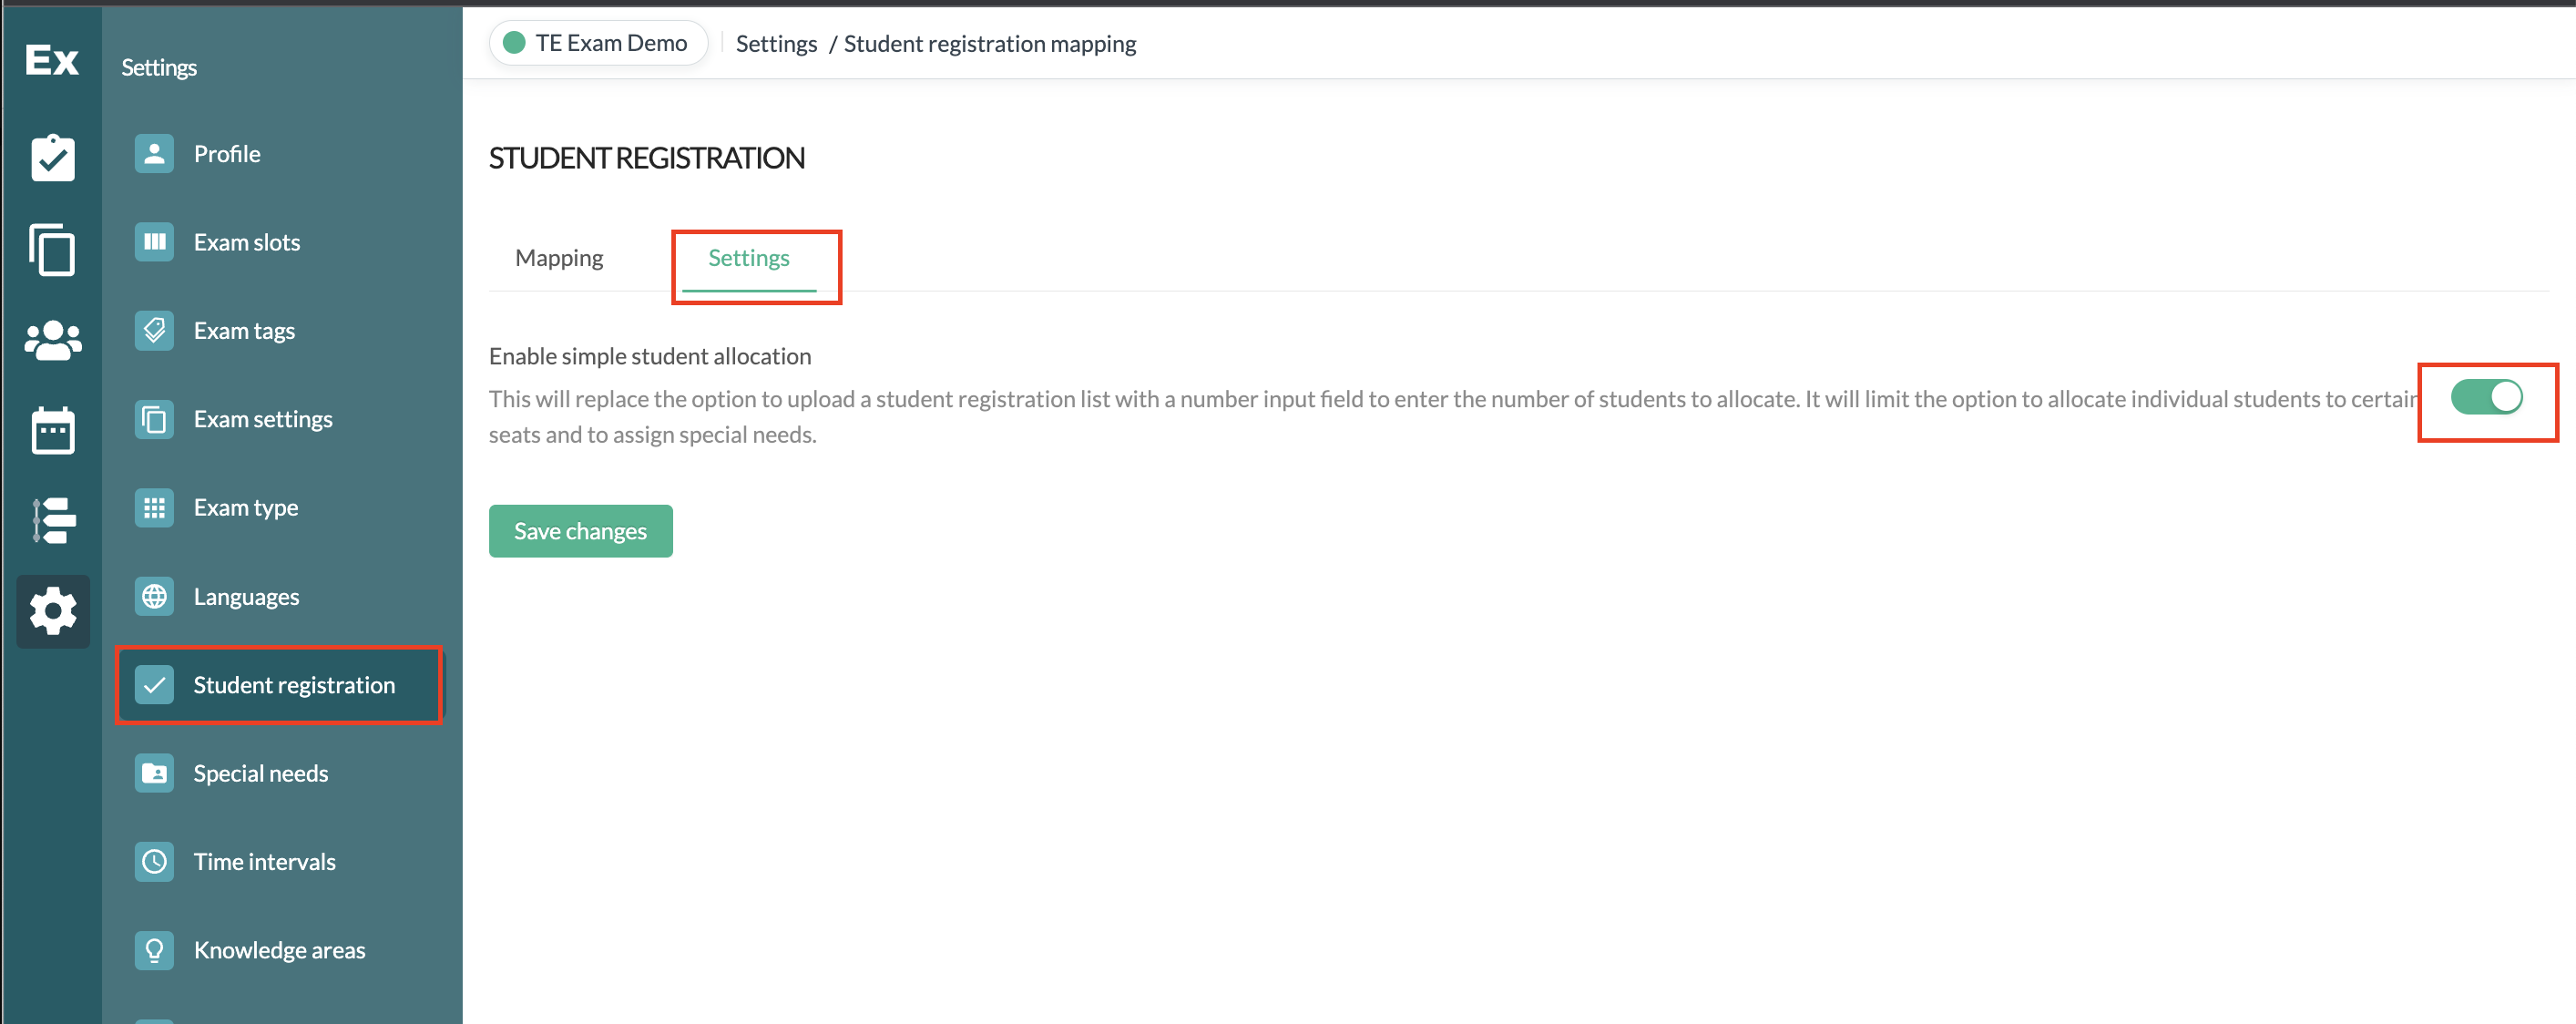
To use this feature, navigate to the student registration settings and toggle on the option for simple allocation.
In a scheduled exam, on the exam detail page, users can access the student seat allocation section and input the following information:
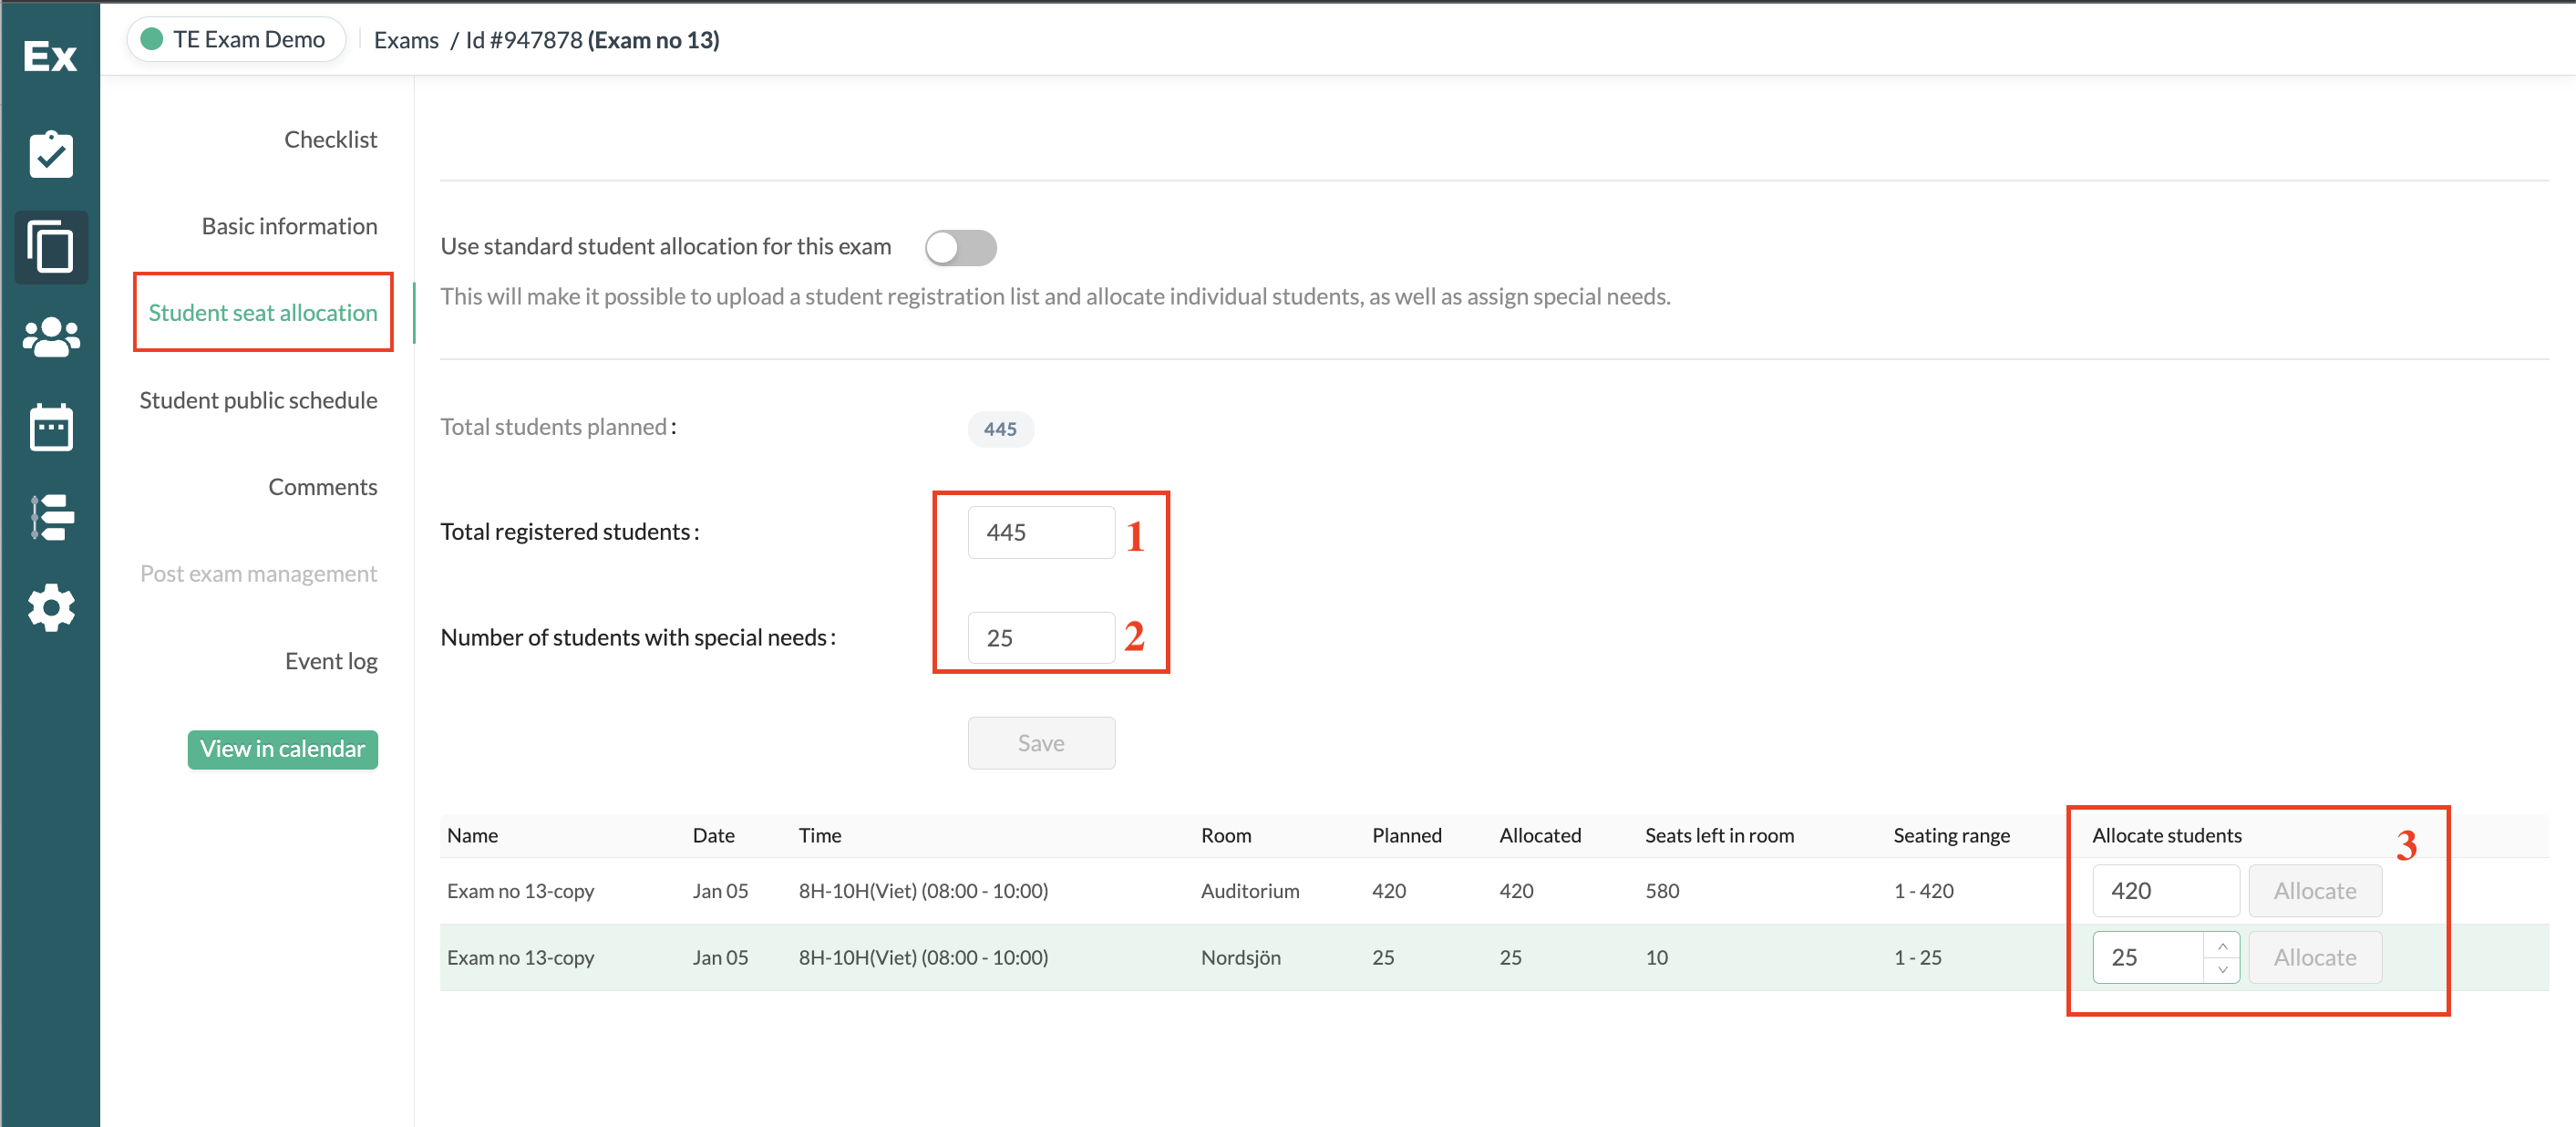
- Total number of registered students for the exam.
- Number of students with special needs.
- Distribute these numbers across the rooms where the exam is scheduled.
Student standard allocation
Standard allocation is used to assign specific seats to students in an examination room during a scheduled exam. It consists of various components, each of which will be described individually below:
- Student Registration: This involves enrolling students for the exam.
- Specifying Students' Special Needs: Users have the option to indicate any special requirements or accommodations needed by certain students.
- Allocation of Students in Rooms: The process involves assigning students to specific seats within the examination rooms.
To enable standard allocation, ensure that the toggle in student registration setting is set to off.

In a pending exam request, initially, only the view for simple allocation is visible on the exam detail page.
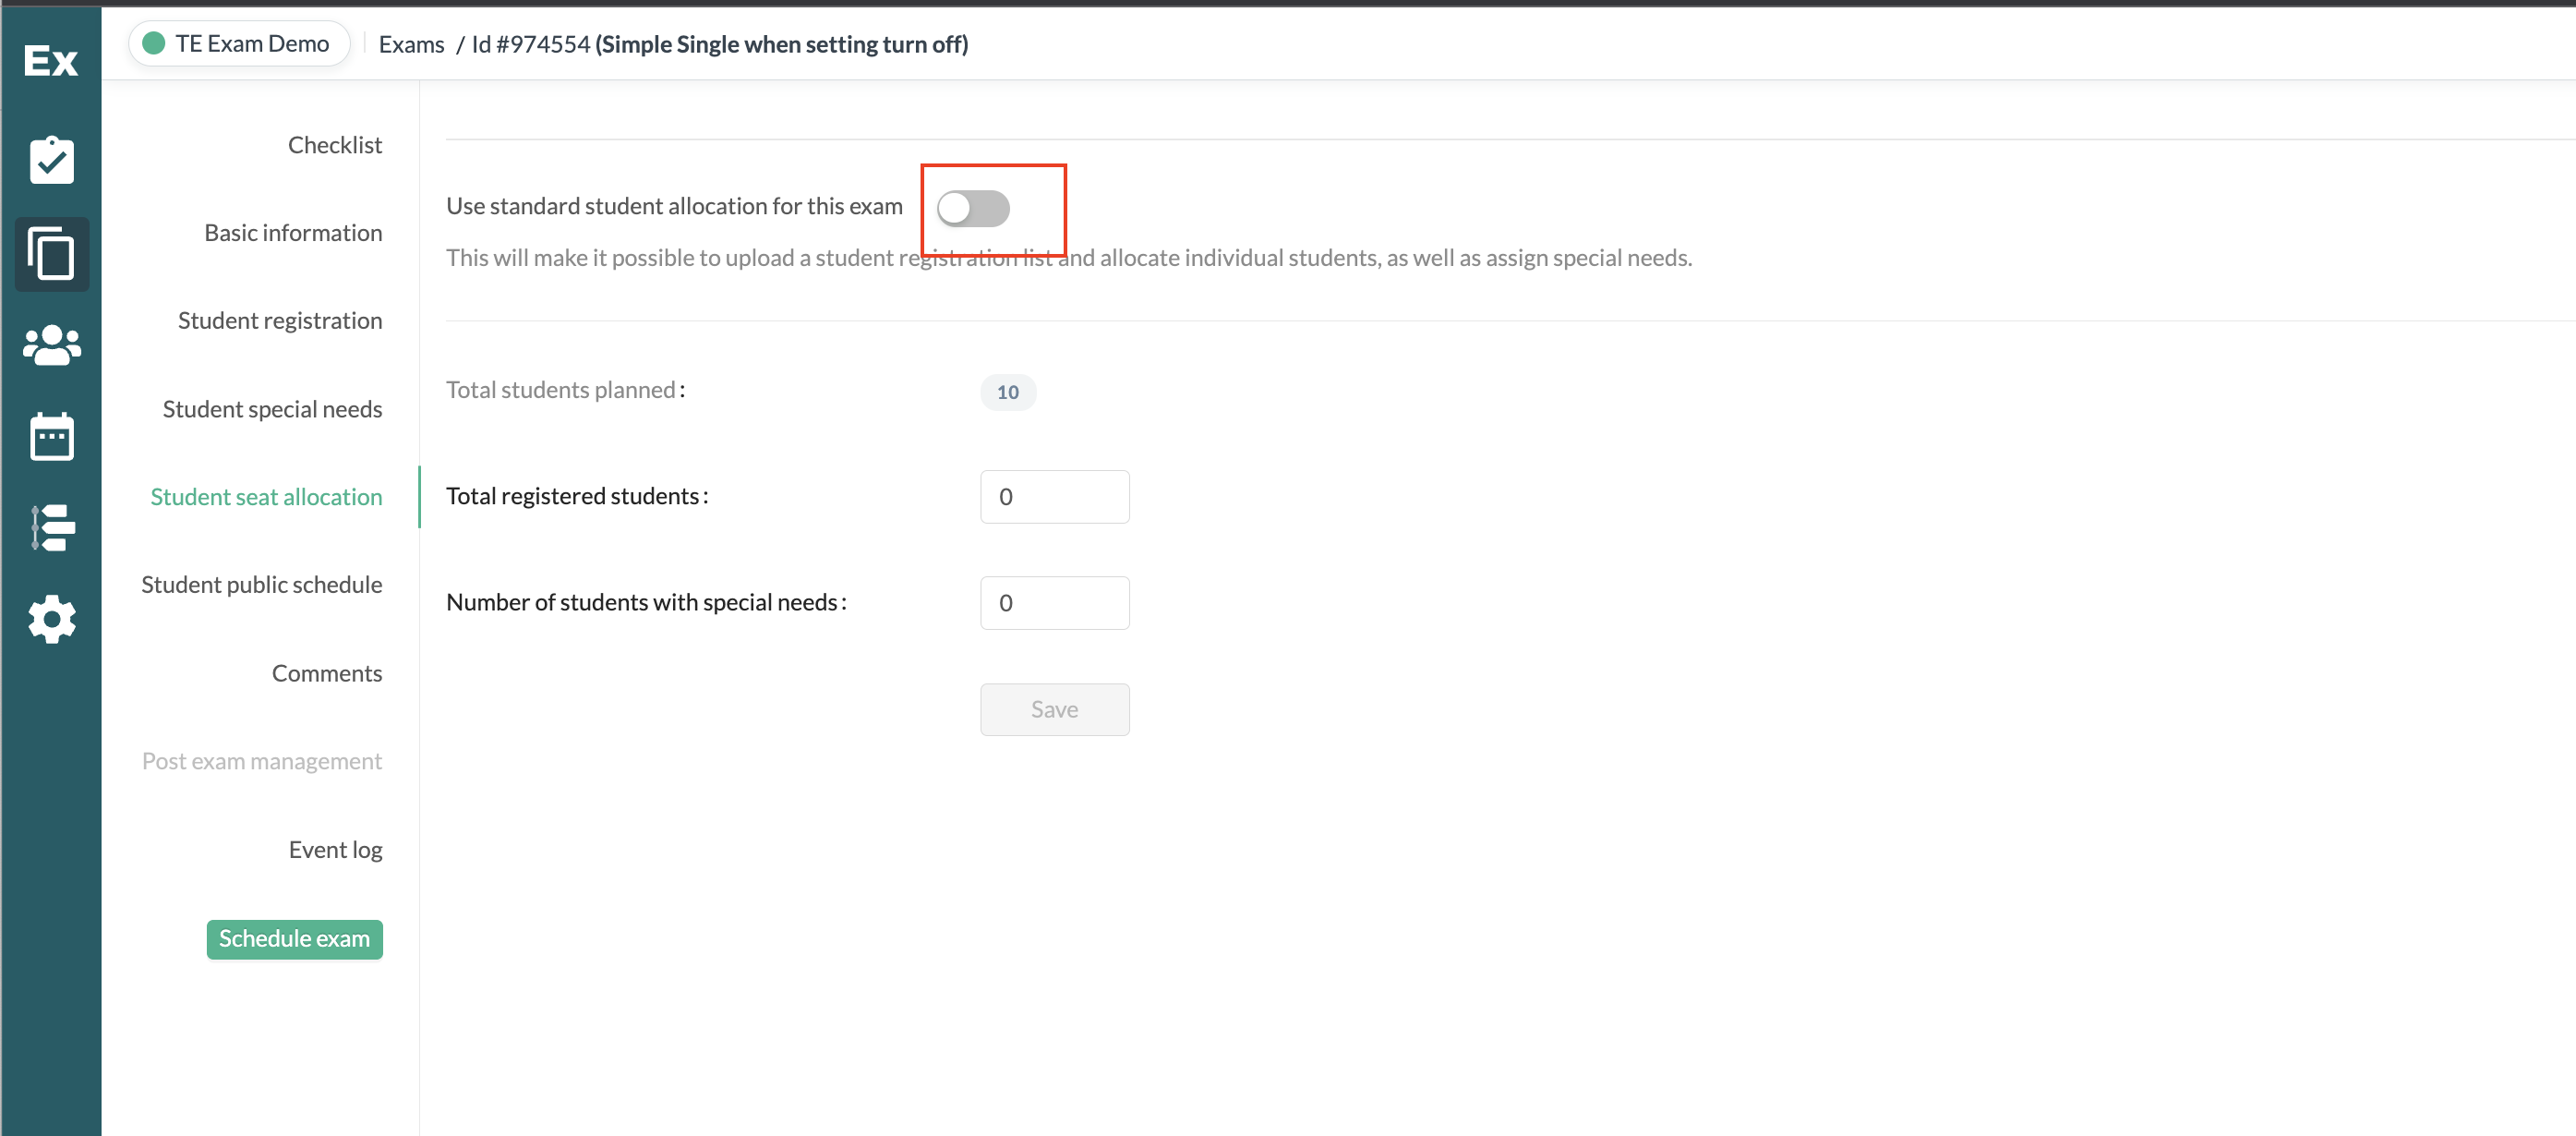
Users can then activate the toggle for standard allocation to access this feature.

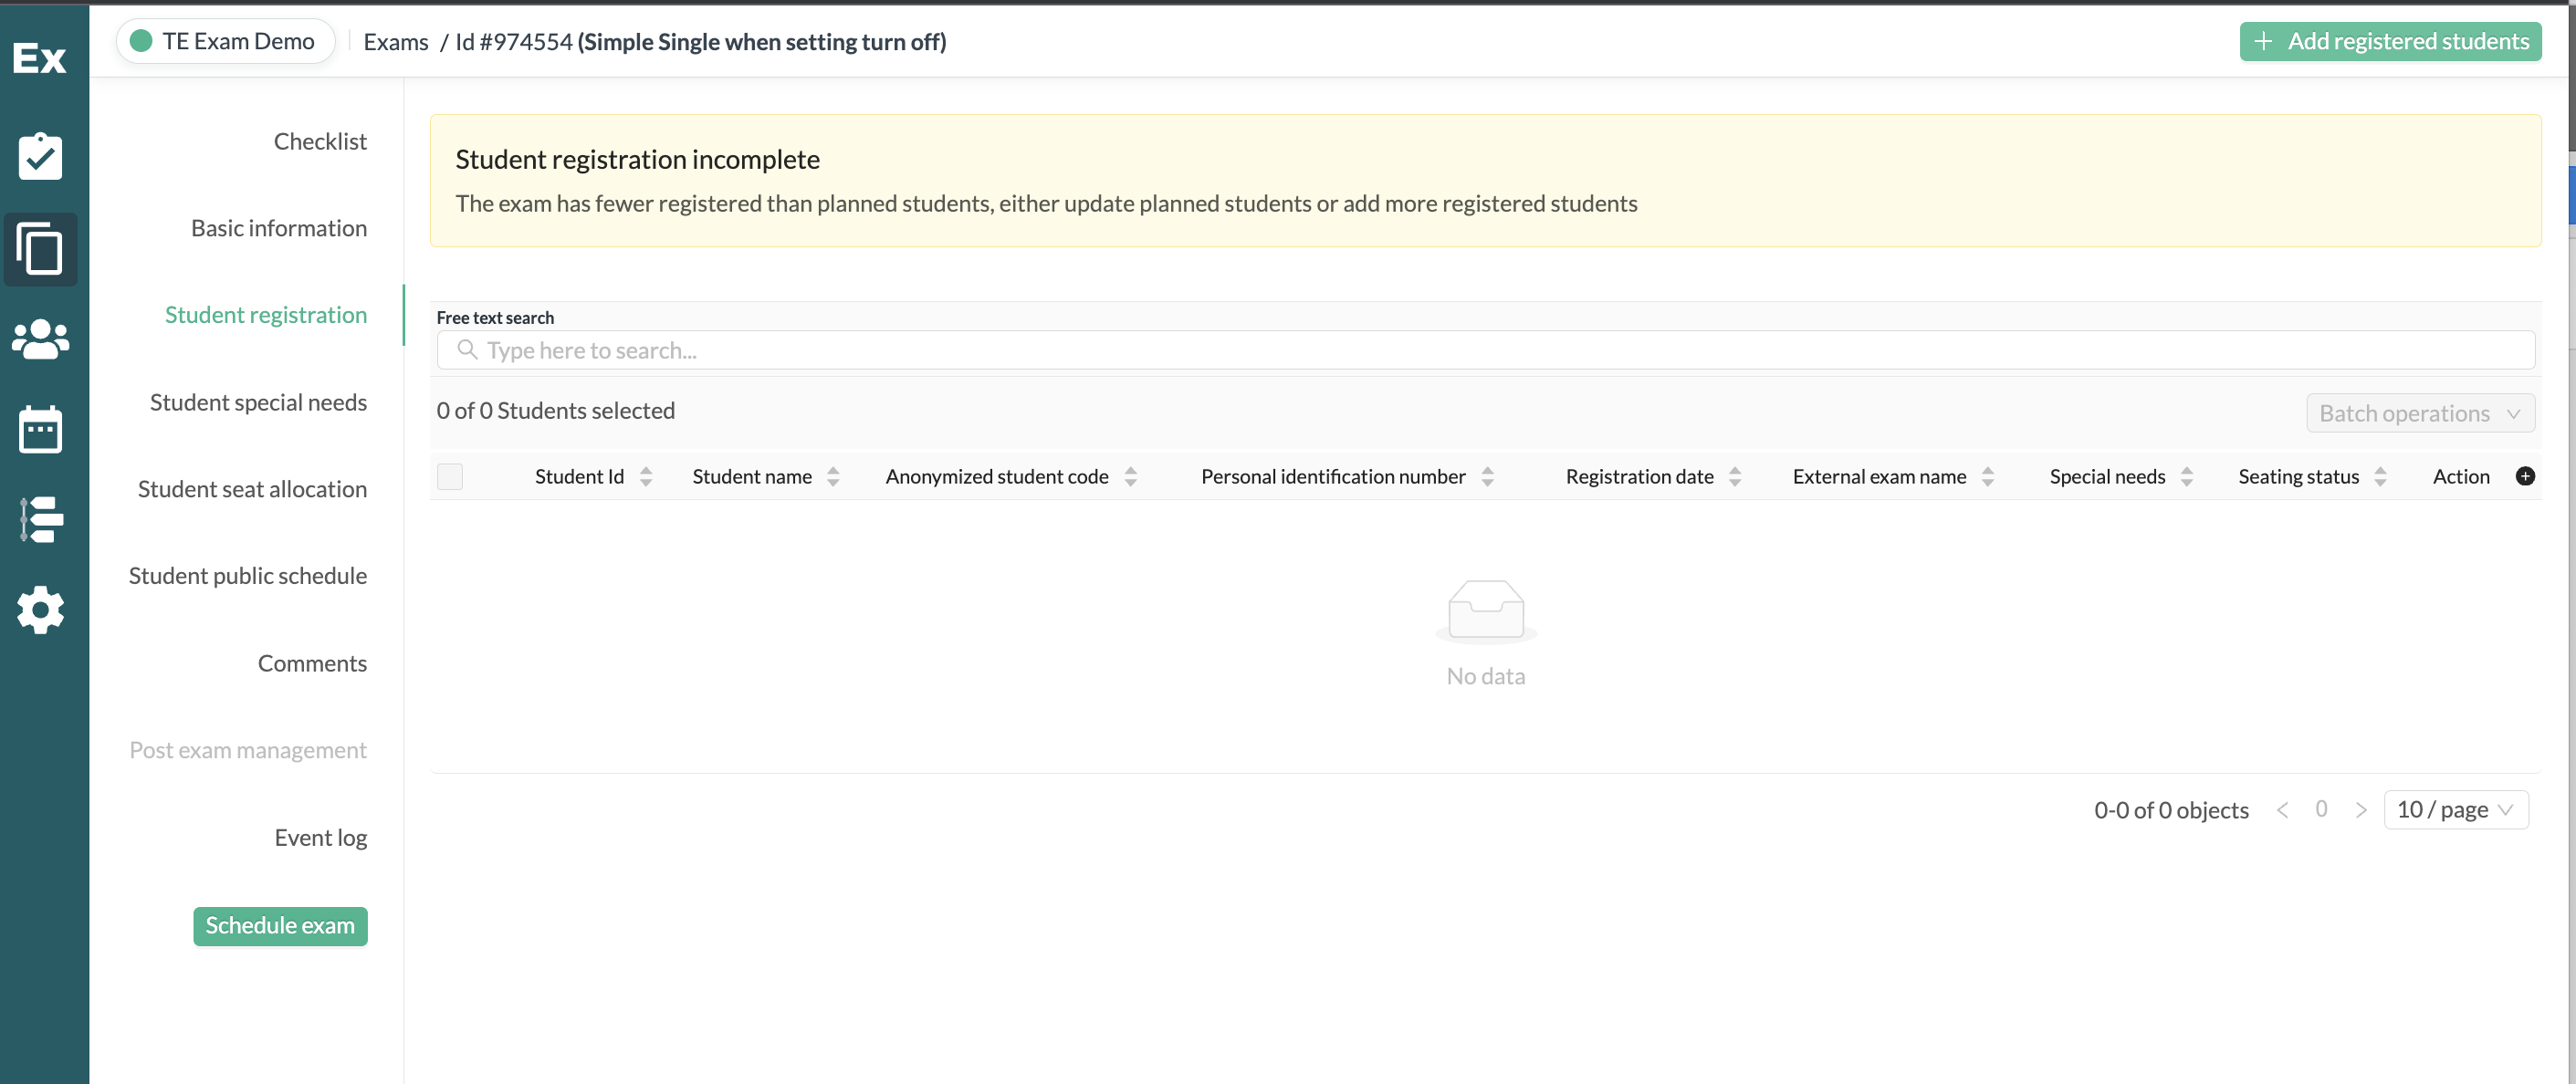
Student registration
To import registered students, you need an Excel file that the customer takes out of Student Management System. The Excel file contains columns with the values needed to import the students Read more here (TBD)
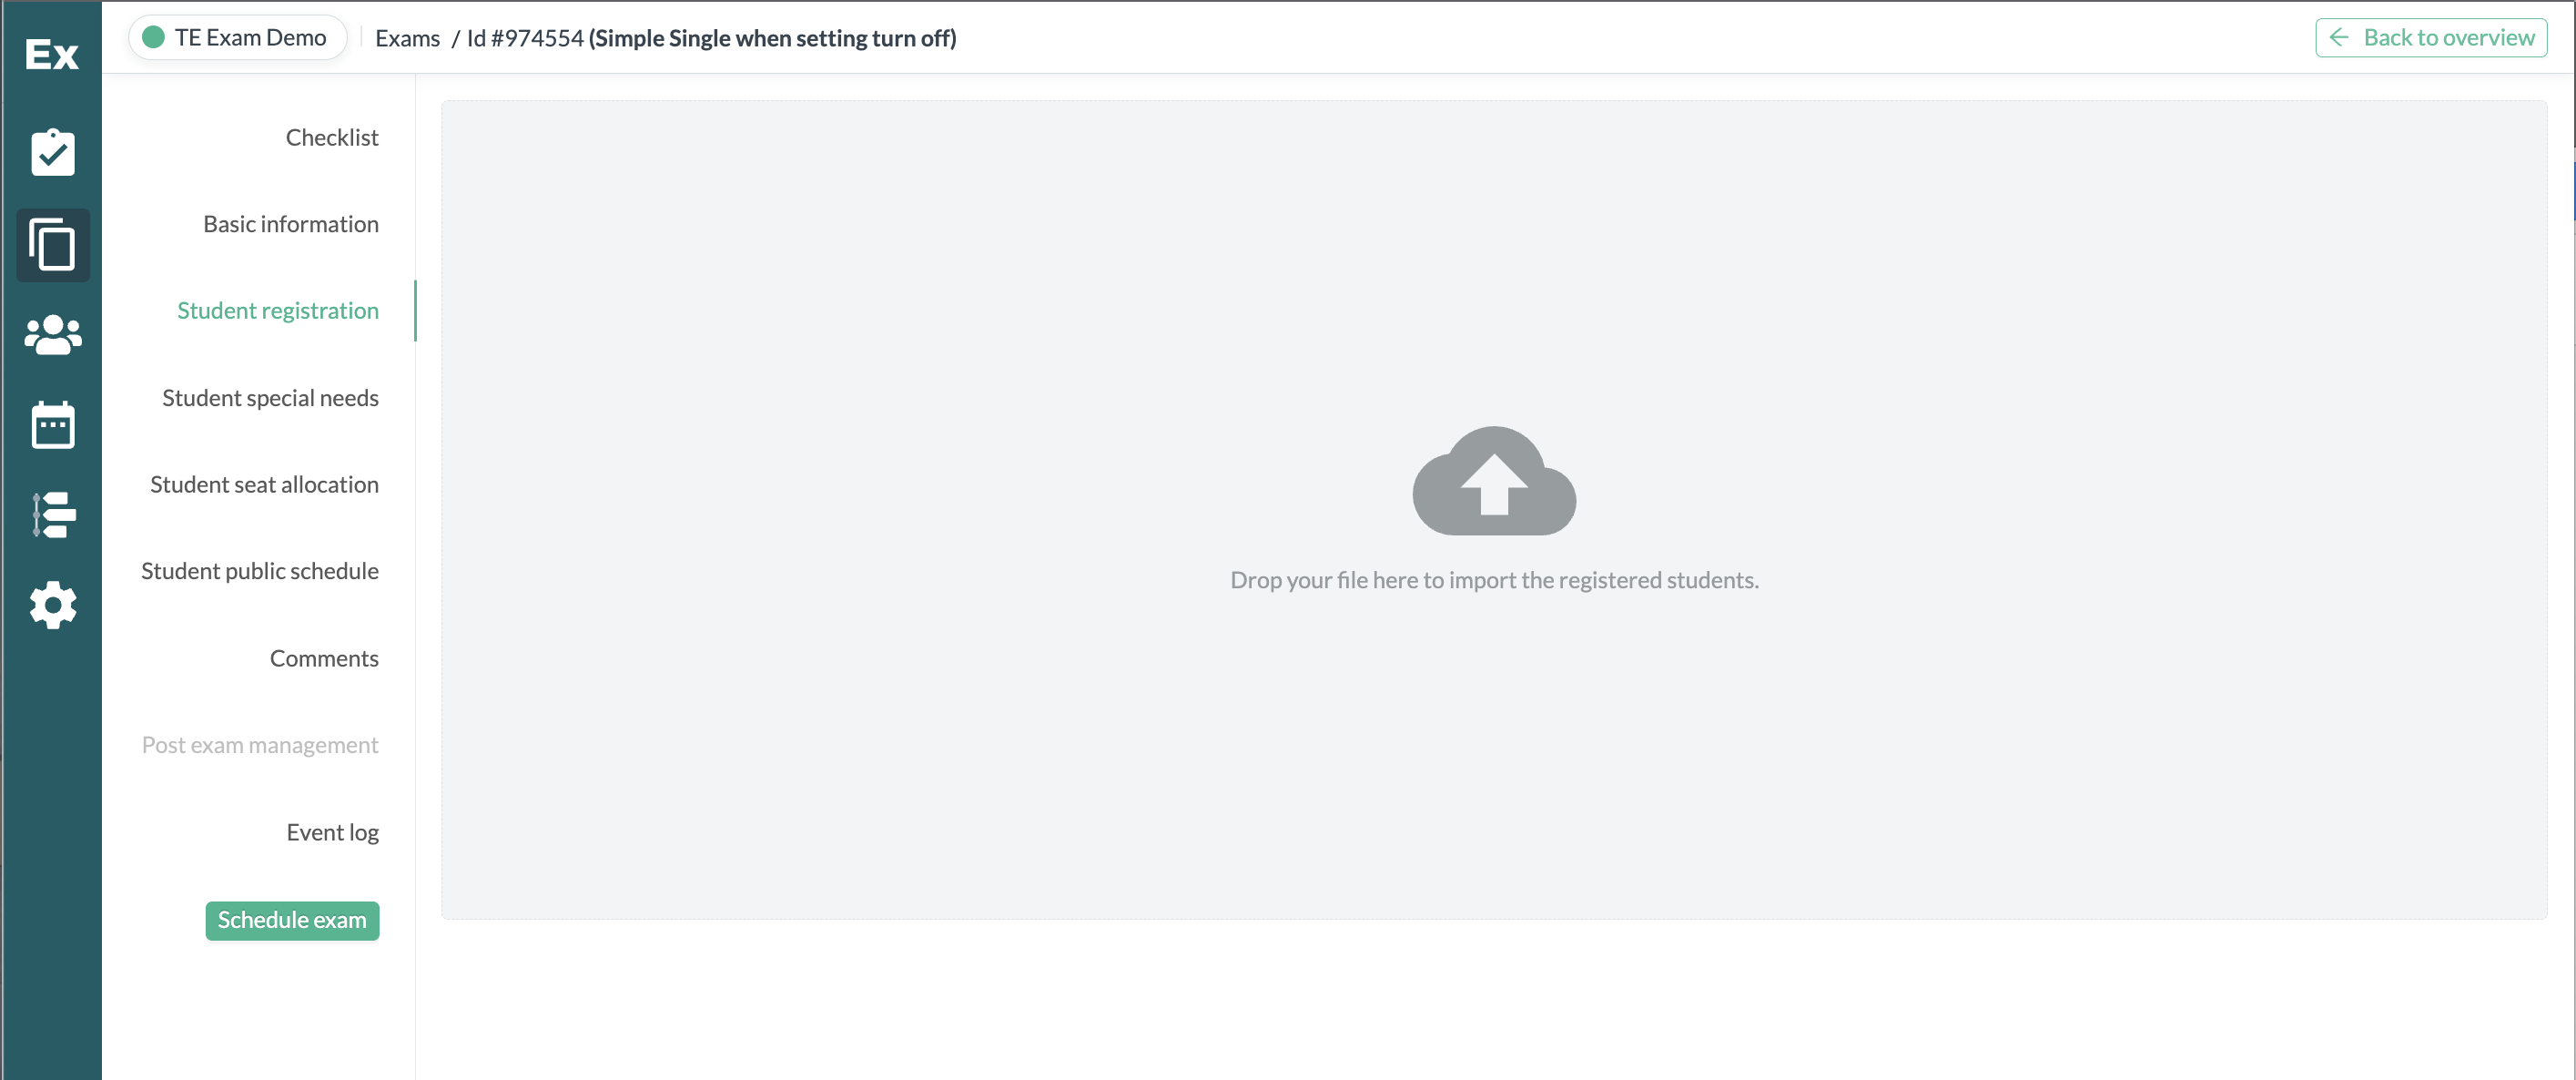
To register students in TE Exam, click on the 'Import Students' icon located at the top right corner. Once on the page, you can easily drag and drop the file you wish to import for the specific exam.
Initially, you'll be presented with a view of the matched students from the file. If you have specified special needs that exactly match the settings in TE Exam, those requirements will be imported. Special needs that do not have an exact match will also be imported, with an indication that they are not currently specified in TE Exam settings.

After reviewing and ensuring satisfaction with the values in the import file, proceed to press the 'Import Registered Students' button."
Special needs
After importing registered students, you can assign special needs. All special needs must be pre-defined under Settings → Special Needs.
To assign special needs to students, navigate to Exams → Scheduled Exams and locate the specific exam where you want to apply these requirements.
If special needs were included in the import file with an exact match, they will be automatically applied in the 'Assigned Special Needs' column.
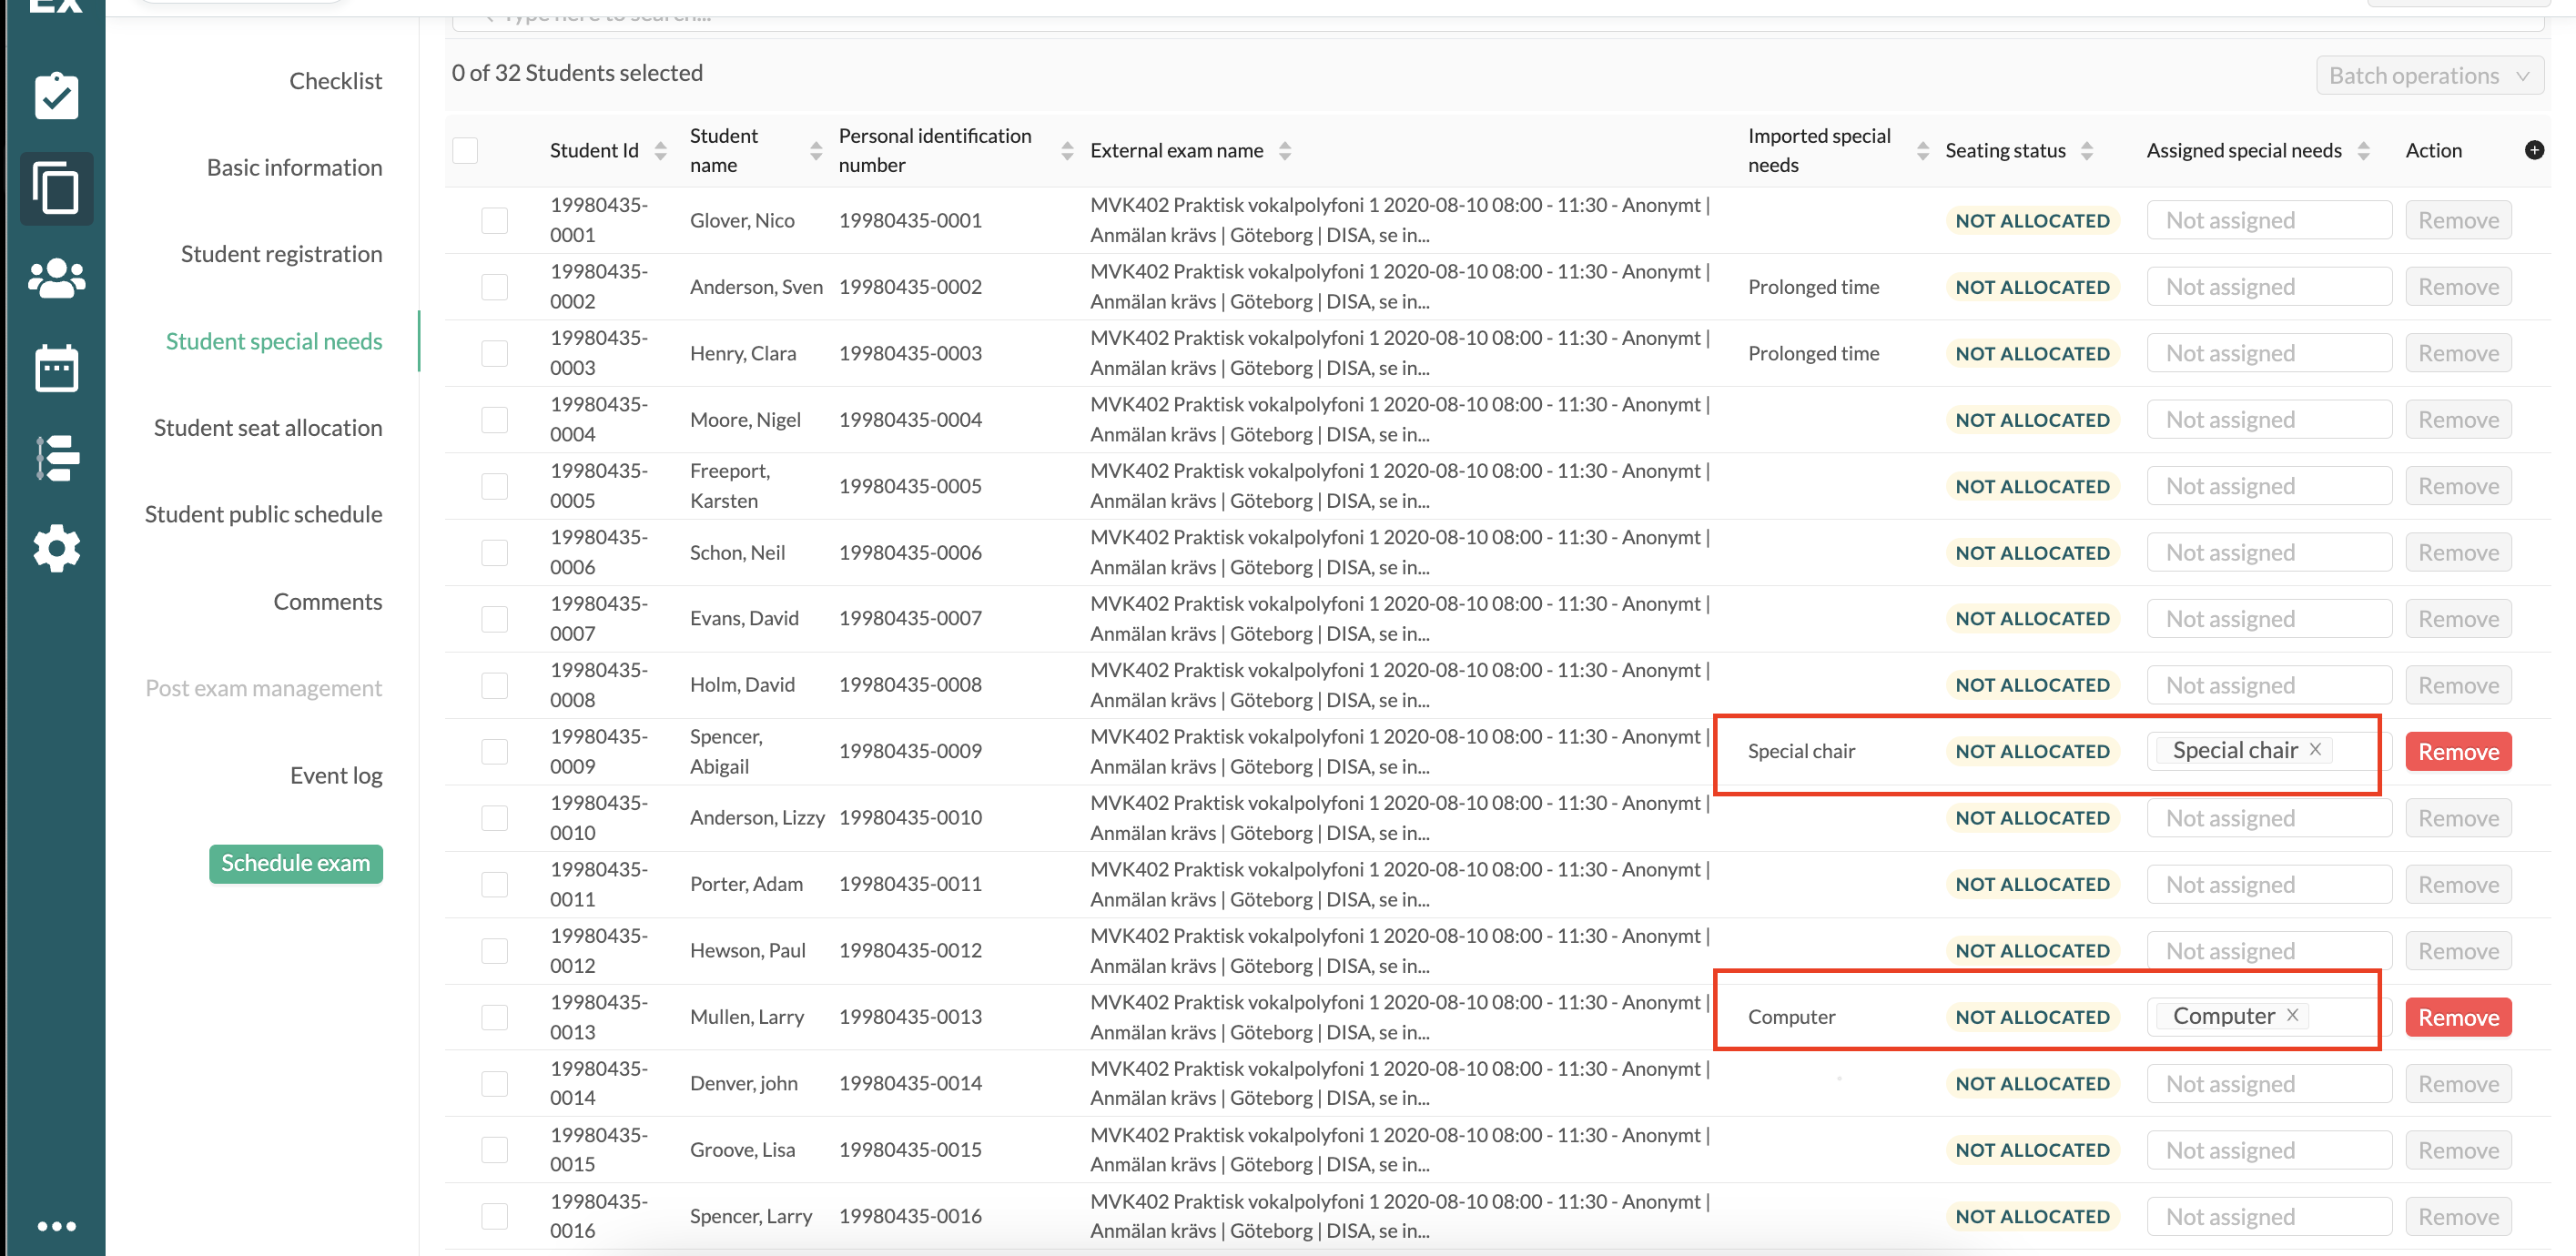
For those not precisely matched or not included in the import file, manual assignment is required for each student in the 'Assigned Special Needs' column. Simply click on the respective row and add from the dropdown list.

It's possible to assign multiple special needs to a single student, whether imported or not.
Don't forget to save your changes when you're done.
Allocation
When using standard allocation, there are two ways to allocate students, with the simplest being allocation of single exams where they are scheduled.
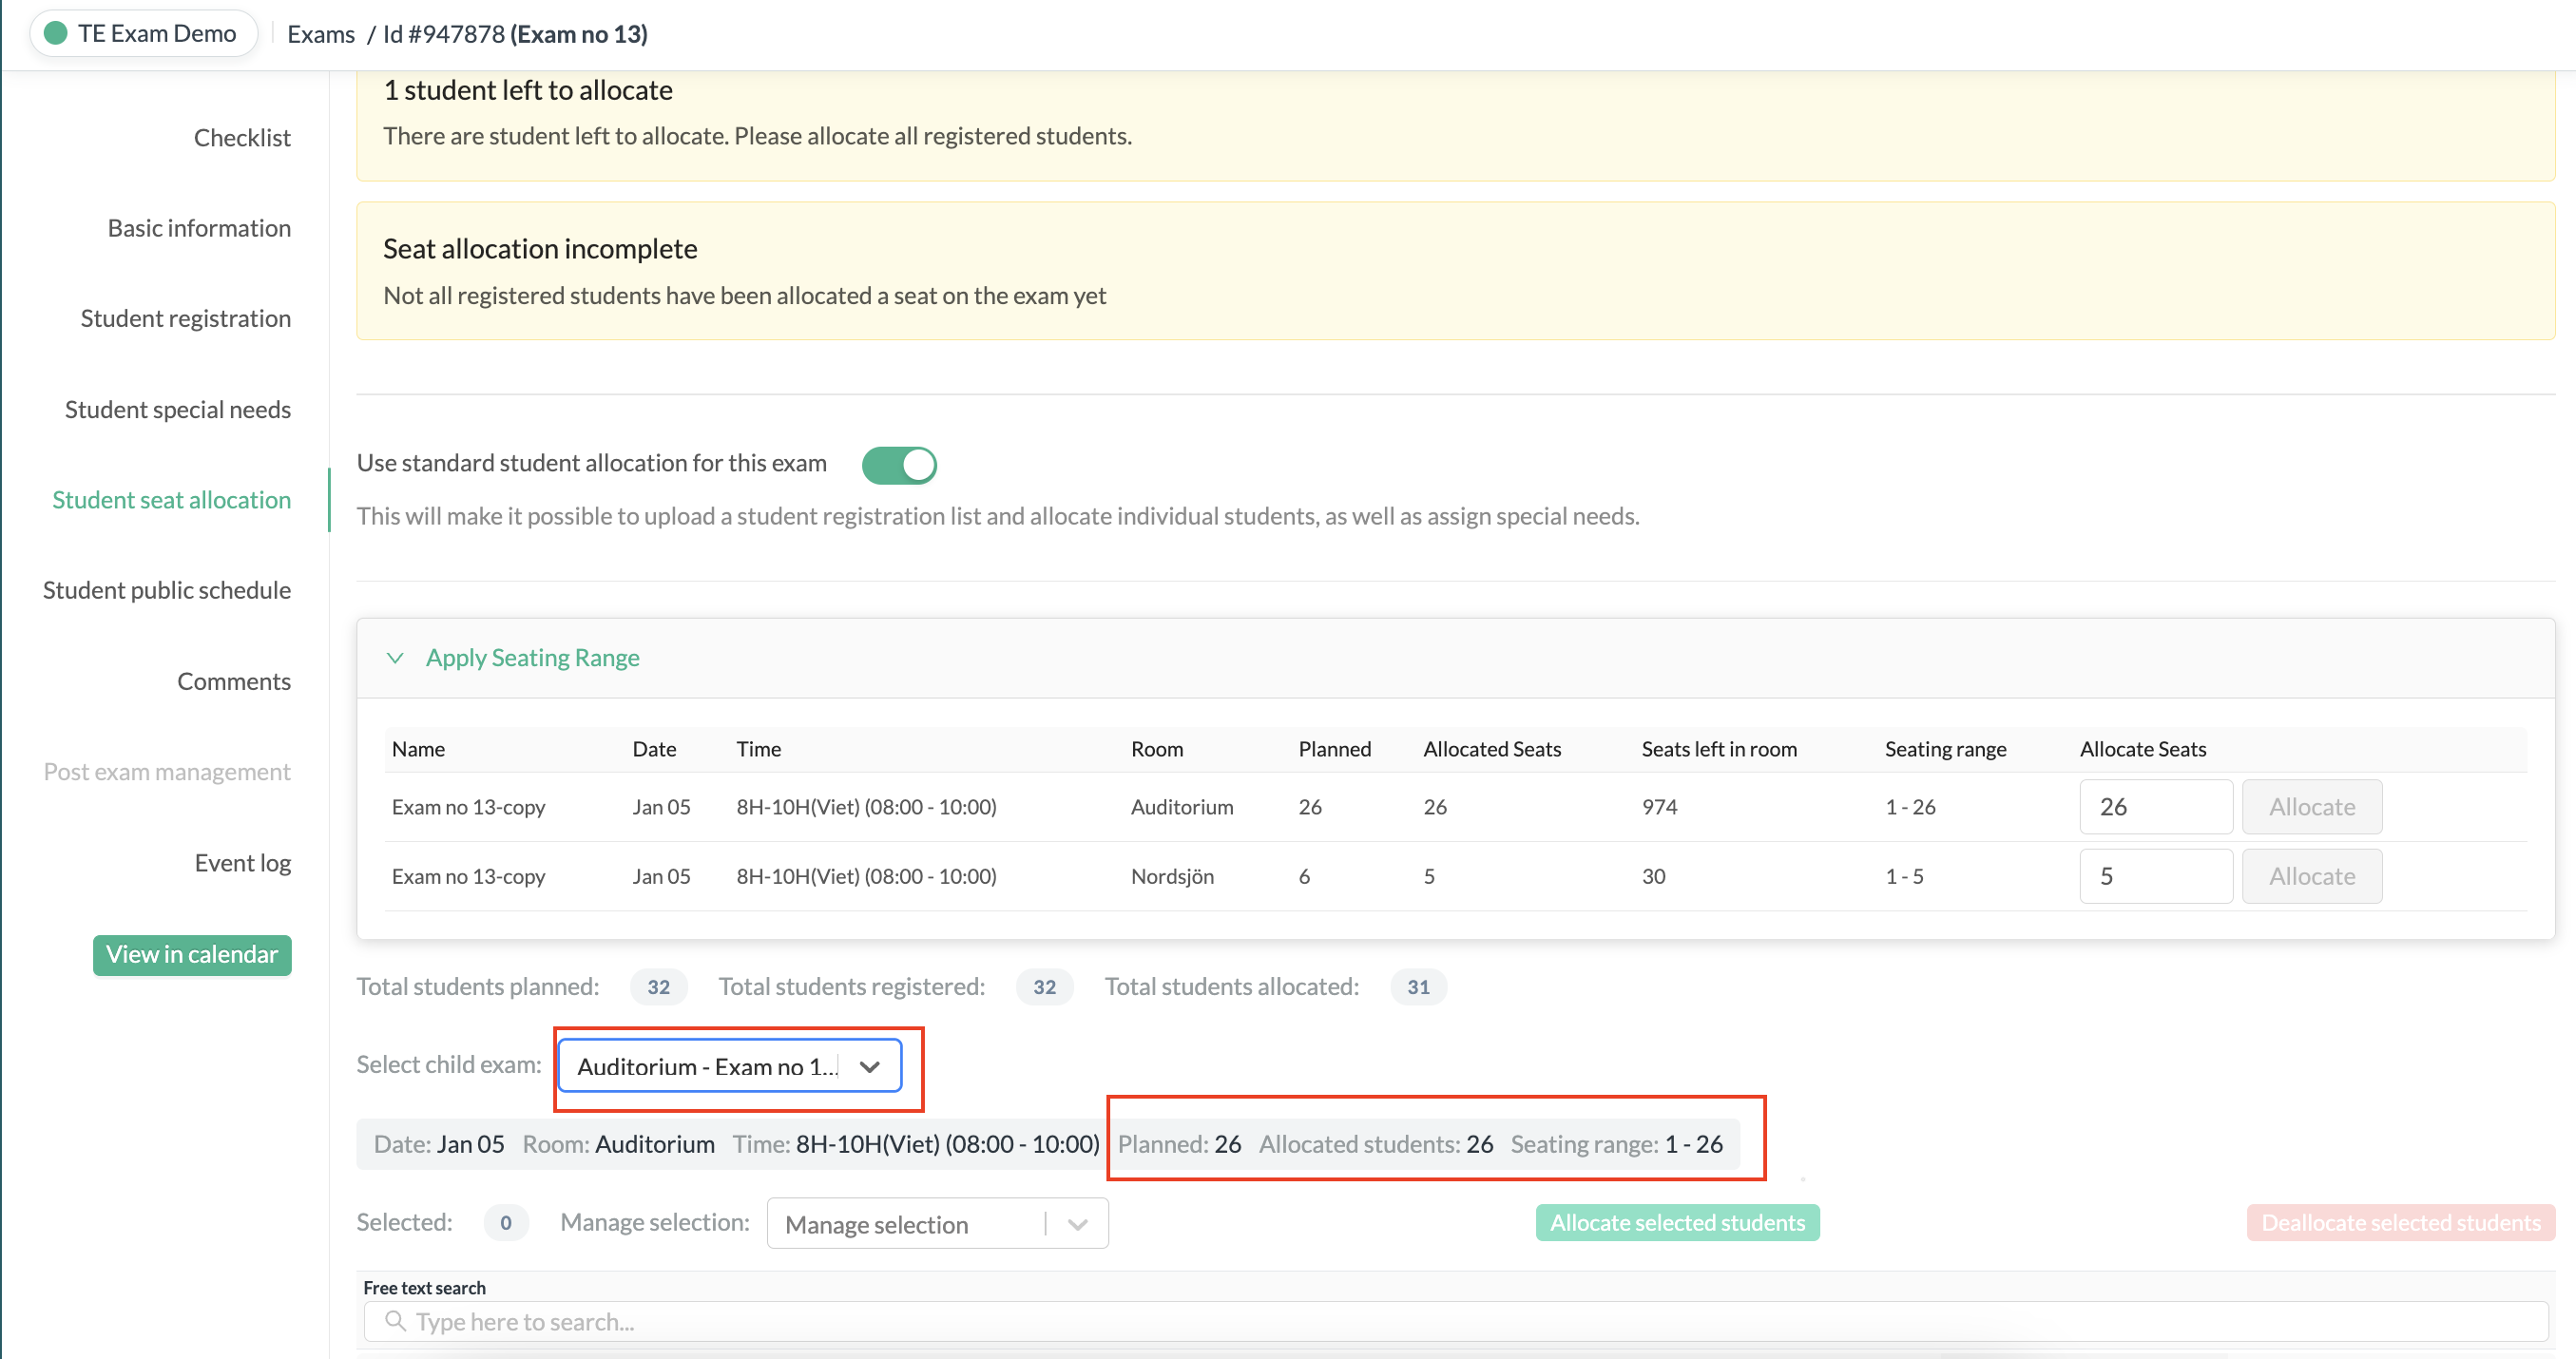
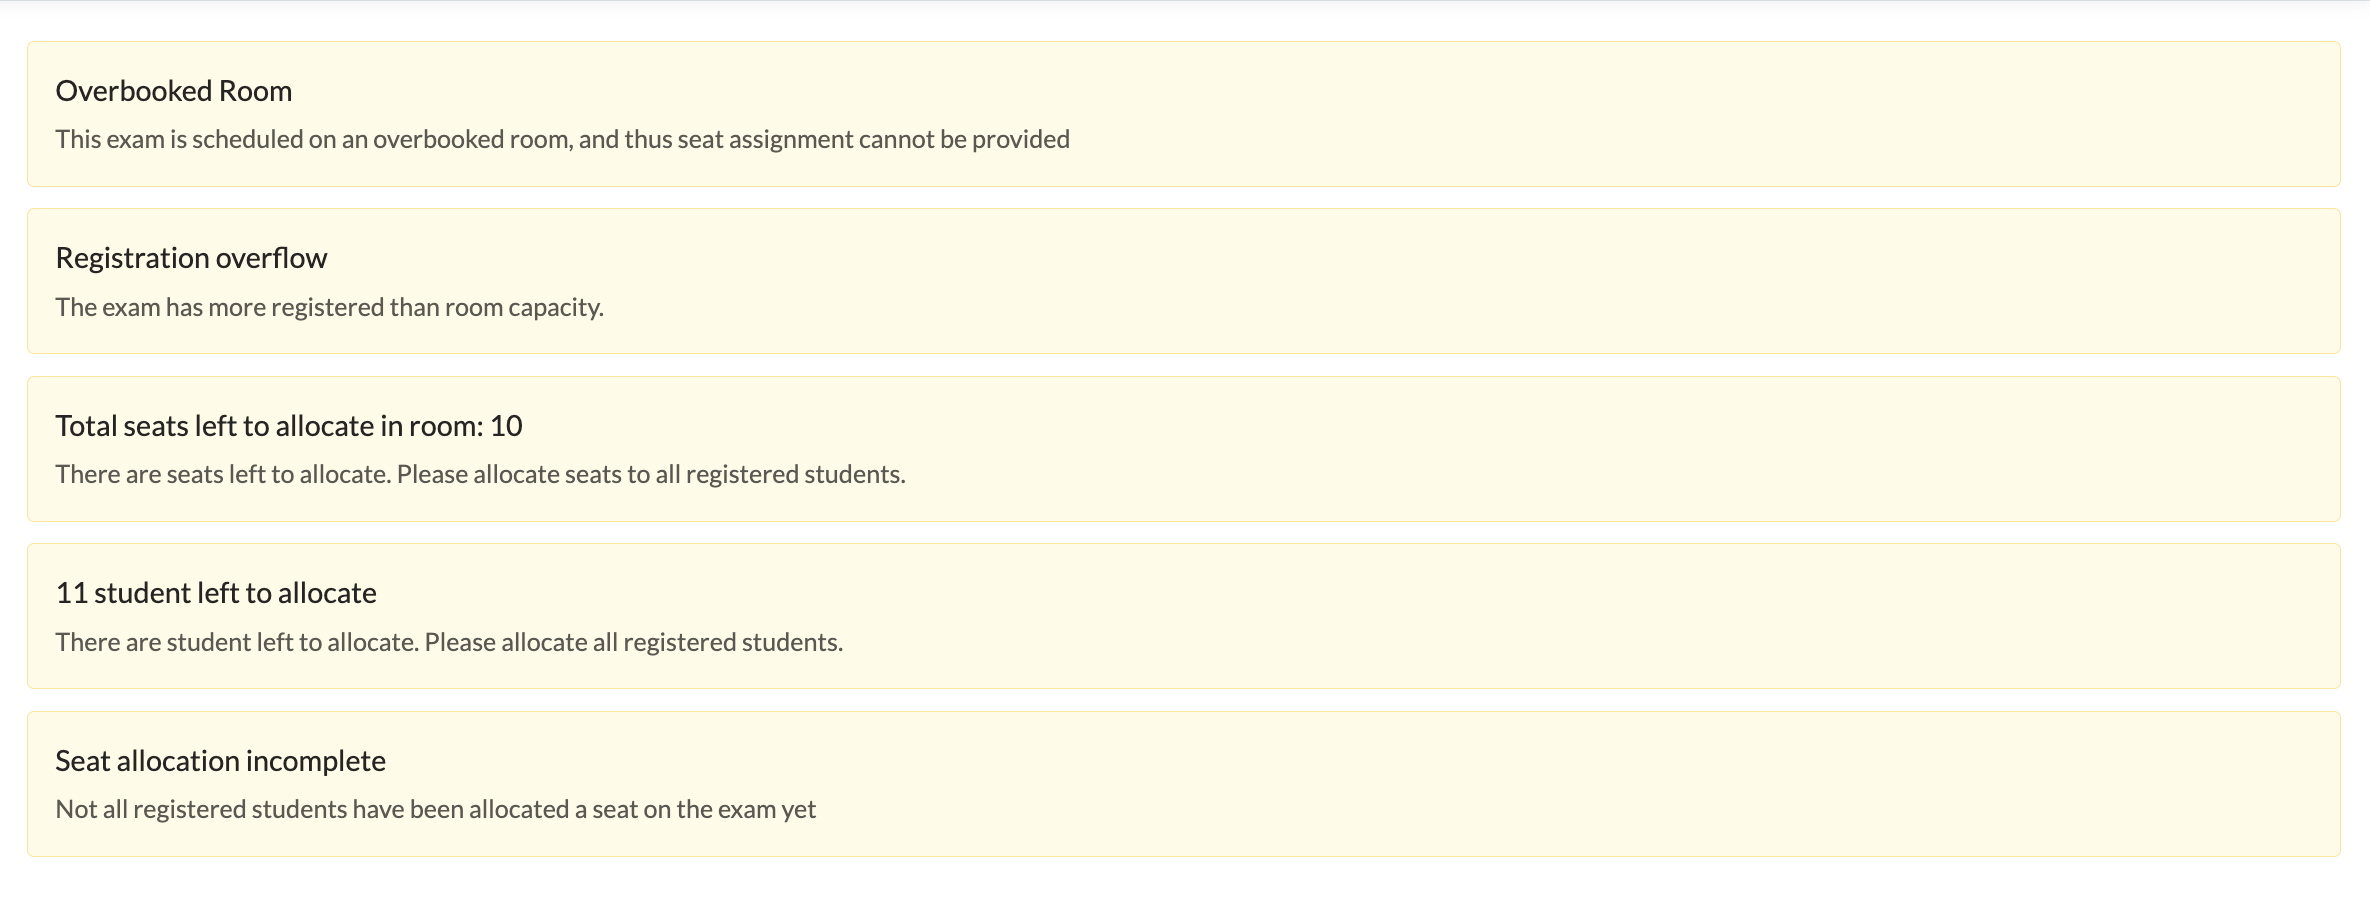
Initially, users receive guiding messages providing information about the status of registered students. The statuses include:
- Room Capacity Status: Messages alert about room overbooking if more students are planned for a room than its capacity, indicating that not all students will be accommodated during allocation.
- Registered Students Status: If the number of registered students is less than the planned number for the exam, a message indicates "Registration is incomplete." If there are more registered students than planned, a message indicates "Registration Overflow."
- Total Seats Available for Allocation in the Room: Displays the number of available seats for allocation in the room (shown for a single exam).
- Students Left to Allocate: Shows the number of registered students remaining to be allocated.
- Seat Allocation Incomplete: An overarching message indicating whether there are still registered students left to be allocated.
However, none of these messages prevent allocation.
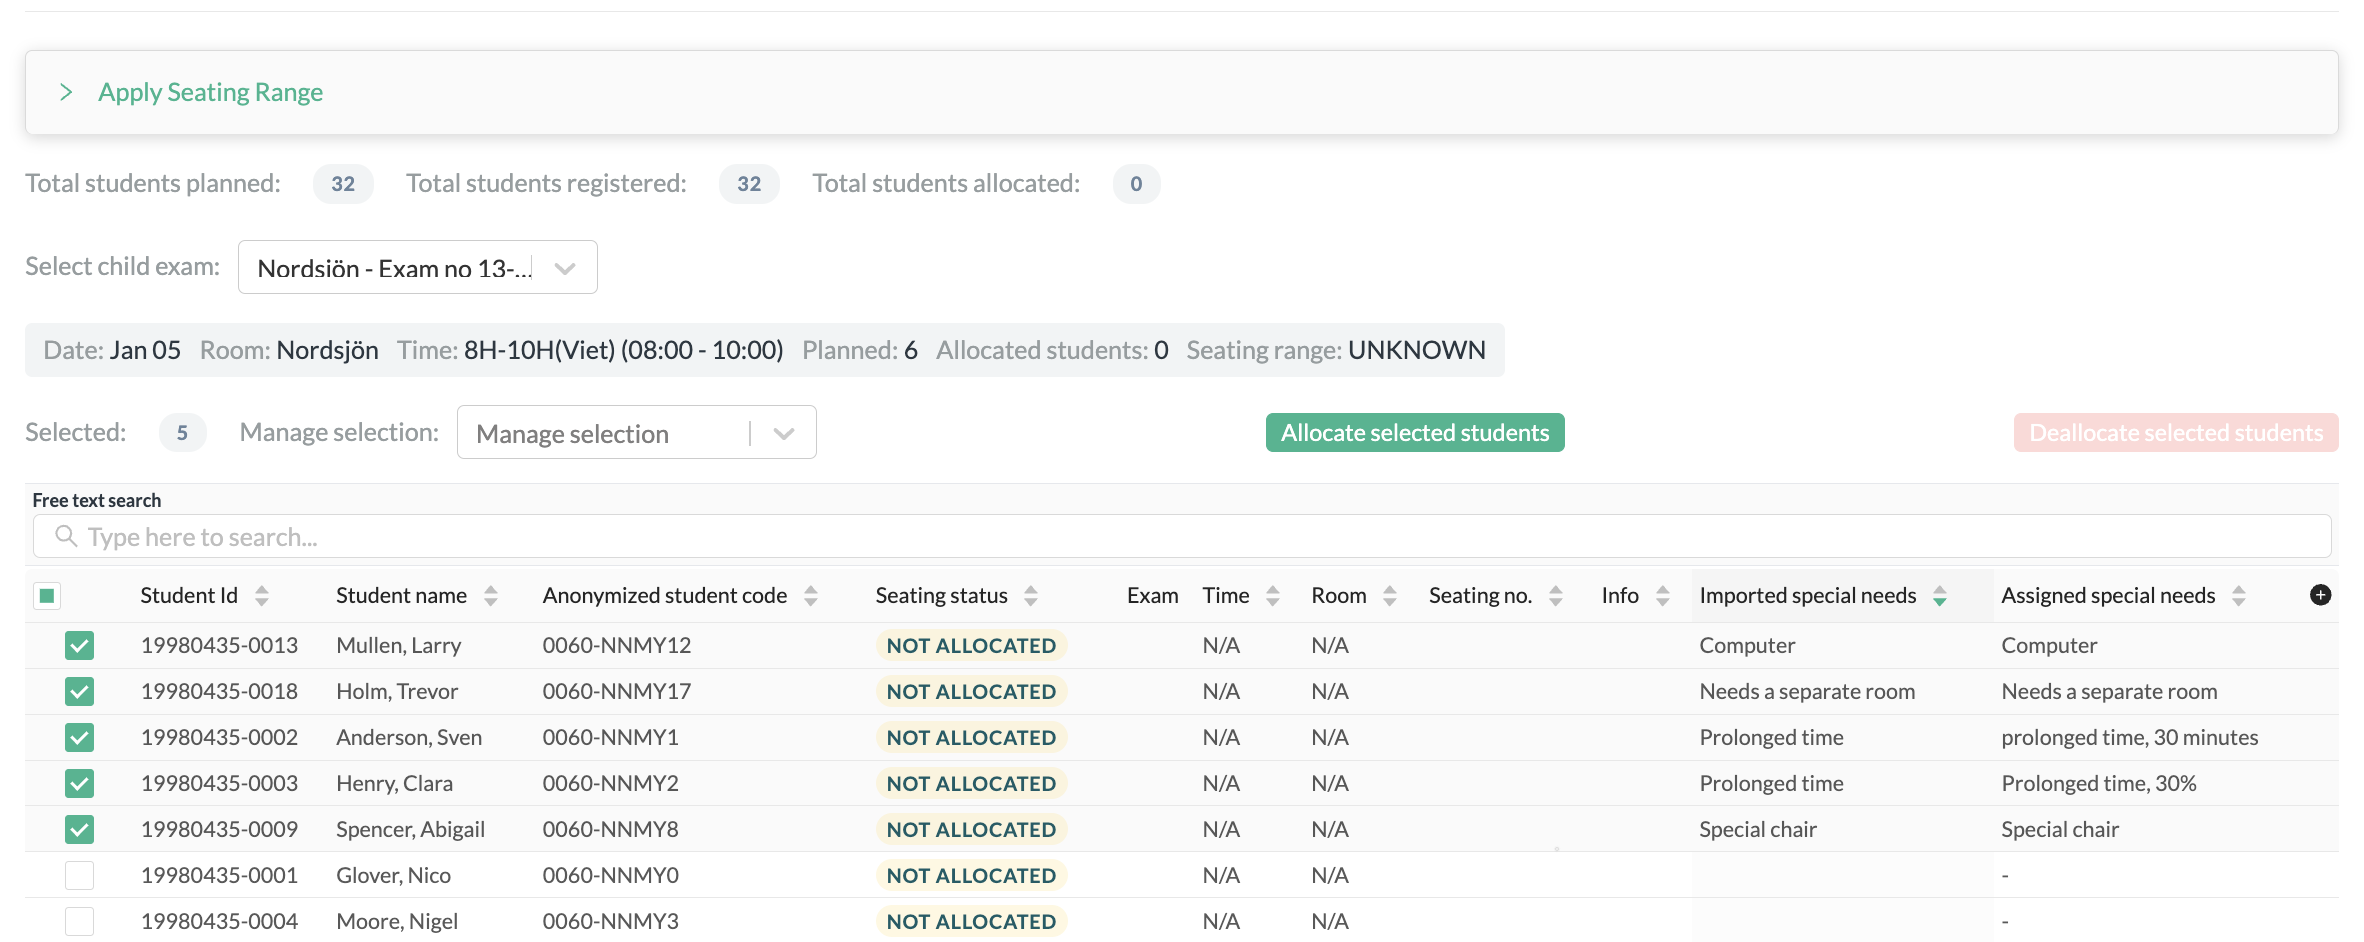
Information for room allocation displays the planned, registered, and allocated student counts. Before allocation begins, the seating range is unknown, and it is determined during the allocation process.
The following considerations apply to seat allocation:
- Seat Ranges: Initially displayed as "Seat Range: UNKNOWN," it is determined after students are assigned to the room based on their seating numbers in both continuous and non-continuous slots.
- Seat Left: Calculates remaining seats by subtracting the room's capacity from the number of students assigned to the exam, covering all cases, whether students have assigned seating numbers or not.
- Seating Number: Remains constant until a student is removed, doesn't consider slots reserved by the seat range when assigning students, and supports both continuous and non-continuous slots. It tries to find the best continuous slots first, then assigns students to available empty slots.
- Special Cases: Even with insufficient room, users can assign students with a warning about slot shortage. If there's no room left due to capacity constraints, the student will be assigned without a seating number, indicated as N/A.
Example Scenarios:
- Allocating Students to Continuous Slots: If there are empty continuous slots, students will be assigned there.
- Allocating Students when Continuous Slots are Unavailable: If no continuous slots are available, students will be assigned to empty slots in the room.
- Allocating Students with Insufficient Room Capacity: Users can still assign students even with insufficient room, but those students won't receive seating numbers if the room is at capacity.
Allocation for single exam
When allocating for a single exam in a room, simply choose the type of allocation and proceed to allocate the students. You will receive updates based on one of the messages mentioned earlier if the allocation aligns with the registered students. If there are any discrepancies, the system will provide relevant notifications to ensure accurate allocation.


Allocation in different rooms
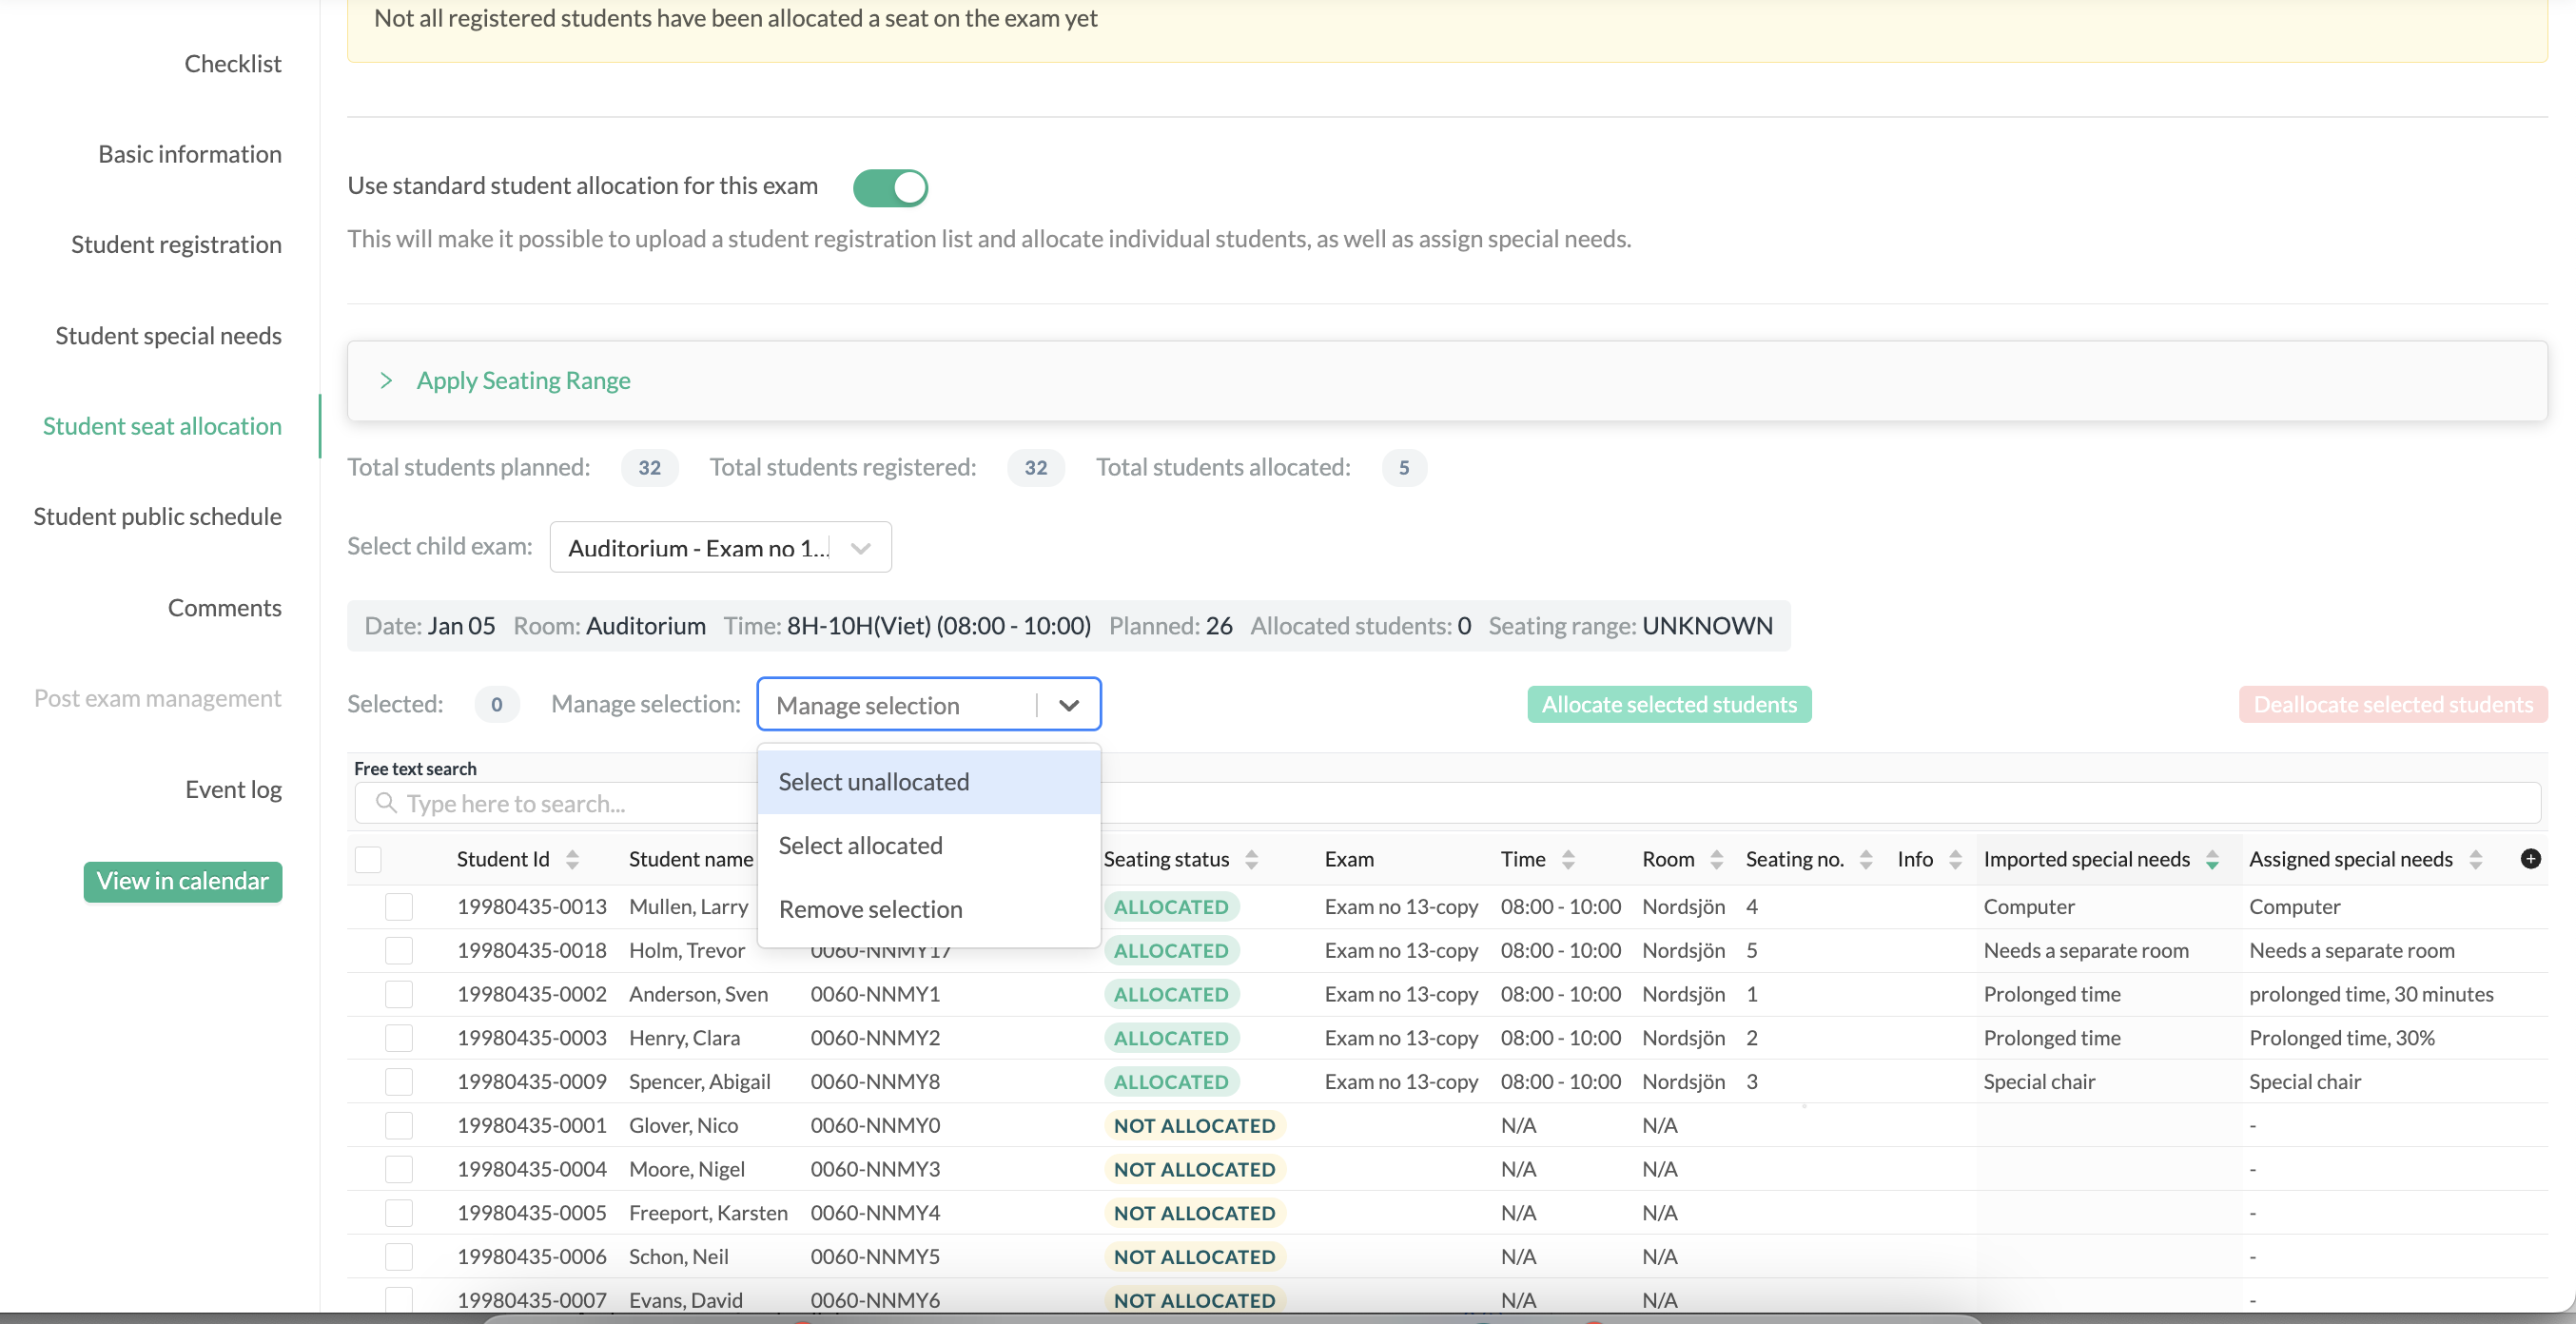
When performing allocation for exams scheduled in different rooms, the initial step involves selecting the room to allocate students to. In the example below, we have chosen to allocate students with special needs to a separate room.

Once the room is selected, simply press the allocate button to assign students to that specific room.
For the remaining students, we have opted to select all unallocated students and allocate them to the chosen room.
It is important to note that in allocations where exams are divided across rooms, the room's capacity still determines whether students can be accommodated. This means it is possible to allocate more students to a room than originally planned for the exam, as long as there is available capacity for the room.

Additionally, when allocating at different times for the same exam and if there are other exams scheduled in the same room, the rules for continuous and non-continuous seating, as described above, apply. This may result in students having scattered seating within the room.
Allocation with applied seating range
If you wish to avoid scattered seating for students or prefer to organize them differently, the system offers the option to set a fixed seating range. This feature empowers you to control the seating arrangement based on your preferences.
The fixed seating range allows you to establish a series of seats if you want to allocate a few registered students at the time during several occasions or ensure that students have a continuous range in a room. To use this feature, specify the number of seats you want to secure in a room by entering this value in the applied seating range field.

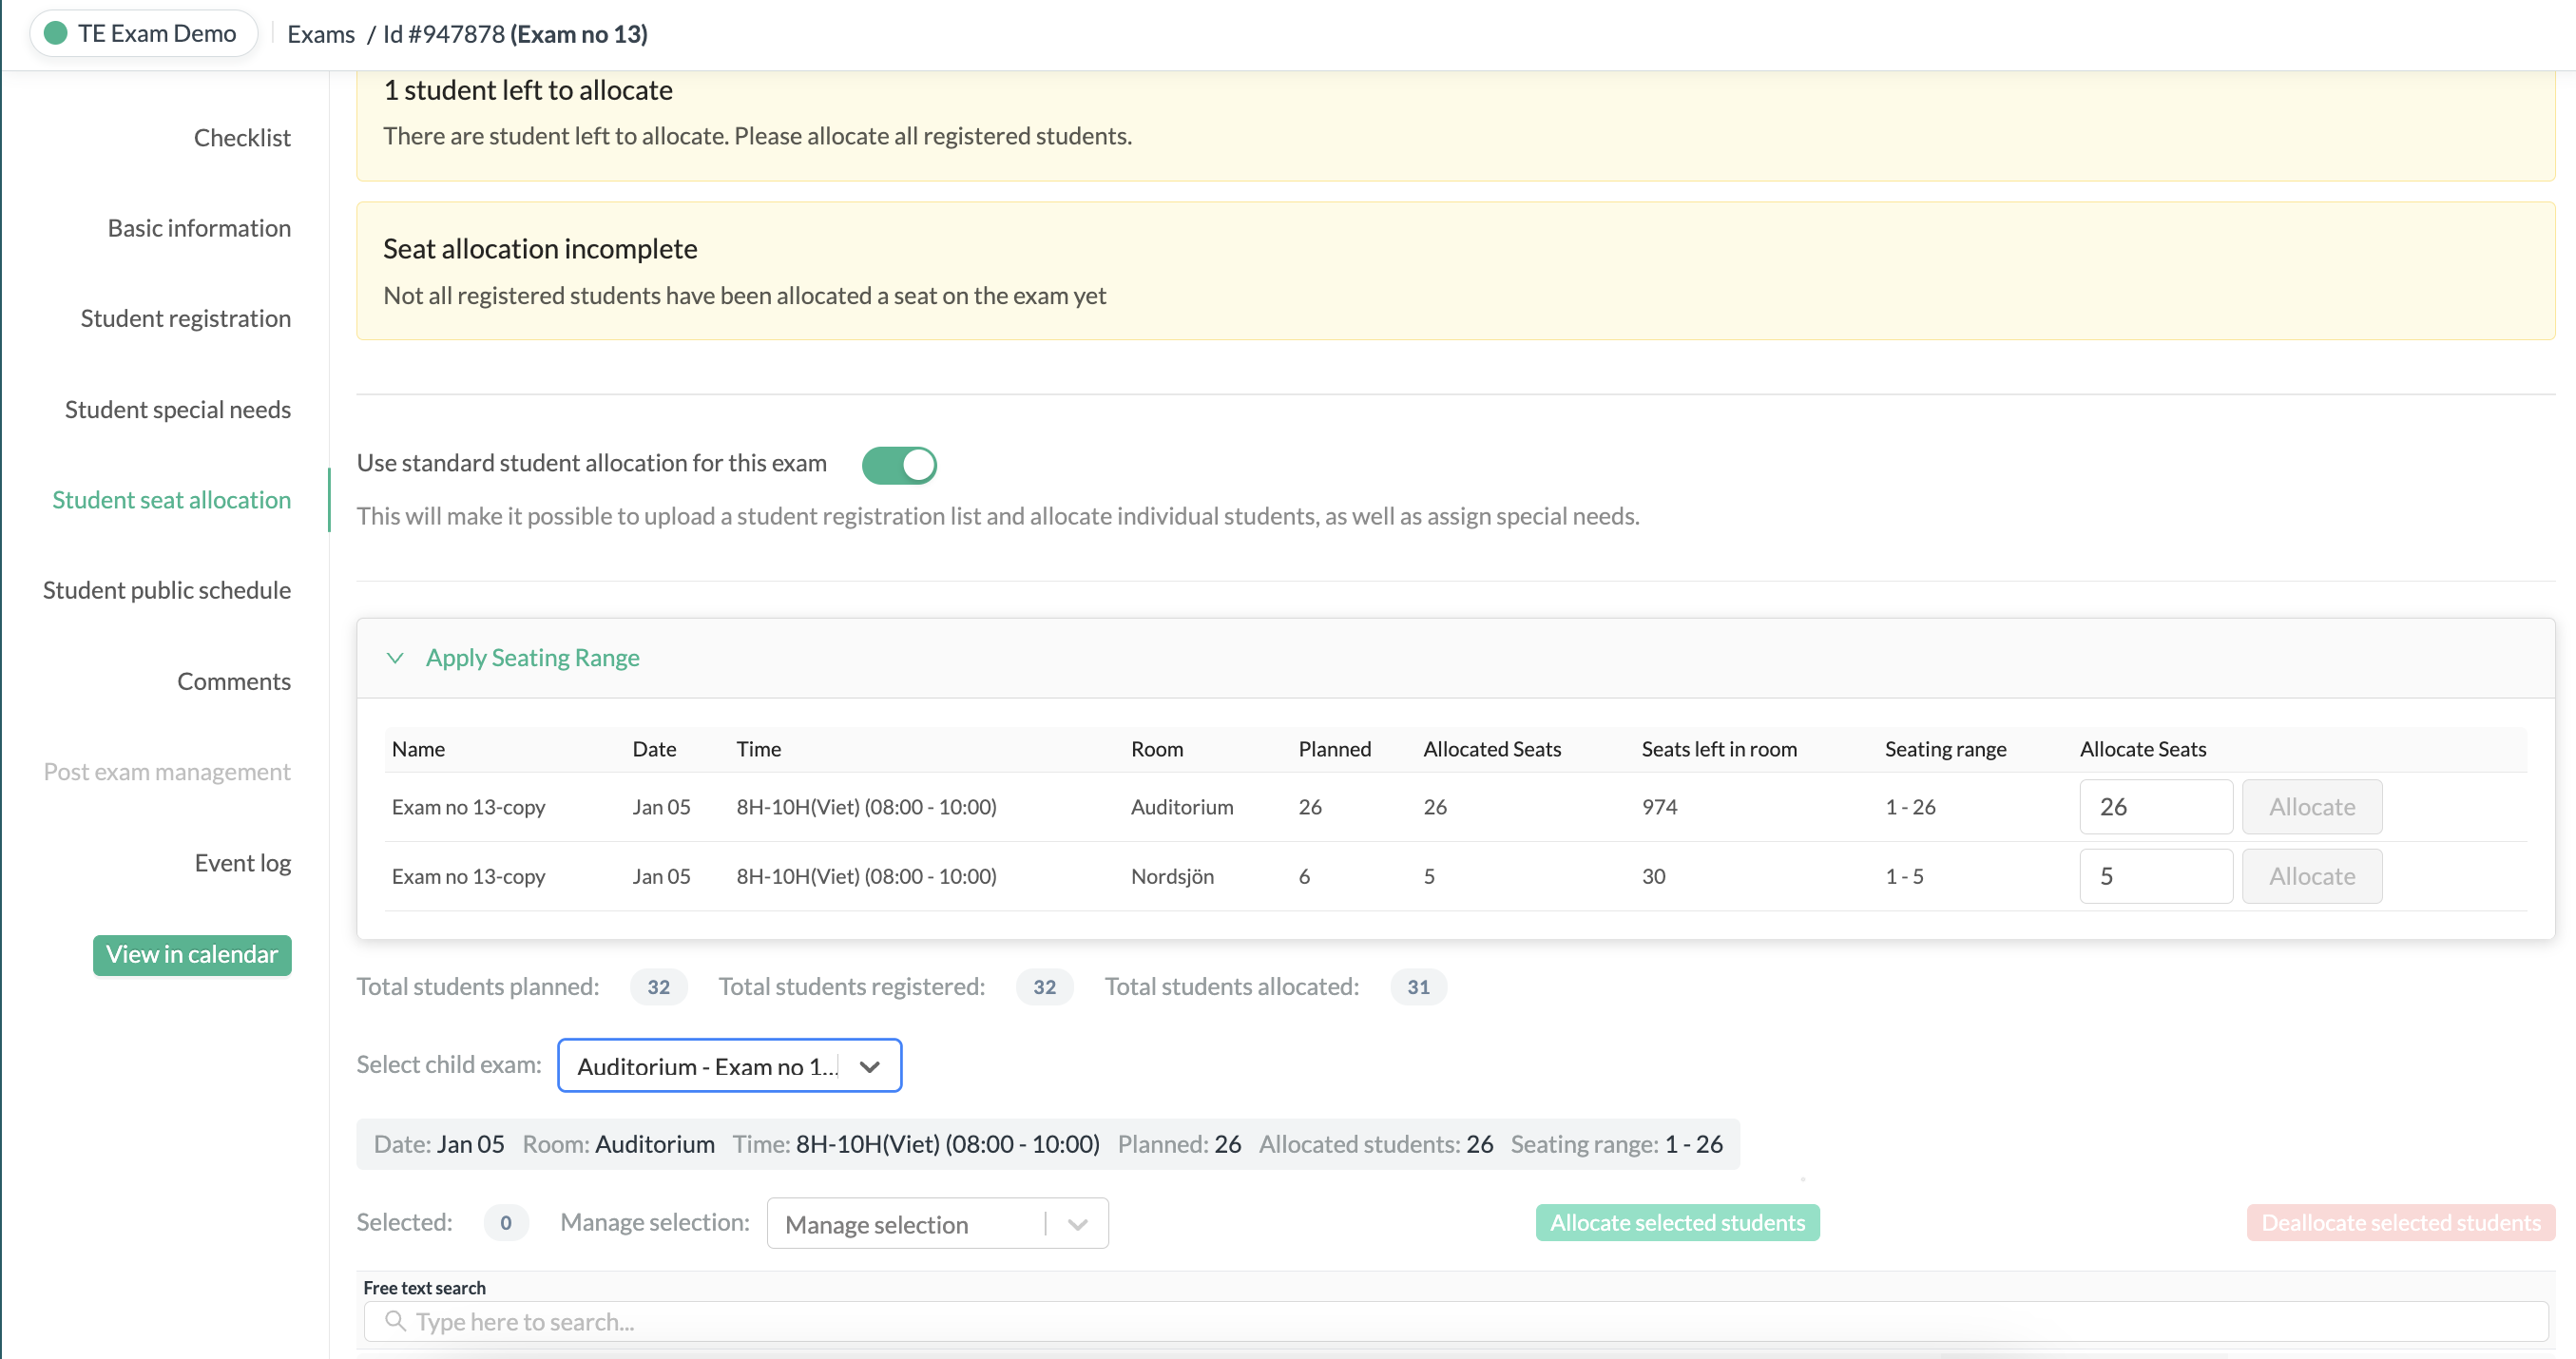
For example, if you have an exam planned for 50 students distributed across two rooms with 30 students in one and 20 students in the other, you can indicate that you want to fixate 20 seats for, let's say, room number 2, which has a capacity for 35. This way, you secure the seats in a series during allocation, restricting allocations to only those specified seats.
However, keep in mind that room capacity is rule number one, so you can still allocate more students to a room than initially planned if the room has the capacity for it.
Once you've entered a number in the field and clicked allocate, you will now have a designated fixed seating series during allocation.