How to work with Reservation Groups

- In this lesson:
- 1How to create a Reservation group
- 2Change reservation time or duration
- 3Edit reservation fields
- 4Adjust all reservations
- 5Remove a Reservation group
- 6Cancel all reservations
- 7Find reservations in a Reservation Group
- 8Changing objects on reservations in a Reservation Group
- 9Working with Reservation Groups using Activity Manager
- 10Copy Reservation Groups
- 11
How to create a Reservation group
There are several ways of creating a reservation group.
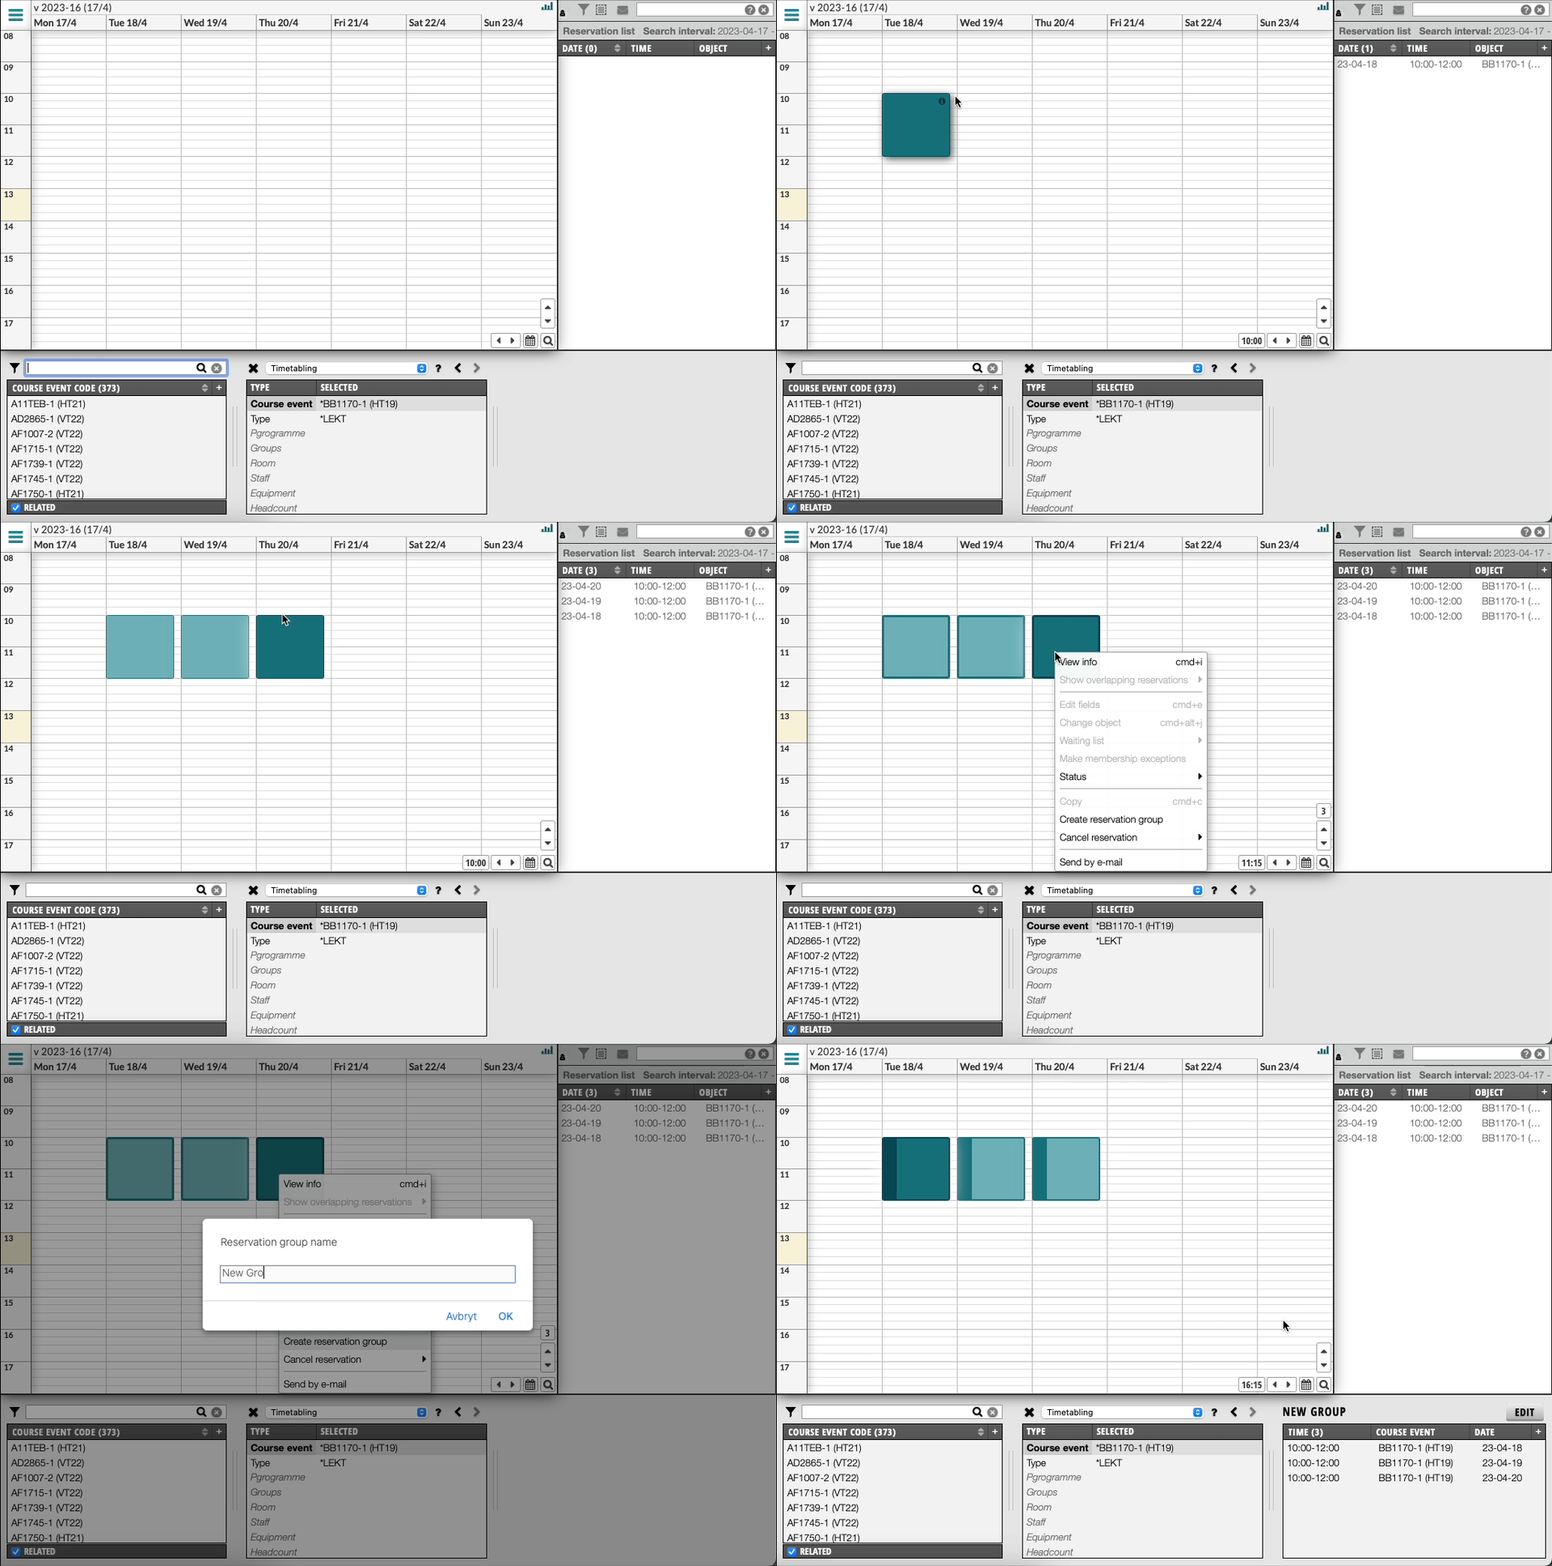
Reservations first
- Complete all reservations that should be included in the group
- Select all reservations in the calendar using ctrl/cmd click
(Alternatively, select reservations in the Reservation List) - Right click one of the reservations and select ”Create reservation group”
- Give the Reservation Group a name. The name can later be used to search for the group.
Group first / Add to group
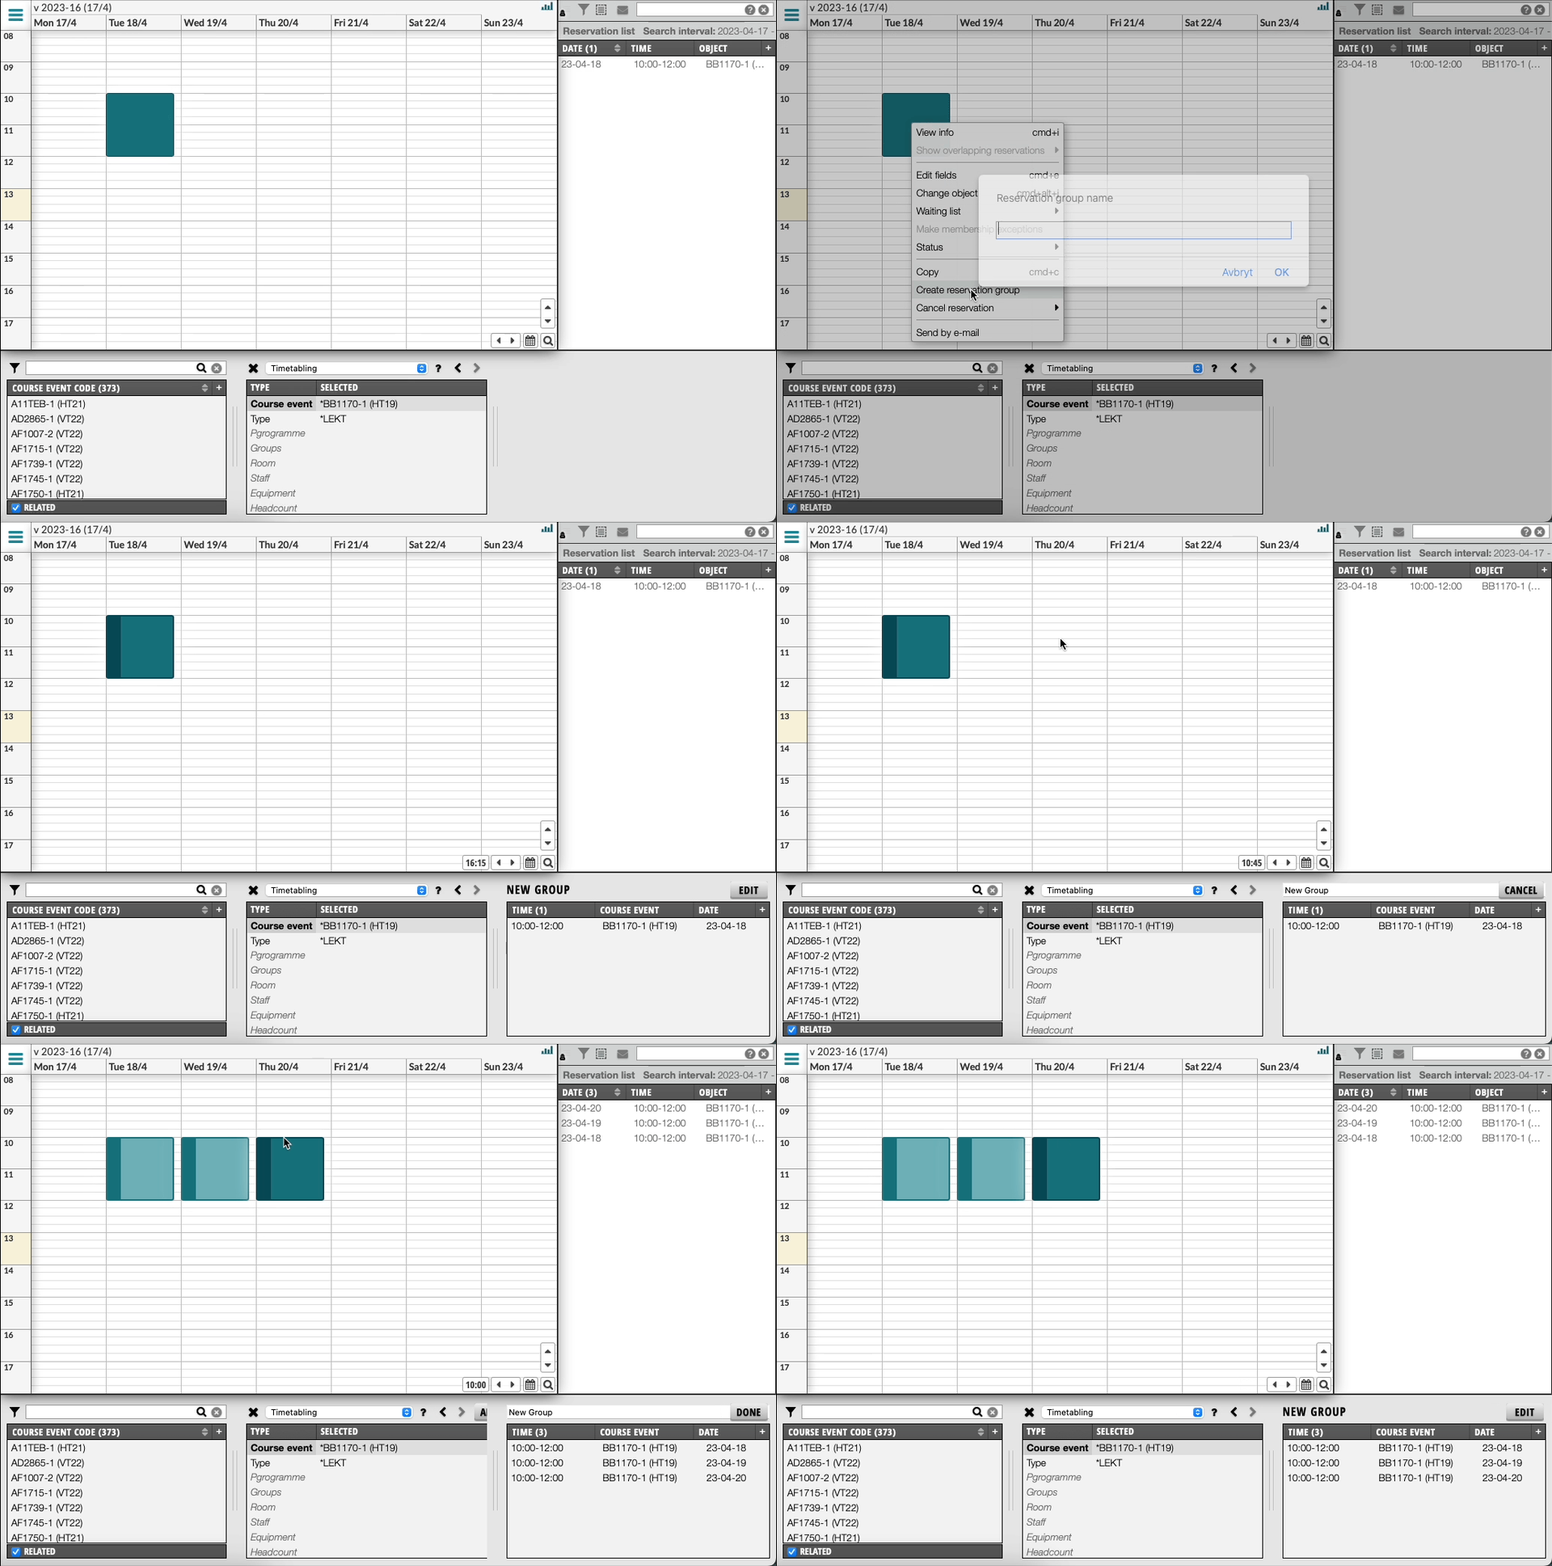
- Right click a reservation that should be included in the Reservation group and select ”Create reservation group”
- Give the Reservation Group a name. The name can later be used to search for the group.
- In the Reservation group panel to the right of the Selection list, click Edit
- Now you can schedule reservations as normal, but each new reservation will be added to the group
- When you have created the reservations, click Done
You can follow steps 4-5 any time to add reservations to a group
Add existing reservation to group
- Right click a reservation that is part of the group and select Edit reservation group
- Right click another reservation that should be added to the group and select Add to reservation group
Repeat step 2 for all reservations that should be added to the Reservation Group
Using Cluster View
- When in Cluster View, locate the Reservation Cluster you want to create a group for.
- Right click the Reservation Cluster and select "Create reservation group"
- Give the group a name
Note: It is possible to turn off the Name-prompt in the Account Setting, if you do not have a need for it. When doing this, the group will still get an ID on the form: "_TE_12345".
Change reservation time or duration
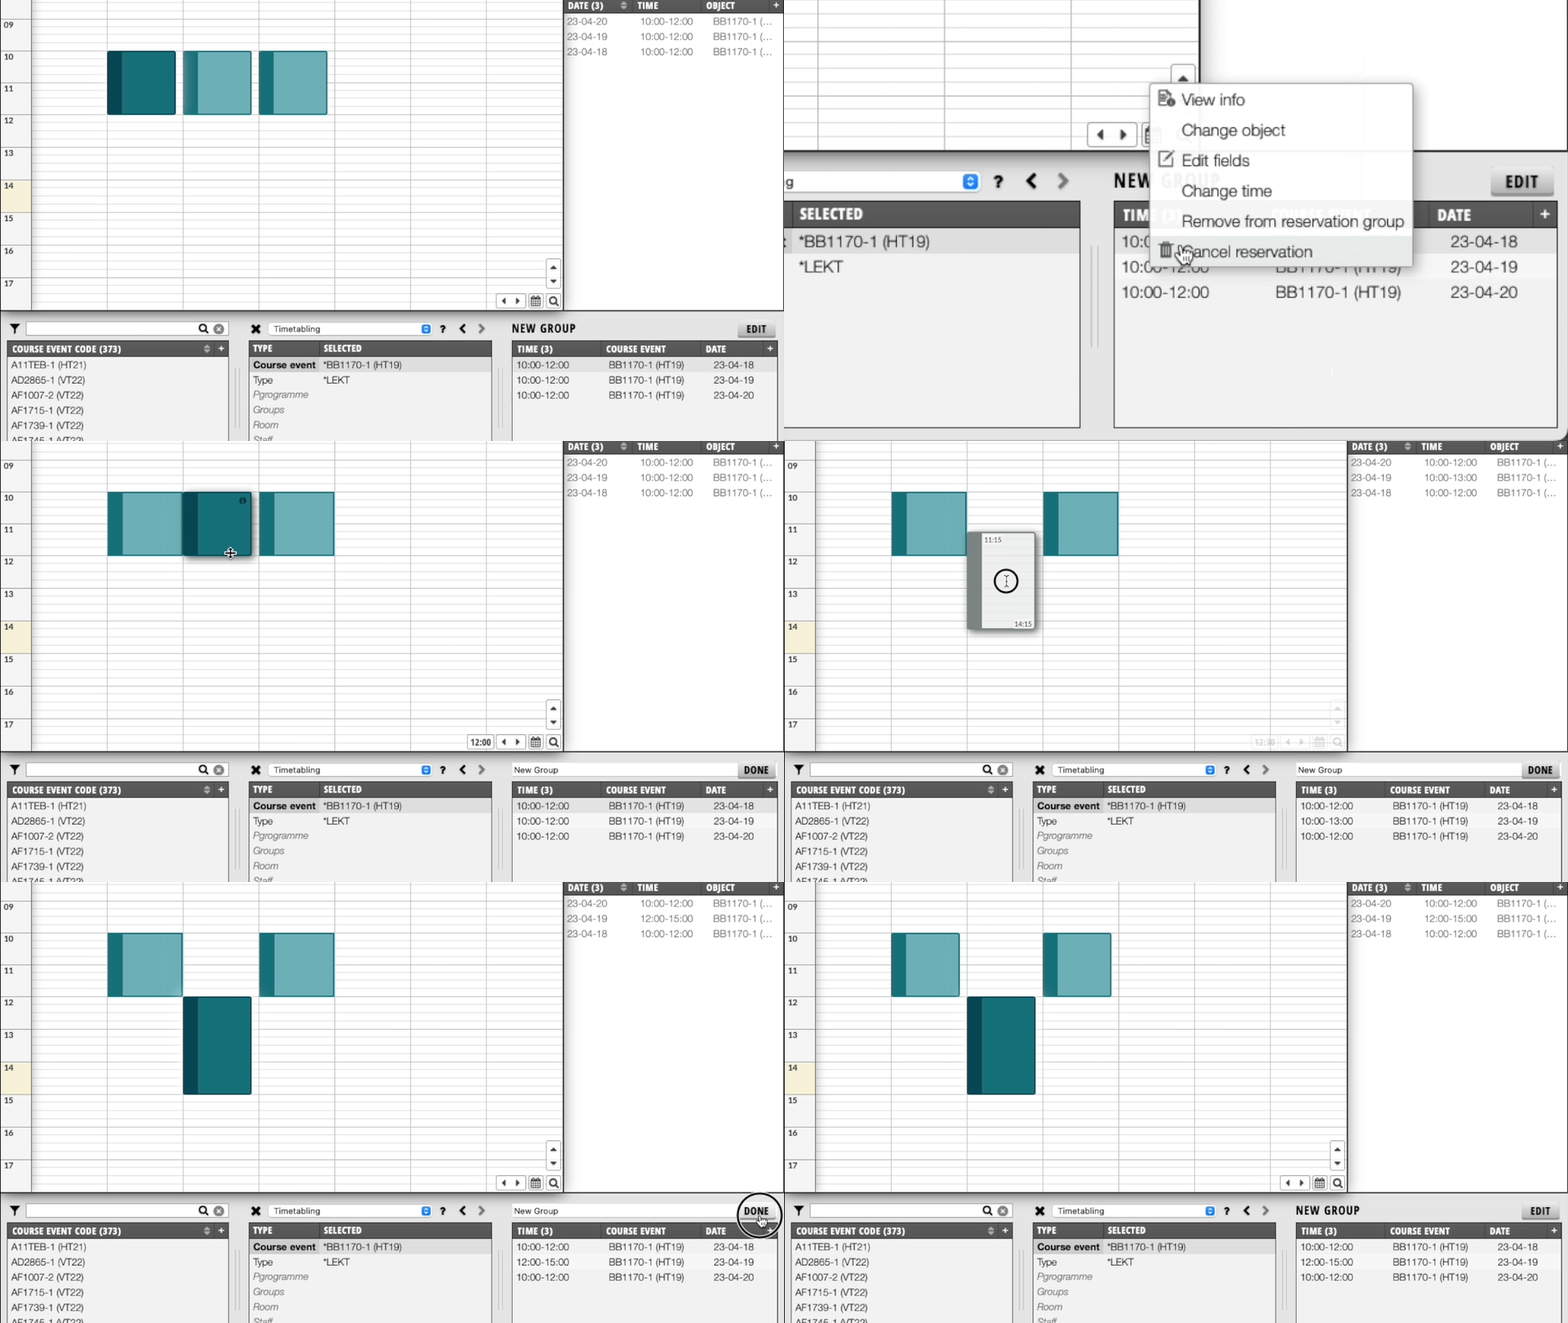
Normally, you can select a reservation in the calendar and drag the beginning or end of the reservation to change its duration. This is not possible for reservations in a Reservation group. Instead, follow theses steps:
- Select a reservation in the Reservation group.
- In the Reservation group panel to the right of the Selection list, right click the reservation you would like to change and select ”Change time”
- Now you can move the reservation independently of other reservations in the group and change its duration by dragging its start or end
- When you are satisfied with the new time and duration of the reservation, click Done
Edit reservation fields
Fields on a reservation in a Reservation group can be changed either individually for a single reservation or simultaneously for all reservations in the group.
To change all reservations simultaneously
- Click the ”i” icon in any reservation in the Reservation group or right click one of the reservations and select ”View info”
- In the Side panel, click ”Edit all”
- Any changes you make here will be applied to all reservations in the Reservation group
- If some reservations have different values for a field, the text ”Multiple values” will be shown in gray and will only be changed if a new value is entered.
- When you have updated all the fields, click Save
To change the fields in one reservation only
- Right click the reservation you would like to update and select ”Edit fields”
- You can now change the fields of the reservation without affecting other reservations in the Reservation group
- When you have updated all the fields, click Save
Alternatively, you can select the reservation in the Reservation list and click Edit in the Reservation information panel, or right click the reservation and select ”Edit fields”
Adjust all reservations
If you want to move all the reservations in a Reservation group, you can easily do this in the Calendar by simply dragging the around. This will move all the reservations as a group, including reservations for different days.
Normal conflict control still applies, so you cannot move a group to a new time where one or more reservations are in conflict.
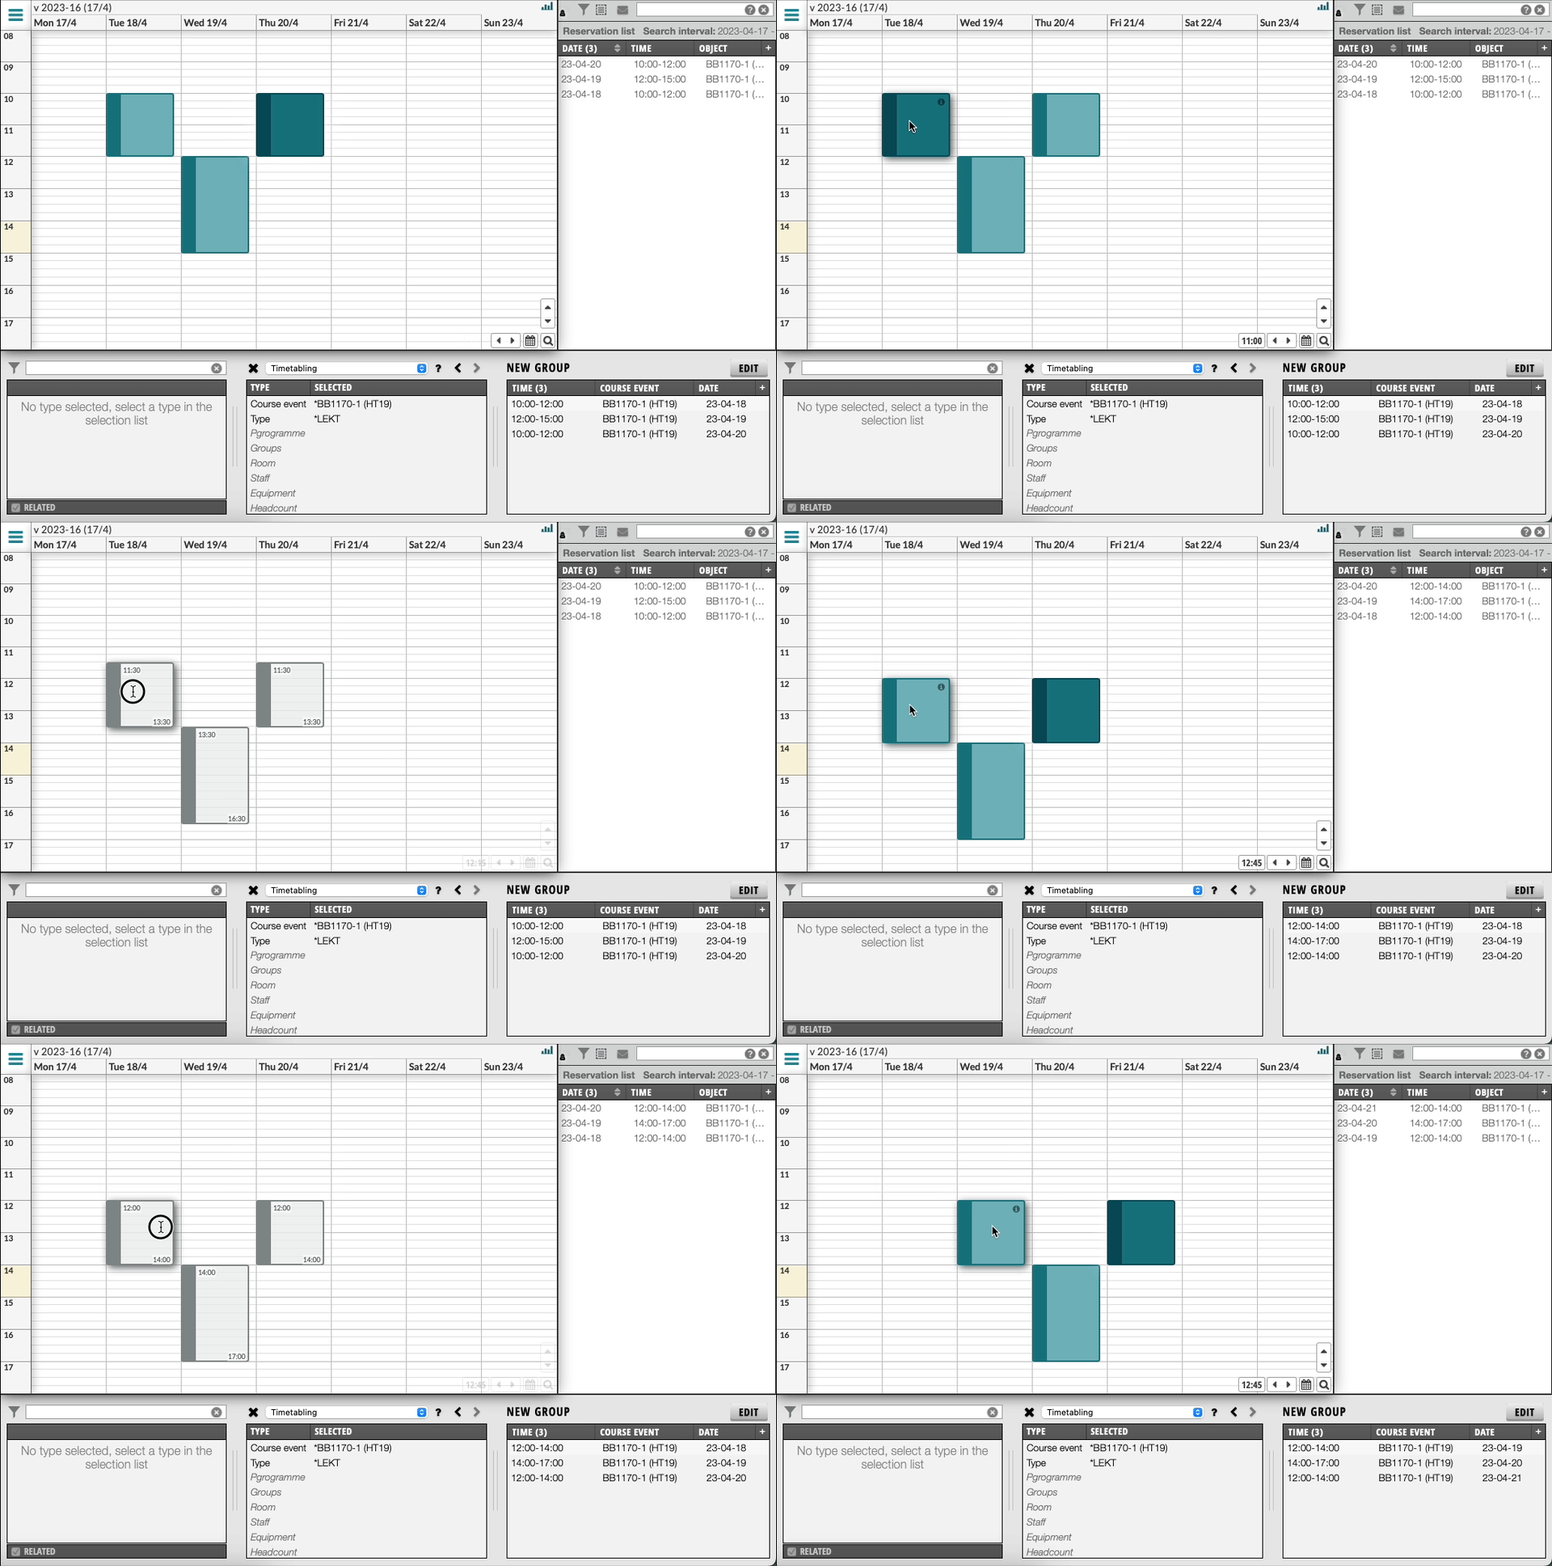
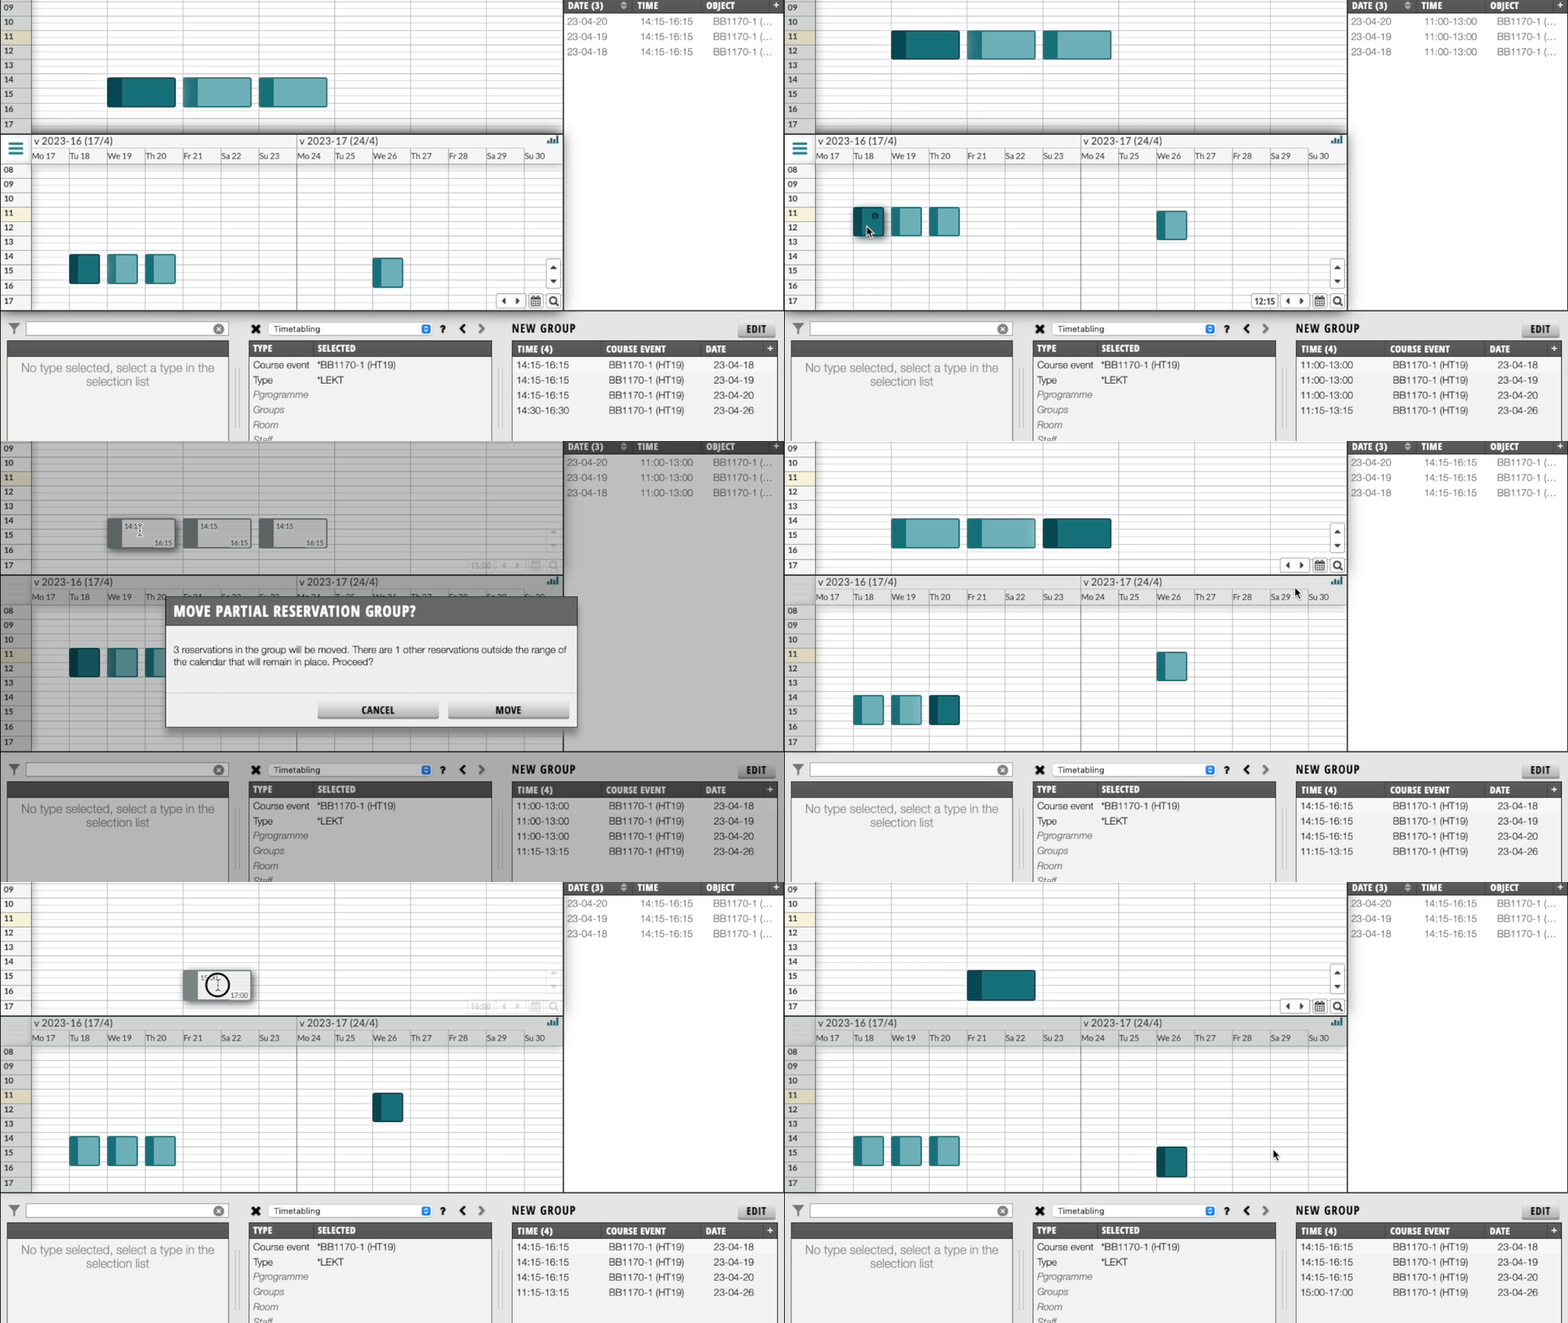
NOTE: When you move an entire Reservation group, only reservations that are visible in the current Calendar timespan will be moved. Reservations that you cannot see will not be affected.
If there are reservations outside the range of the calendar, you will receive a warning that you are moving only some of the reservations in the Reservation Group
Remove a Reservation group
If you no longer wish to keep the reservations connected in a Reservation Group, you can easily remove it, while keeping the reservations otherwise intact.
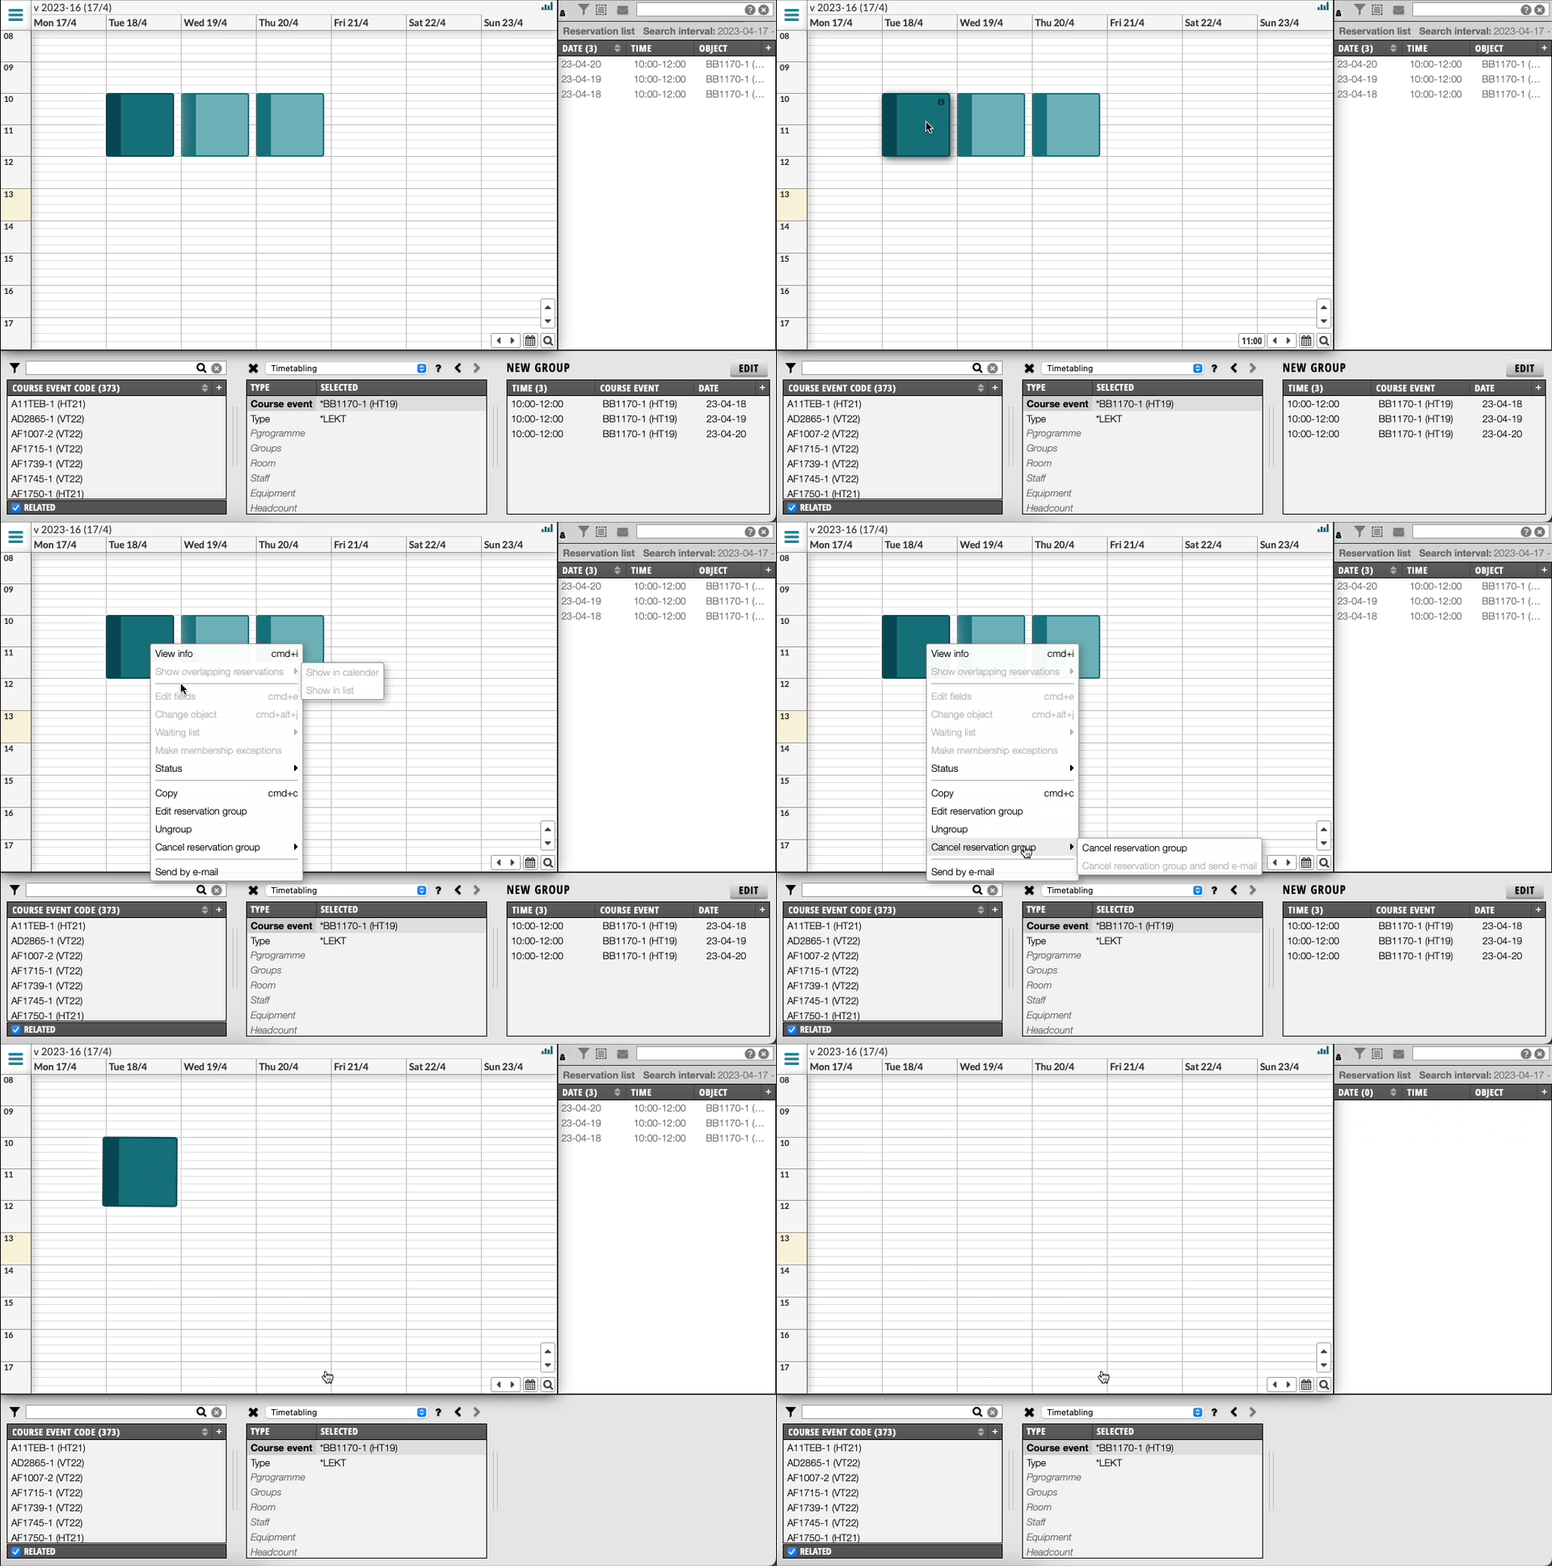
- Right click one of the reservations in the calendar and select ”Ungroup”
Cancel all reservations
If you want to cancel all reservations in a Reservation group, you can either select one of the reservations in the Calendar, right click it and select ”Cancel reservation group” or select one of the reservations and click the ”Delete all” button in the Reservation information panel
Find reservations in a Reservation Group
To easily find all reservations in a Reservation Group in the Reservation List, simply type: g:GroupName in the search bar.
If the name of the Reservation Group includes spaces, wrap the search string in double quotes, like so: g:"name of the group"
Changing objects on reservations in a Reservation Group
Change a single reservation
To change the objects of a single reservation, right click it in the Calendar and select Change Object. It is also possible to right click a reservation in the Reservation Group Panel and select Change Object (Note, this is not possible when a Cluster view is selected)
Change multiple reservations
If you want to change the objects on multiple reservations in a Reservation Group, there are a few ways to accomplish this.
Using Cluster view
When reservations in a Reservation Group have the same objects and are on the same day and time, a Cluster view can be used to change those reservations at the same time.
- When in Cluster View, right click the Reservation Cluster you want to edit and select "Edit reservation group" (Or select the Reservation Group and click Edit in the Reservation Group panel in the bottom right)
You are now in "Edit Reservation Mode". - Right click the Reservation Cluster you want to change objects for and select "Change object"
You are now in "Change Object Mode" - Change the objects as desired using the selection list and click Save
This will exit the "Change Object Mode" - Click Save in the Reservation Group panel in the bottom right to exit "Edit Reservation Mode".
Using the Reservation List
- Locate and select the reservations you want to change in the Reservation List
Note: You can find all reservations in a Reservation Group, by searching "g:<rservation-group-name>" - Right click the selected reservations and select "Add object", "Remove object" or "Replace object", to perform the desired changes
Working with Reservation Groups using Activity Manager
Using TE Autopilot
When scheduling activities using TE Autopilot, all reservations that are made using Deviation Constraints, will be placed in a Reservation Group. The Reservation Group will be given a unique name based on the Deviation Constraint.
After TE Autopilot has scheduled activities into Reservation Groups, they will work as any other Reservation Groups.
Scheduling Activities Manually
When scheduling repeating activities manually (read more here), Reservation Groups will be automatically created for each track you schedule.
The Reservation Group will be given a name based on the Primary Object and Track. This behavior can be switched off in the Account settings in TE Core.
Copy Reservation Groups
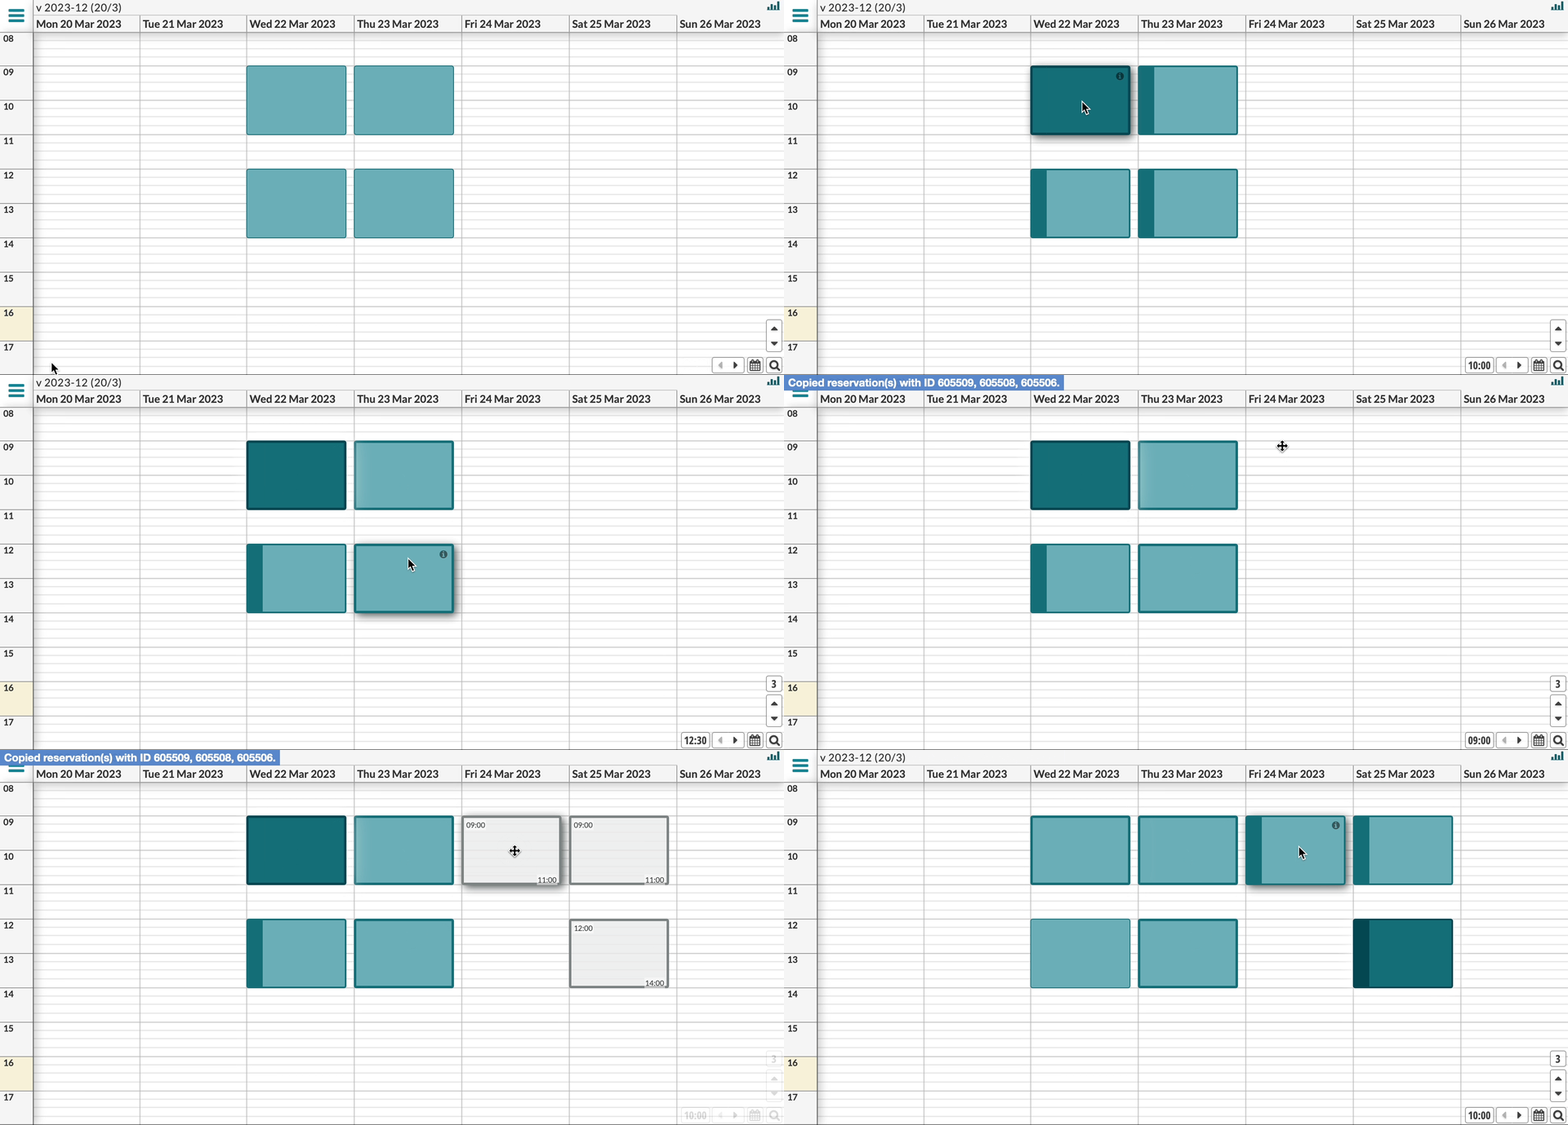
To copy a Reservation Group, follow these steps
- Select the Reservation Group by clicking on one of the reservations in the Calendar.
- Right-click the reservation and select Copy from the context menu, or simply press Ctrl-C (Cmd-c) to copy the Reservation Group.
- Press Ctrl-V (Cmd-V), or right click in the calendar and select Paste reservation, to load the copied reservation.
- Move the pasted reservation to the desired spot and click to schedule it.
The newly created reservations will be included in a new Reservation Group.
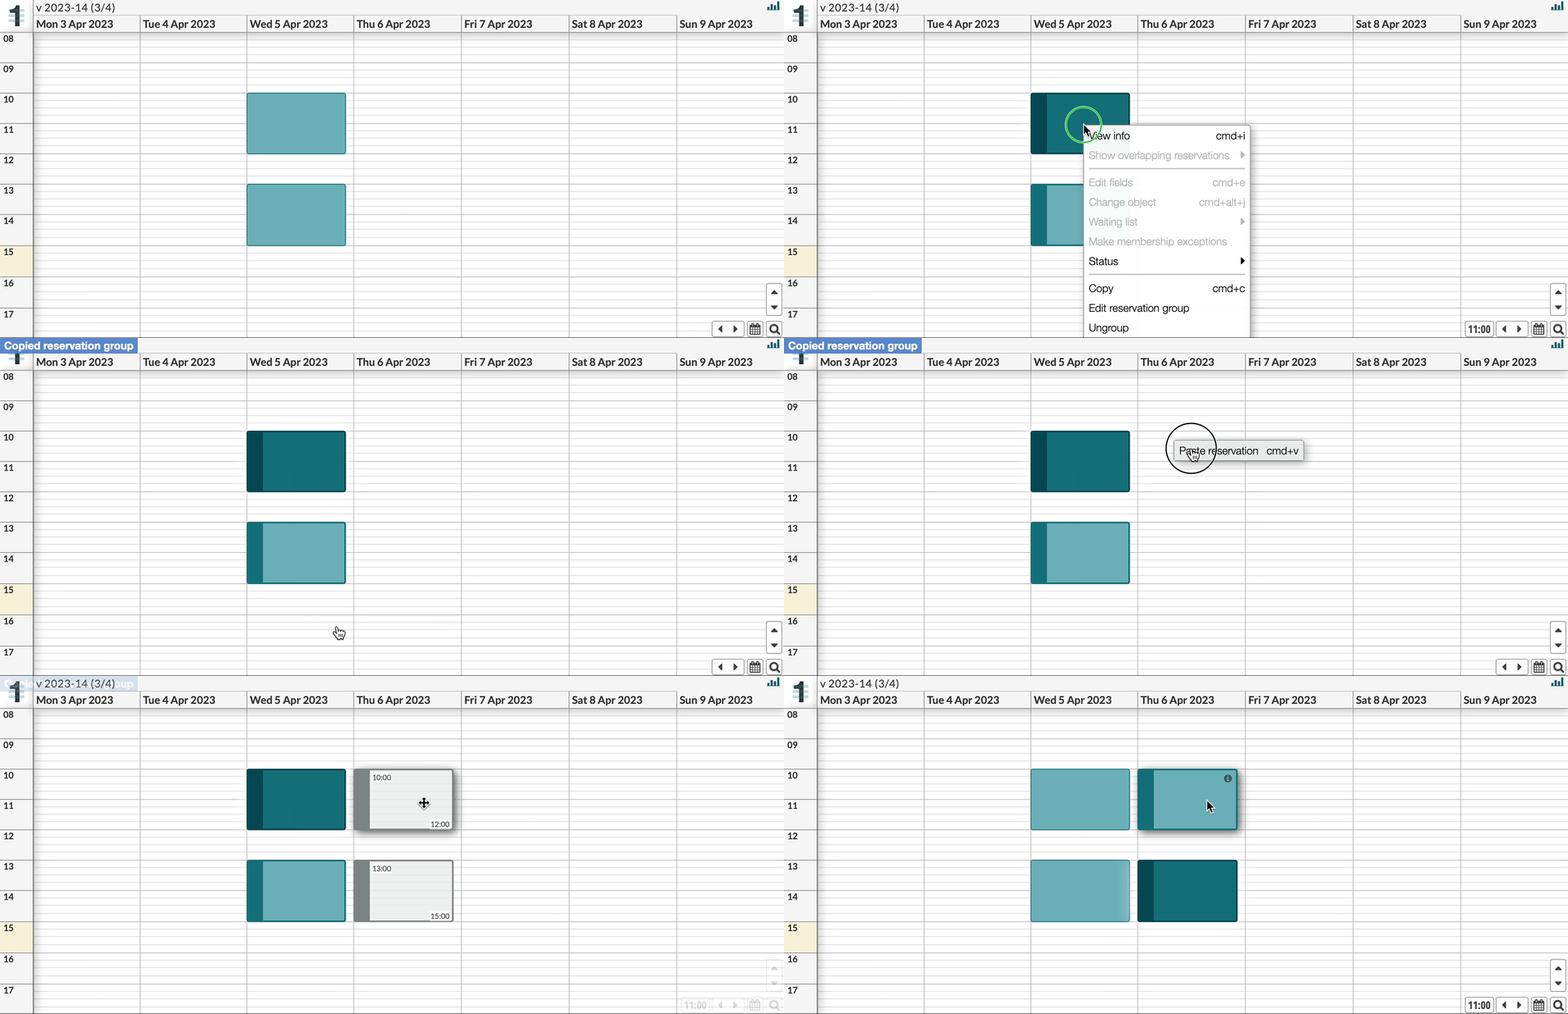
Note: Similarly to when moving a Reservation Group, only the visible reservations in the Group will be copied. So if there are reservations outside the range of the calendar, they will not be included in the copy
Copy parts of a group
To copy only some reservations in a Reservation Group, follow these steps
- Press and hold Ctrl (Cmd) while clicking the reservations in the group you want to copy.
- Right-click one of the reservations and select Copy from the context menu, or simply press Ctrl-C (Cmd-c) to copy the Reservation Group. (A bug is currently preventing the right-click option, so pressing Ctrl-C is the only option)
- Press Ctrl-V (Cmd-V), or right click in the calendar and select Paste reservation, to load the copied reservation.
- Move the pasted reservation to the desired spot and click to schedule it.
The newly created reservations will be included in a new Reservation Group. However, if reservations outside the group are included in the copy, no new Reservation Group will be created.
